
基于mmdetection3d框架完成nvx-net算法的训练和推理


.png)


文章目录
- 写在前面
- 1.安装cuda和cudnn
- 2.配置mmdetection3d环境
- 3.测试mmdetection3d中的多模态3D目标检测算法
- 4.下载kitti数据集
- 5.基于kitti数据集对多模态3D目标检测算法进行复现
- 6.基于kitti数据集训练结果进行推理
- 7.问题与思考
写在前面
参考链接:
MMdetection3d环境搭建
【MMDetection3D】MVXNet踩坑笔记
本篇算法复现主要基于以上两篇博客,mmdetection3d环境搭建主要基于第一篇博客,基于mmdetection3d的mvx-net模型训练和推理主要基于第2篇博客,因为mmdetection3d的版本也在不断的迭代,所以最新的命令和参考链接中有一些出入,在此进行记录和更新。
1.安装cuda和cudnn
电脑配置为3090 Ti, 目前安装了cuda11.6+cudnn8.4,理论上将更高版本的,但是第一次复现为了保证不出问题选择和参考博客中保持一致。
电脑配置信息:
+---------------------------------------------------------------------------------------+
| NVIDIA-SMI 535.171.04             Driver Version: 535.171.04   CUDA Version: 12.2     |
|-----------------------------------------+----------------------+----------------------+
| GPU  Name                 Persistence-M | Bus-Id        Disp.A | Volatile Uncorr. ECC |
| Fan  Temp   Perf          Pwr:Usage/Cap |         Memory-Usage | GPU-Util  Compute M. |
|                                         |                      |               MIG M. |
|=========================================+======================+======================|
|   0  NVIDIA GeForce RTX 3090 Ti     Off | 00000000:86:00.0 Off |                  Off |
|  0%   46C    P8              18W / 450W |     12MiB / 24564MiB |      0%      Default |
|                                         |                      |                  N/A |
+-----------------------------------------+----------------------+----------------------+

+---------------------------------------------------------------------------------------+
| Processes:                             |
|  GPU   GI   CI        PID   Type   Process name                            GPU Memory |
|        ID   ID              Usage      |
|=======================================================================================|
|    0   N/A  N/A      1510      G   /usr/lib/xorg/Xorg                            4MiB |
+---------------------------------------------------------------------------------------+
2.配置mmdetection3d环境
为了方便可视化直接在本地搭建算法环境,这里conda安装的最新版本的miniconda, 使用的清华镜像源下载安装。
# 创建虚拟环境
conda create -n mmdetection3d python=3.8
conda activate
# 安装pytorch,pytorch的安装命令直接在官网复制,根据自己电脑系统和硬件配置选一个自己喜欢的
# https://pytorch.org/get-started/previous-versions/
conda install pytorch==1.13.1 torchvision==0.14.1 torchaudio==0.13.1 pytorch-cuda=11.6 -c pytorch -c nvidia
# 安装mmcv:https://mmcv.readthedocs.io/en/latest/get_started/installation.html#install-mmcv
pip install mmcv==2.1.0 -f https://download.openmmlab.com/mmcv/dist/cu116/torch1.13/index.html
# 安装mmdetection,这里选择的最新版本
git clone https://github.com/open-mmlab/mmdetection.git
cd mmdetection
pip install -r requirements/build.txt
pip install -v -e .
# 编译mmdetection3d
git clone https://github.com/open-mmlab/mmdetection3d.git
cd mmdetection3d
# 最开始使用的python setup.py develop,但报错了,还是选择下面的命令进行安装,后面正常使用
pip install -v -e .
3.测试mmdetection3d中的多模态3D目标检测算法
这里使用的一帧kitti点云数据,使用pointpillars进行3D目标检测算法测试,权重文件需要自己下载:
下载链接
python demo/pcd_demo.py demo/data/kitti/000008.bin pointpillars_hv_secfpn_8xb6-160e_kitti-3d-car.py hv_pointpillars_secfpn_6x8_160e_kitti-3d-car_20220331_134606-d42d15ed.pth --show
4.下载kitti数据集
下载文件目录, 这里下载的只是几个txt目录,数据集还是需要自己提前下载好的
wget -c  https://raw.githubusercontent.com/traveller59/second.pytorch/master/second/data/ImageSets/test.txt --no-check-certificate --content-disposition -O ./data/kitti/ImageSets/test.txt
wget -c  https://raw.githubusercontent.com/traveller59/second.pytorch/master/second/data/ImageSets/train.txt --no-check-certificate --content-disposition -O ./data/kitti/ImageSets/train.txt
wget -c  https://raw.githubusercontent.com/traveller59/second.pytorch/master/second/data/ImageSets/val.txt --no-check-certificate --content-disposition -O ./data/kitti/ImageSets/val.txt
wget -c  https://raw.githubusercontent.com/traveller59/second.pytorch/master/second/data/ImageSets/trainval.txt --no-check-certificate --content-disposition -O ./data/kitti/ImageSets/trainval.txt
将下载后的数据集整理为以下目录结构:
mmdetection3d
├── mmdet3d
├── tools
├── configs
├── data
│   ├── kitti
│   │   ├── ImageSets
│   │   ├── testing
│   │   │   ├── calib
│   │   │   ├── image_2
│   │   │   ├── velodyne
│   │   ├── training
│   │   │   ├── calib
│   │   │   ├── image_2
│   │   │   ├── label_2
│   │   │   ├── velodyne
│   │   │   ├── planes (optional)
数据预处理,在命令行中可以修改对应的路径,同样的在进行训练时也需要进行相应的路径修改:
python tools/create_data.py kitti --root-path ./data/kitti --out-dir ./data/kitti --extra-tag kitti
数据预处理后会得到以下文件目录:
kitti
├── ImageSets
│   ├── test.txt
│   ├── train.txt
│   ├── trainval.txt
│   ├── val.txt
├── testing
│   ├── calib
│   ├── image_2
│   ├── velodyne
│   ├── velodyne_reduced
├── training
│   ├── calib
│   ├── image_2
│   ├── label_2
│   ├── velodyne
│   ├── velodyne_reduced
│   ├── planes (optional)
├── kitti_gt_database
│   ├── xxxxx.bin
├── kitti_infos_train.pkl
├── kitti_infos_val.pkl
├── kitti_dbinfos_train.pkl
├── kitti_infos_test.pkl
├── kitti_infos_trainval.pkl
5.基于kitti数据集对多模态3D目标检测算法进行复现
在数据集预处理之后开始训练,需要确认数据集路径是否正确:
data_root = '/home/tjsiasun/data/kitti/'
...
val_evaluator = dict(
    type='KittiMetric', ann_file='/home/tjsiasun/data/kitti/kitti_infos_val.pkl')
进行训练
训练前将学习率改一下,0.003->0.0001
# configs/_base_/schedules/cosine.py
lr = 0.0001
python tools/train.py configs/mvxnet/dv_mvx-fpn_second_secfpn_adamw_2x8_80e_kitti-3d-3class.py
查看损失函数曲线
python tools/analysis_tools/analyze_logs.py plot_curve work_dirs/mvxnet_fpn_dv_second_secfpn_8xb2-80e_kitti-3d-3class/20240419_112405/vis_data/20240419_112405.json --keys loss_cls loss_bbox --out losses.pdf
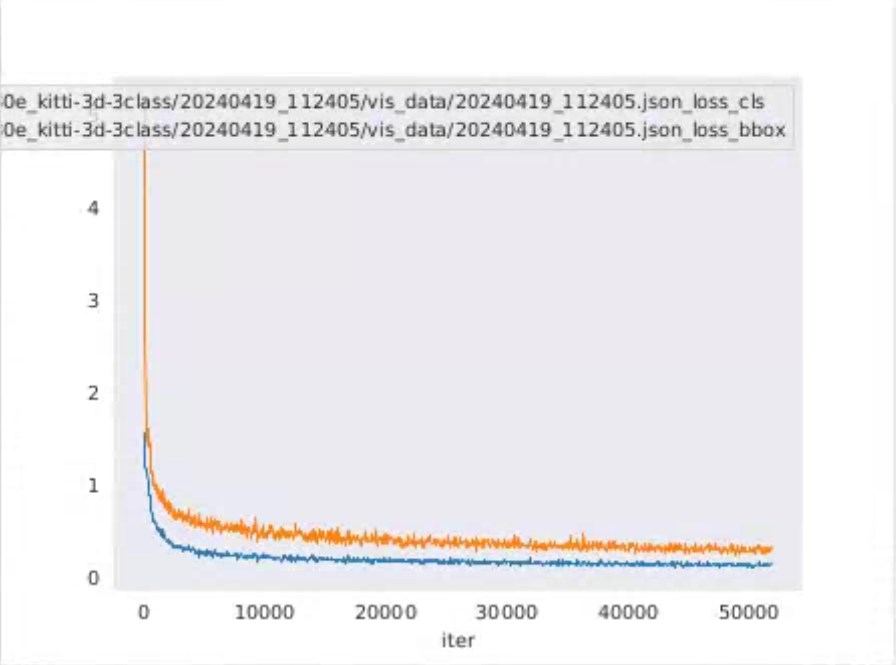
如果损失函数已经收敛,可以提前终止训练过程,注意到当算法训练KITTI数据集时,在迭代了20个epoch时loss曲线差不多就收敛了,所以在训练时可以适当缩小max_epoch的值。
# configs/_base_/schedules/cosine.py
    dict(type='LinearLR', start_factor=0.1, by_epoch=False, begin=0, end=1000),
    dict(
        type='CosineAnnealingLR',
        begin=0,
        T_max=40,
        end=40,
        by_epoch=True,
        eta_min=1e-5)
6.基于kitti数据集训练结果进行推理
当所有的epoch迭代结束后,会得到一个epoch_40.pth权重文件,一个last_checkpoint用于下次训练的预训练模型。
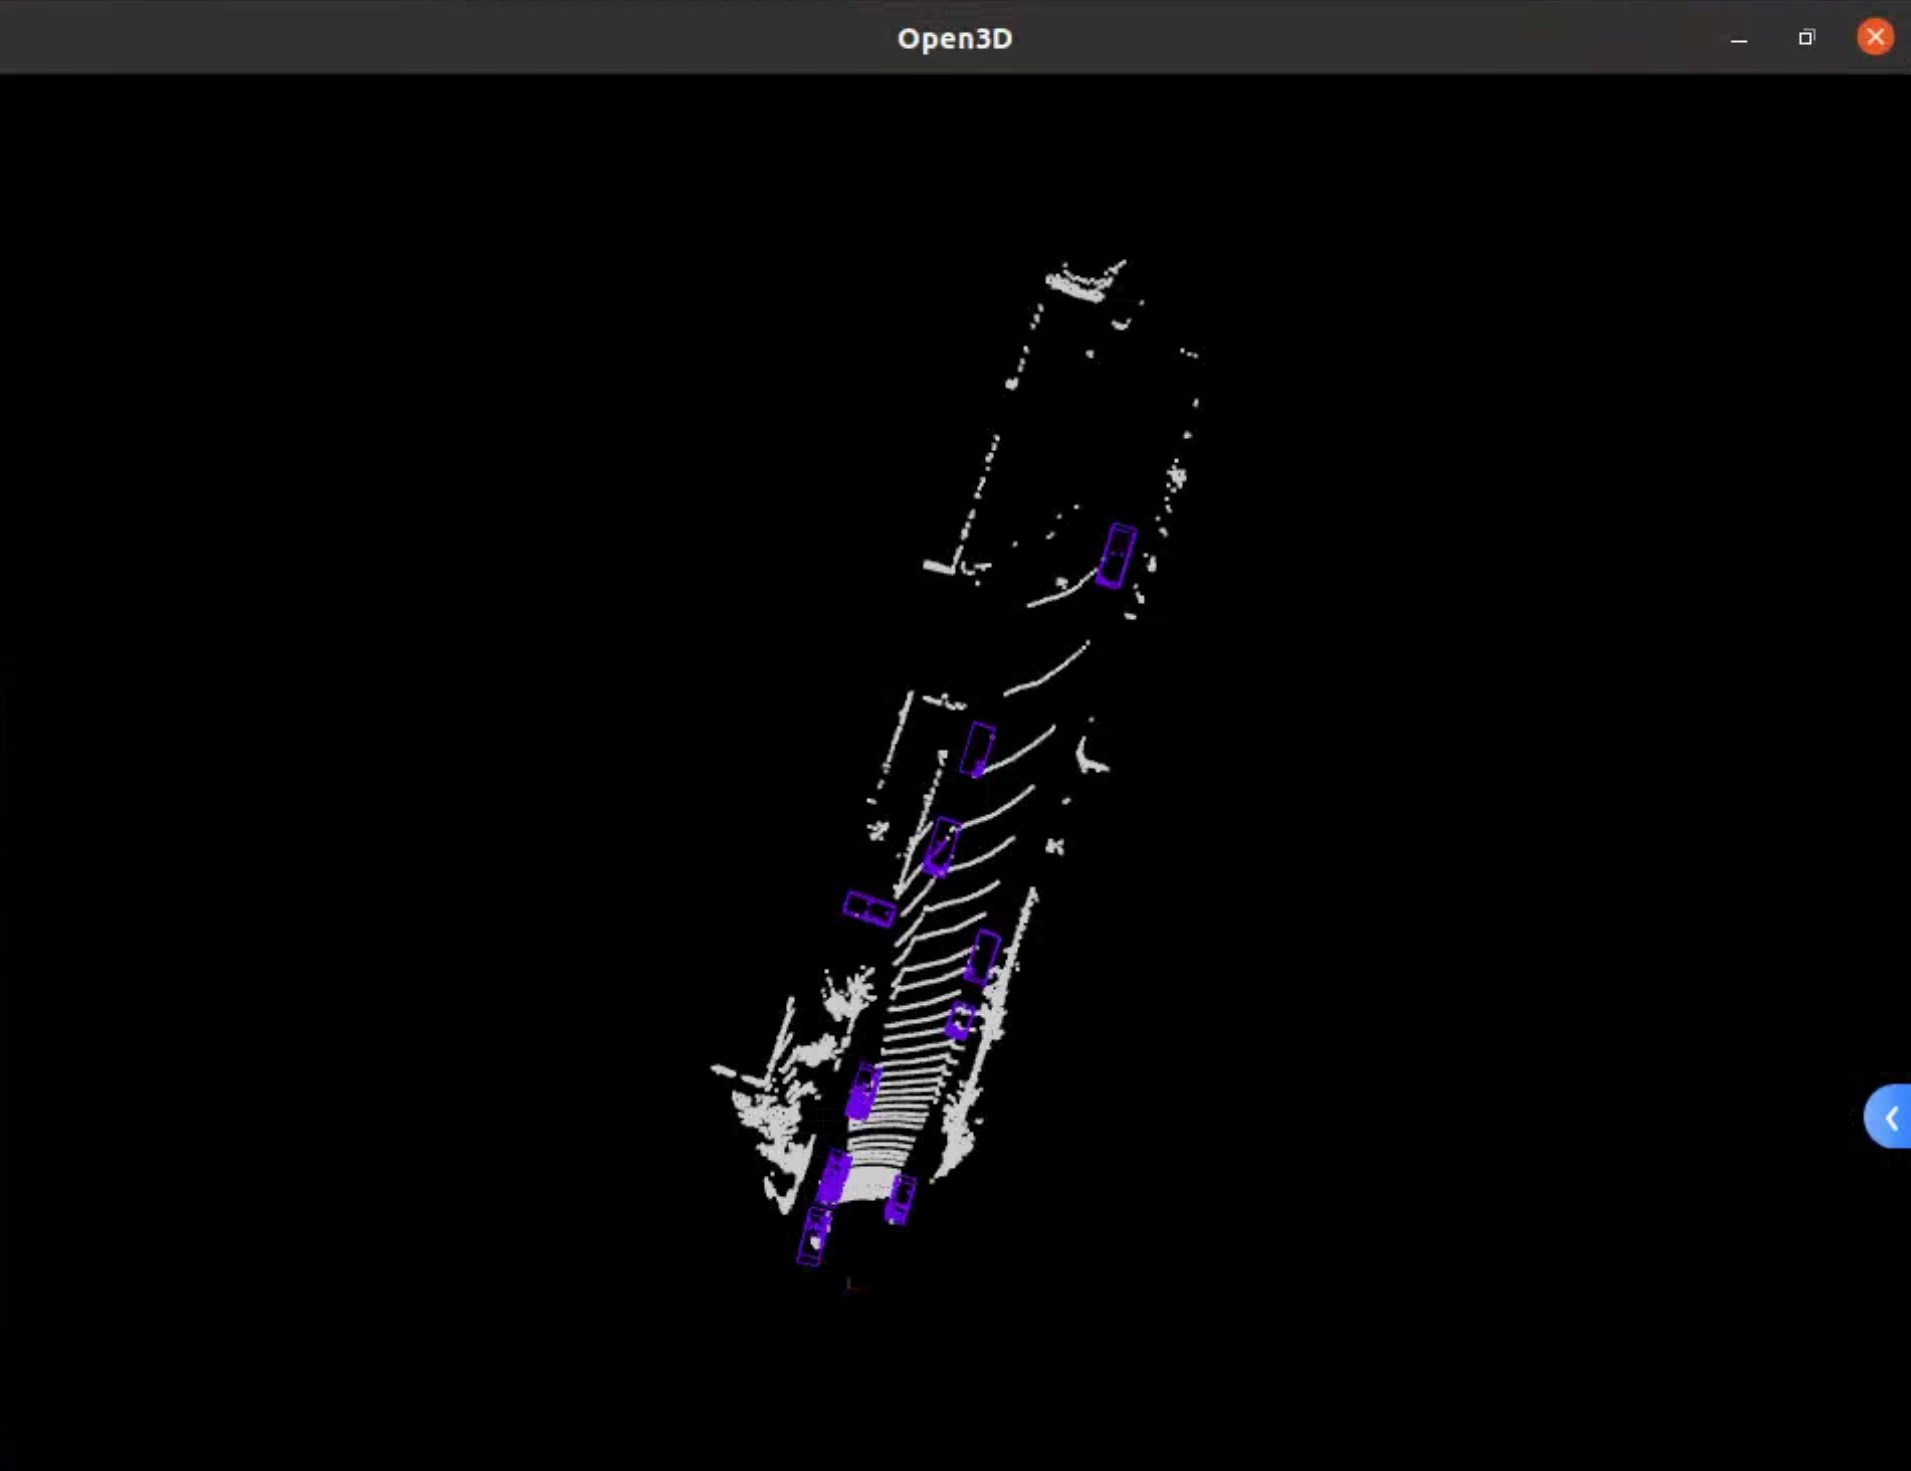
python tools/test.py work_dirs/mvxnet_fpn_dv_second_secfpn_8xb2-80e_kitti-3d-3class/mvxnet_fpn_dv_second_secfpn_8xb2-80e_kitti-3d-3class.py work_dirs/mvxnet_fpn_dv_second_secfpn_8xb2-80e_kitti-3d-3class/epoch_40.pth --task multi-modality_det --show
手拍视频:
mmexport1713751926750
7.问题与思考
- 对于大车存在漏检的情况,拟通过增加大车训练集进行解决
- 模型部署目前还缺少开源的tensorrt部署方案,虽然不是实时读取,目前基于原始模型的推理速度大概不到2hz
- 如果想要应用,可能需要写基于python的ROS2节点
https://zhuanlan.zhihu.com/p/617469740

")


")