
Ubuntu 22最新dockers部署redis哨兵模式,并整合spring boot和配置redisson详细记录(含spring boot项目包)


.png)


dockers部署redis哨兵模式,并整合spring boot
- 环境说明
- 相关学习博客
- 一、在docker中安装redis
- 1、下载dockers镜像包和redis配置文件(主从一样)
- 2、编辑配置文件
- 3、启动redis(主从一样)
- 4、进入容器测试(主从一样)
- 二、配置主从复制
- 1、在从机上设置master的IP的端口,并切换主机
- 2、查询两台服务器的主从配置
- 3、主从测试
- 三、配置哨兵模式(主从一样)
- 1、可有可无的工具
- 2、配置sentinel.conf
- 3、启动哨兵模式
- 4、查看启动情况
- 四、整合到spring boot中
- 1、创建一个新的spring boot项目
- 2、添加依赖
- 3、添加application.yaml的配置
- 4、创建redis的配置类
- 5、自定义RedisTemplate
- 6、遇到的问题redisson
环境说明
系统:Ubuntu 22
容器:docker
redis服务器:
master:192.168.81.128
slave:192.168.81.129
相关学习博客
docker的详细学习教程
redis的详细学习教程
一、在docker中安装redis
1、下载dockers镜像包和redis配置文件(主从一样)
# 下载最新的redis镜像包
docker pull redis
# 查询镜像
docker images
REPOSITORY       TAG       IMAGE ID       CREATED       SIZE
redis            latest    7fc37b47acde   12 days ago   116MB
delron/fastdfs   latest    8487e86fc6ee   5 years ago   464MB
# 创建docker挂载目录
mkdir -p /usr/local/redis
cd /usr/local/redis/
# 下载redis配置文件
wget -c http://download.redis.io/redis-stable/redis.conf
2、编辑配置文件
主机配置
vim redis.conf
# 允许所有IP连接(也可以注掉)
bind 0.0.0.0
# 监听端口
port 6379
# 开启后台运行
daemonize yes
# 日志文件
logfile "/data/logs/redis.log"
# 授权密码
masterauth yourPassword
# 客户端访问密码
requirepass yourPassword
# 开启持久化
appendonly yes
# 关闭持久化失败时停止接收命令(对数据丢失要求不是很高时可以关闭)
stop-writes-on-bgsave-error no
# 开启集群模式
cluster-enabled yes
从机配置
vim redis.conf
bind 0.0.0.0
port 6379
daemonize yes
logfile "/data/logs/redis.log"
masterauth yourPassword
# master的ip 端口
replicaof 192.168.81.128 6379
requirepass yourPassword
appendonly yes
3、启动redis(主从一样)
不指定启动文件启动(这种方式前面的配置文件会失效)
docker run -p 6379:6379 -p 26379:26379 --privileged=true --name redis -v $PWD/redis.conf:/etc/redis/redis.conf -v $PWD/data:/data -d --restart=always redis
指定启动文件启动(最好删除配置文件中其他多余的配置)
docker run -p 6379:6379 -p 26379:26379 --privileged=true --name redis -v $PWD/redis.conf:/etc/redis/redis.conf -v $PWD/data:/data -d --restart=always redis redis-server /etc/redis/redis.conf
4、进入容器测试(主从一样)
# 进入容器
$ docker exec -it redis  bash
# 使用客户端命令进入reids并输入密码
root@93e142d4b040:/data# redis-cli -a "yourPassword"
# 设置一个key为test,value为redis的键值对做简单的测试
127.0.0.1:6379> set test redis
OK
# 取值
127.0.0.1:6379> get test
"redis"
127.0.0.1:6379> info
二、配置主从复制
1、在从机上设置master的IP的端口,并切换主机
# 设置主机
127.0.0.1:6379> SLAVEOF  192.168.81.128 6379
# 切换master(当自动切换无效时,可以使用此命令手动切换)
127.0.0.1:6379> replicaof  192.168.81.128 6379
配置文件的密码可能会不生效,则需要手动配置
127.0.0.1:6379> config set masterauth yourPassword
127.0.0.1:6379> config set requirepass yourPassword
2、查询两台服务器的主从配置
Master
127.0.0.1:6379> info replication
# Replication
role:master
connected_slaves:1
slave0:ip=192.168.81.128,port=6379,state=online,offset=3327799,lag=0
master_failover_state:no-failover
master_replid:0e2af2cc670451aa4ec703c336f3014a35a67016
master_replid2:2dbd8f657c563221b2bfd8d45aead1f25e7e9922
master_repl_offset:3327799
second_repl_offset:2395307
repl_backlog_active:1
repl_backlog_size:1048576
repl_backlog_first_byte_offset:2265043
repl_backlog_histlen:1062757
Slave
127.0.0.1:6379> info  replication
# Replication
role:slave
master_host:192.168.81.129
master_port:6379
master_link_status:up
master_last_io_seconds_ago:0
master_sync_in_progress:0
slave_read_repl_offset:3362051
slave_repl_offset:3362051
slave_priority:100
slave_read_only:1
replica_announced:1
connected_slaves:0
master_failover_state:no-failover
master_replid:0e2af2cc670451aa4ec703c336f3014a35a67016
master_replid2:0000000000000000000000000000000000000000
master_repl_offset:3362051
second_repl_offset:-1
repl_backlog_active:1
repl_backlog_size:1048576
repl_backlog_first_byte_offset:2408022
repl_backlog_histlen:954030
127.0.0.1:6379>
3、主从测试
自行在master上设置一个值,然后看从机上
三、配置哨兵模式(主从一样)
1、可有可无的工具
# 推荐在容器里面安装一下两个依赖
apt-get update
# 方便编辑文件
apt-get install -y vim
# ps用于查询进程
apt-get install procps
2、配置sentinel.conf
root@4266ebe78410:/# vim sentinel.conf
port 26379
daemonize yes
sentinel monitor mymaster 192.168.81.128 6379 2
sentinel auth-pass mymaster yourPassword
3、启动哨兵模式
redis-sentinel sentinel.conf
# 使用ps查询进程
root@4266ebe78410:/# ps -ef
UID          PID    PPID  C STIME TTY          TIME CMD
redis          1       0  1 09:31 ?        00:01:20 redis-server *:6379
root          21       0  0 09:31 pts/0    00:00:00 bash
root          74       1  0 10:45 ?        00:00:32 redis-sentinel *:26379 [sentinel]
root          84       0  0 11:28 pts/1    00:00:00 bash
root          96      84 99 11:41 pts/1    00:00:00 ps -ef
4、查看启动情况
redis-cli -a "yourPassword" -p 26379
127.0.0.1:26379> info sentinel
sentinel_masters:1
sentinel_tilt:0
sentinel_running_scripts:0
sentinel_scripts_queue_length:0
sentinel_simulate_failure_flags:0
master0:name=mymaster,status=ok,address=172.22.1.68:6379,slaves=2,sentinels=4
总结
未解决的问题:(如果找到原因欢迎在评论区沟通)
- redis.conf中配置的密码,没有生效,每次重启需要手动配置密码,然后再启动哨兵
四、整合到spring boot中
1、创建一个新的spring boot项目
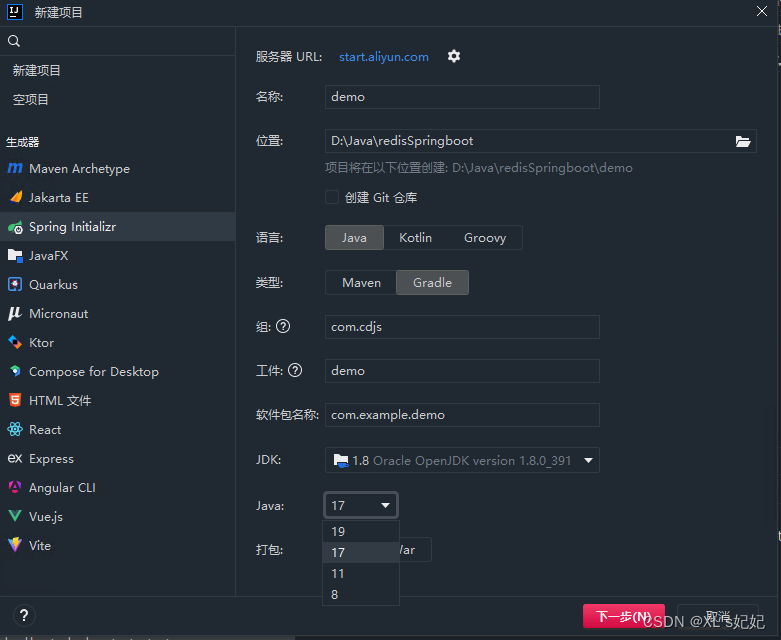
- 如果遇到可选择的Java版式过高,可将idea默认“服务器URL”改为:https://start.aliyun.com/
2、添加依赖
            org.springframework.boot
            spring-boot-starter-data-redis


            org.springframework.boot
            spring-boot-starter-web


            org.apache.commons
            commons-pool2


            org.springframework.boot
            spring-boot-devtools
            runtime
            true


            org.projectlombok
            lombok
            true


            org.springframework.boot
            spring-boot-starter-test
            test


                    org.junit.vintage
                    junit-vintage-engine


            org.redisson
            redisson
            3.12.4
            3.13.6
3、添加application.yaml的配置
server:
  port: 8088
spring:
  redis:
    # 数据库(默认为0号库)
    database: 2
    # 密码(默认空),操作redis需要使用的密码
    password: yourPassword
    # 端口号
    #    port: 6379
    #连接超时时间(毫秒)
    timeout: 10000ms
    sentinel:
      master: mymaster
      nodes:
        - 192.168.81.128:26379
        - 192.168.81.129:26379
      # 操作sentinel时需要提供的密码
      password: yourPassword
    # 使用lettuce配置
    lettuce:
      pool:
        # 连接池最大连接数(使用负值表示没有限制)
        max-active: 200
        # 连接池中的最大空闲连接
        max-idle: 20
        # 连接池中的最小空闲连接
        min-idle: 5
        # 连接池最大阻塞等待时间(使用负值表示没有限制)
        max-wait: -1ms
4、创建redis的配置类
package com.cdjs.config; import org.redisson.Redisson; import org.redisson.api.RedissonClient; import org.redisson.config.Config; import org.springframework.context.annotation.Bean; import org.springframework.context.annotation.Configuration; import org.springframework.data.redis.connection.RedisConnectionFactory; import org.springframework.data.redis.core.RedisTemplate; import org.springframework.data.redis.serializer.GenericJackson2JsonRedisSerializer; import org.springframework.data.redis.serializer.RedisSerializer; import org.springframework.data.redis.serializer.StringRedisSerializer; @Configuration public class RedisConfig { @Bean RedissonClient redissonSentinel() { Config config = new Config(); config.useSentinelServers() .setMasterName("mymaster") .addSentinelAddress("redis://192.168.81.128:26379") .addSentinelAddress("redis://192.168.81.129:26379") .setMasterConnectionPoolSize(250) .setSlaveConnectionPoolSize(250) .setCheckSentinelsList(false) .setPassword("yourPassword") .setMasterConnectionMinimumIdleSize(10) .setSlaveConnectionMinimumIdleSize(10); return Redisson.create(config); } @Bean public RedisTemplate redisTemplate(RedisConnectionFactory connectionFactory) { // 创建RedisTemplate对象 RedisTemplate template = new RedisTemplate(); // 设置连接工厂 template.setConnectionFactory(connectionFactory); // 创建Json序列化工具 GenericJackson2JsonRedisSerializer jsonRedisSerializer = new GenericJackson2JsonRedisSerializer(); StringRedisSerializer stringRedisSerializer = new StringRedisSerializer(); // 设置Key的序列化 template.setKeySerializer(RedisSerializer.string()); template.setHashKeySerializer(RedisSerializer.string()); // 设置Value的序列化 template.setValueSerializer(jsonRedisSerializer); // 设置Hash采用String的方式序列化Value template.setHashValueSerializer(stringRedisSerializer); return template; } }- RedissonClient redissonSentinel() redisson是分布式锁配置,不需要的可以不配
5、自定义RedisTemplate
见笔记
6、遇到的问题redisson
redisson是分布式配置。
启动spring boot时报错:Can’t execute SENTINEL commands on /192.168.81.128:26379
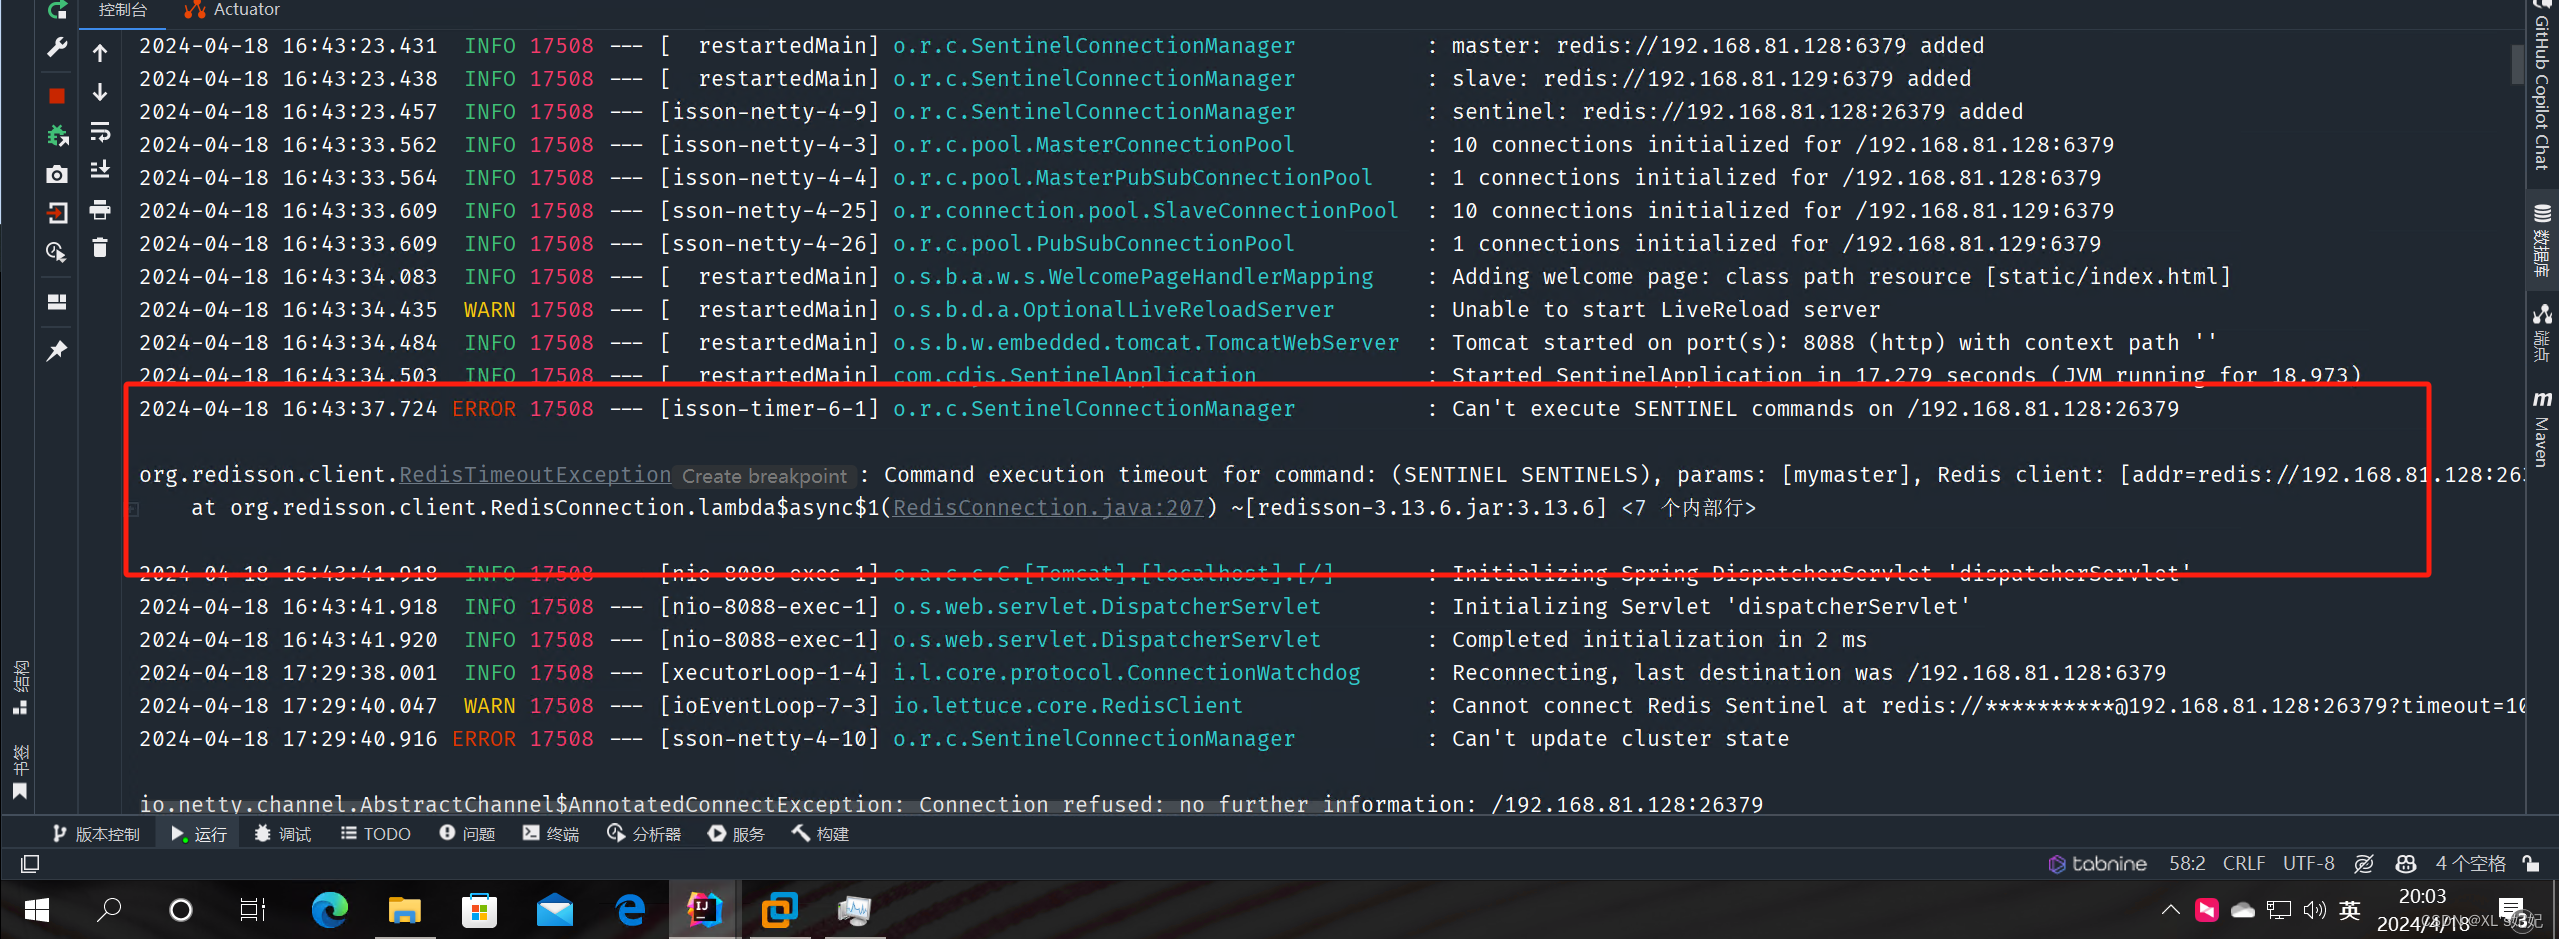
解决办法:
降低redisson版本
org.redisson
redisson
3.12.4
- RedissonClient redissonSentinel() redisson是分布式锁配置,不需要的可以不配
- 如果遇到可选择的Java版式过高,可将idea默认“服务器URL”改为:https://start.aliyun.com/
- redis.conf中配置的密码,没有生效,每次重启需要手动配置密码,然后再启动哨兵
文章版权声明:除非注明,否则均为主机测评原创文章,转载或复制请以超链接形式并注明出处。

")


")

