
AIGC专栏2——Stable Diffusion结构解析-以文本生成图像(文生图,txt2img)为例
AIGC专栏2——Stable Diffusion结构解析-以文本生成图像(文生图,txt2img)为例
- 学习前言
- 源码下载地址
- 网络构建
- 一、什么是Stable Diffusion(SD)
- 二、Stable Diffusion的组成
- 三、生成流程
- 1、文本编码
- 2、采样流程
- a、生成初始噪声
- b、对噪声进行N次采样
- c、单次采样解析
- I、预测噪声
- II、施加噪声
- d、预测噪声过程中的网络结构解析
- I、apply_model方法解析
- II、UNetModel模型解析
- 3、隐空间解码生成图片
- 文本到图像预测过程代码
学习前言
用了很久的Stable Diffusion,但从来没有好好解析过它内部的结构,写个博客记录一下,嘿嘿。

源码下载地址
https://github.com/bubbliiiing/stable-diffusion
喜欢的可以点个star噢。
网络构建
一、什么是Stable Diffusion(SD)
Stable Diffusion是比较新的一个扩散模型,翻译过来是稳定扩散,虽然名字叫稳定扩散,但实际上换个seed生成的结果就完全不一样,非常不稳定哈。
Stable Diffusion最开始的应用应该是文本生成图像,即文生图,随着技术的发展Stable Diffusion不仅支持image2image图生图的生成,还支持ControlNet等各种控制方法来定制生成的图像。
Stable Diffusion基于扩散模型,所以不免包含不断去噪的过程,如果是图生图的话,还有不断加噪的过程,此时离不开DDPM那张老图,如下:

Stable Diffusion相比于DDPM,使用了DDIM采样器,使用了隐空间的扩散,另外使用了非常大的LAION-5B数据集进行预训练。
直接Finetune Stable Diffusion大多数同学应该是无法cover住成本的,不过Stable Diffusion有很多轻量Finetune的方案,比如Lora、Textual Inversion等,但这是后话。
本文主要是解析一下整个SD模型的结构组成,一次扩散,多次扩散的流程。
大模型、AIGC是当前行业的趋势,不会的话容易被淘汰,hh。
二、Stable Diffusion的组成
Stable Diffusion由四大部分组成。
1、Sampler采样器。
2、Variational Autoencoder (VAE) 变分自编码器。
3、UNet 主网络,噪声预测器。
4、CLIPEmbedder文本编码器。
每一部分都很重要,我们首先以文本生成图像为例进行解析。既然是文本生成图像,那么我们的输入也只剩下文本了,这时候没有输入图片。
三、生成流程
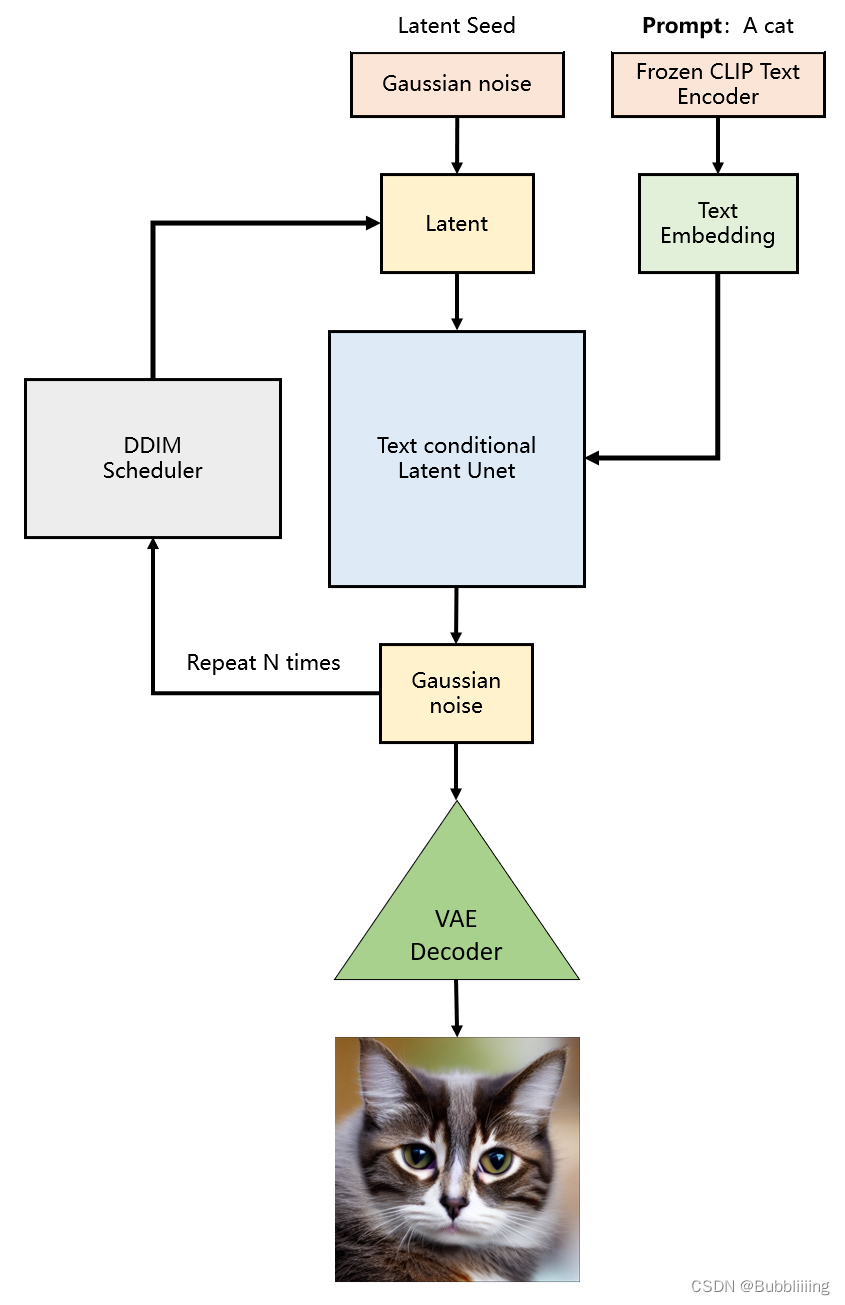
生成流程分为三个部分:
1、prompt文本编码。
2、进行若干次采样。
3、进行解码。
with torch.no_grad():
    if seed == -1:
        seed = random.randint(0, 65535)
    seed_everything(seed)
    # ----------------------- #
    #   获得编码后的prompt
    # ----------------------- #
    cond    = {"c_crossattn": [model.get_learned_conditioning([prompt + ', ' + a_prompt] * num_samples)]}
    un_cond = {"c_crossattn": [model.get_learned_conditioning([n_prompt] * num_samples)]}
    H, W    = input_shape
    shape   = (4, H // 8, W // 8)
    # ----------------------- #
    #   进行采样
    # ----------------------- #
    samples, intermediates = ddim_sampler.sample(ddim_steps, num_samples,
     shape, cond, verbose=False, eta=eta,
     unconditional_guidance_scale=scale,
     unconditional_conditioning=un_cond)
    # ----------------------- #
    #   进行解码
    # ----------------------- #
    x_samples = model.decode_first_stage(samples)
    x_samples = (einops.rearrange(x_samples, 'b c h w -> b h w c') * 127.5 + 127.5).cpu().numpy().clip(0, 255).astype(np.uint8)
1、文本编码
文本编码的思路比较简单,直接使用CLIP的文本编码器进行编码就可以了,在代码中定义了一个FrozenCLIPEmbedder类别,使用了transformers库的CLIPTokenizer和CLIPTextModel。
在前传过程中,我们对输入进来的文本首先利用CLIPTokenizer进行编码,然后使用CLIPTextModel进行特征提取,通过FrozenCLIPEmbedder,我们可以获得一个[batch_size, 77, 768]的特征向量。
class FrozenCLIPEmbedder(AbstractEncoder):
    """Uses the CLIP transformer encoder for text (from huggingface)"""
    LAYERS = [
        "last",
        "pooled",
        "hidden"
    ]
    def __init__(self, version="openai/clip-vit-large-patch14", device="cuda", max_length=77,
                 freeze=True, layer="last", layer_idx=None):  # clip-vit-base-patch32
        super().__init__()
        assert layer in self.LAYERS
        # 定义文本的tokenizer和transformer
        self.tokenizer      = CLIPTokenizer.from_pretrained(version)
        self.transformer    = CLIPTextModel.from_pretrained(version)
        self.device         = device
        self.max_length     = max_length
        # 冻结模型参数
        if freeze:
            self.freeze()
        self.layer = layer
        self.layer_idx = layer_idx
        if layer == "hidden":
            assert layer_idx is not None
            assert 0 "c_crossattn": [model.get_learned_conditioning([prompt + ', ' + a_prompt] * num_samples)]}
    un_cond = {"c_crossattn": [model.get_learned_conditioning([n_prompt] * num_samples)]}
    H, W    = input_shape
    shape   = (4, H // 8, W // 8)
    # ----------------------- #
    #   进行采样
    # ----------------------- #
    samples, intermediates = ddim_sampler.sample(ddim_steps, num_samples,
     shape, cond, verbose=False, eta=eta,
     unconditional_guidance_scale=scale,
     unconditional_conditioning=un_cond)
    # ----------------------- #
    #   进行解码
    # ----------------------- #
    x_samples = model.decode_first_stage(samples)
    x_samples = (einops.rearrange(x_samples, 'b c h w - b h w c') * 127.5 + 127.5).cpu().numpy().clip(0, 255).astype(np.uint8)
# ----------------------- #
#   保存图片
# ----------------------- #
if not os.path.exists(save_path):
    os.makedirs(save_path)
for index, image in enumerate(x_samples):
    cv2.imwrite(os.path.join(save_path, str(index) + ".jpg"), cv2.cvtColor(image, cv2.COLOR_BGR2RGB))


