
【课程设计/毕业设计】Java图书借阅管理系统源码+开发文档
项目介绍
一直想做一款图书借阅管理系统,看了很多优秀的开源项目但是发现没有合适的。于是利用空闲休息时间开始自己写了一套管理系统。学习过程中遇到问题可以咨询留言。
在线体验
http://book.gitapp.cn/
源码地址
https://github.com/geeeeeeeek/java_book
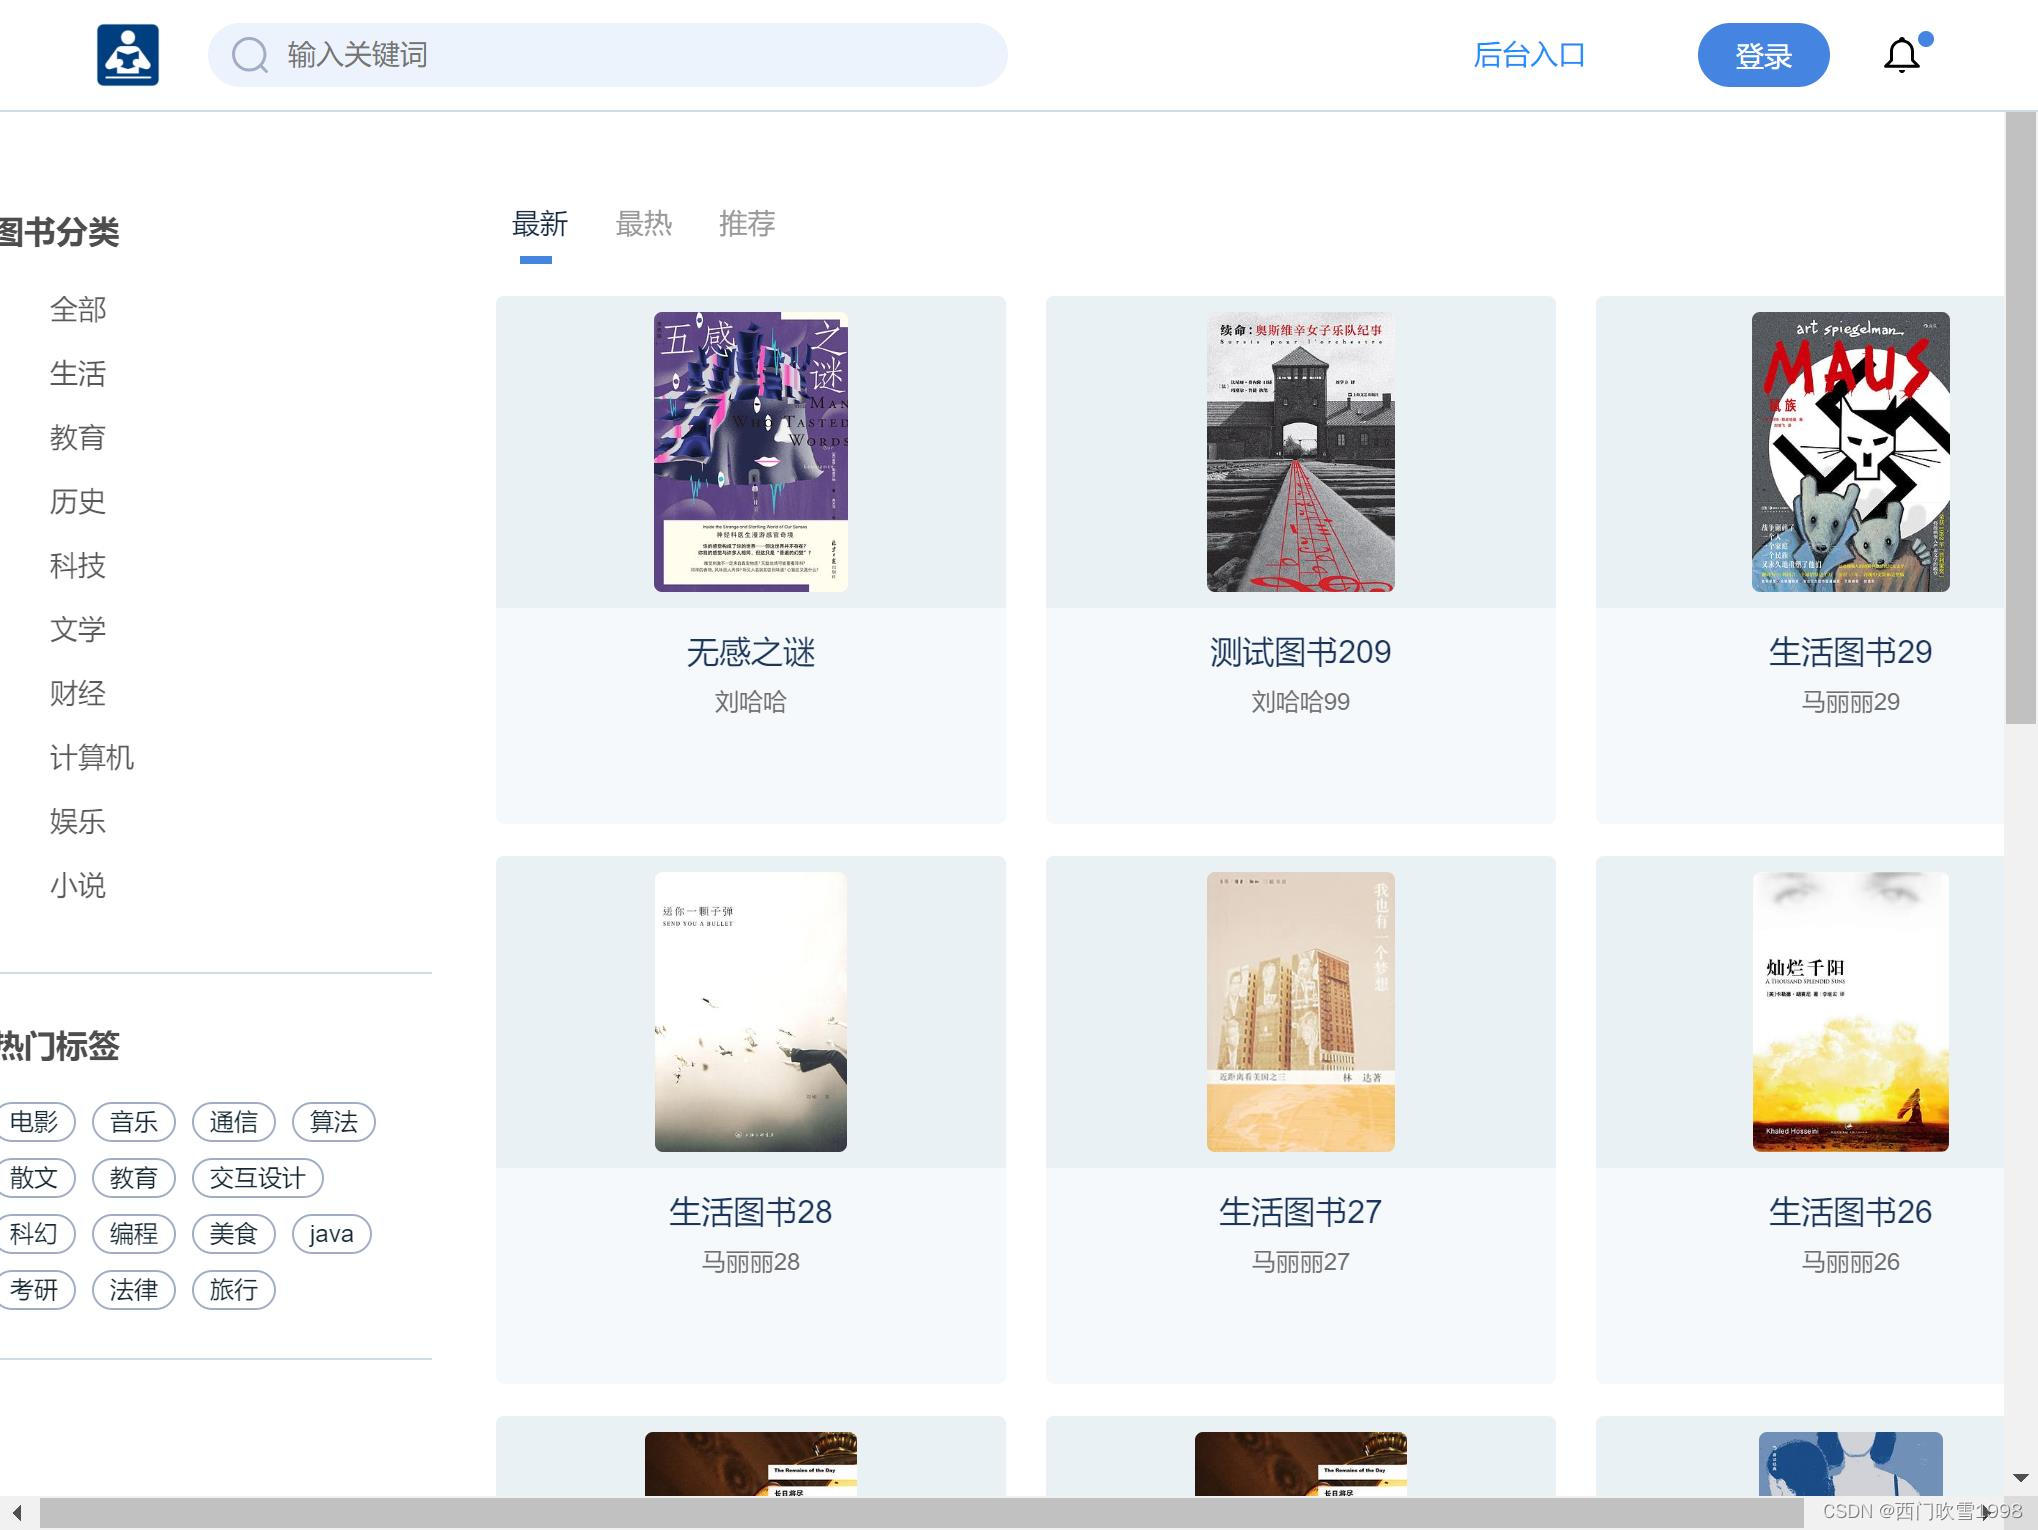
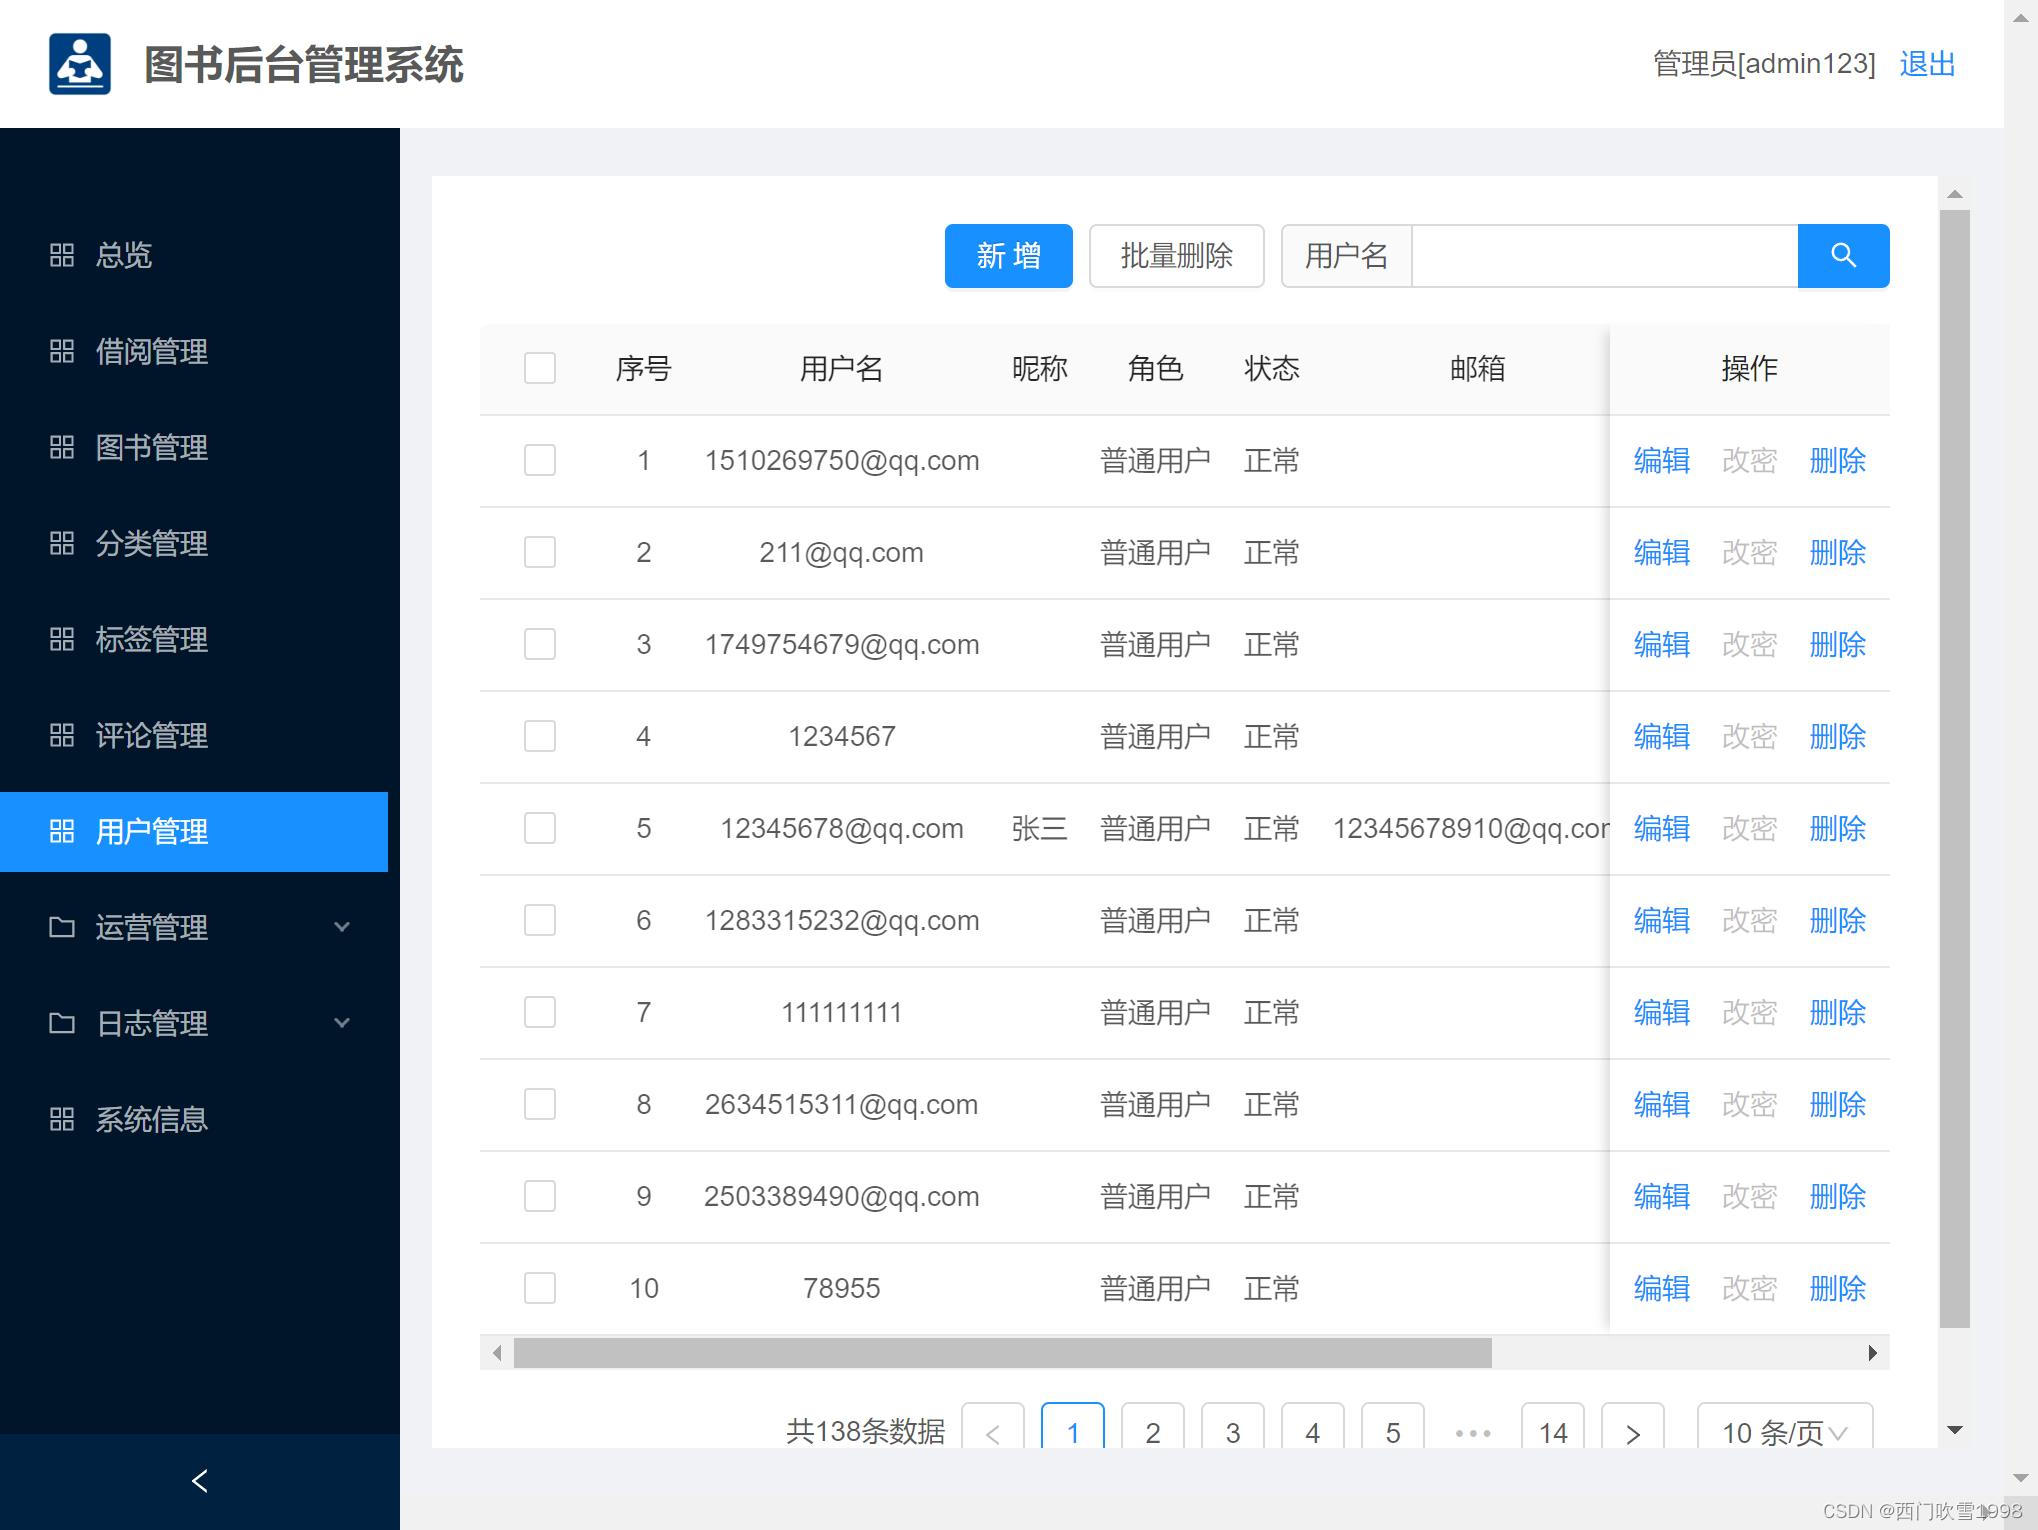
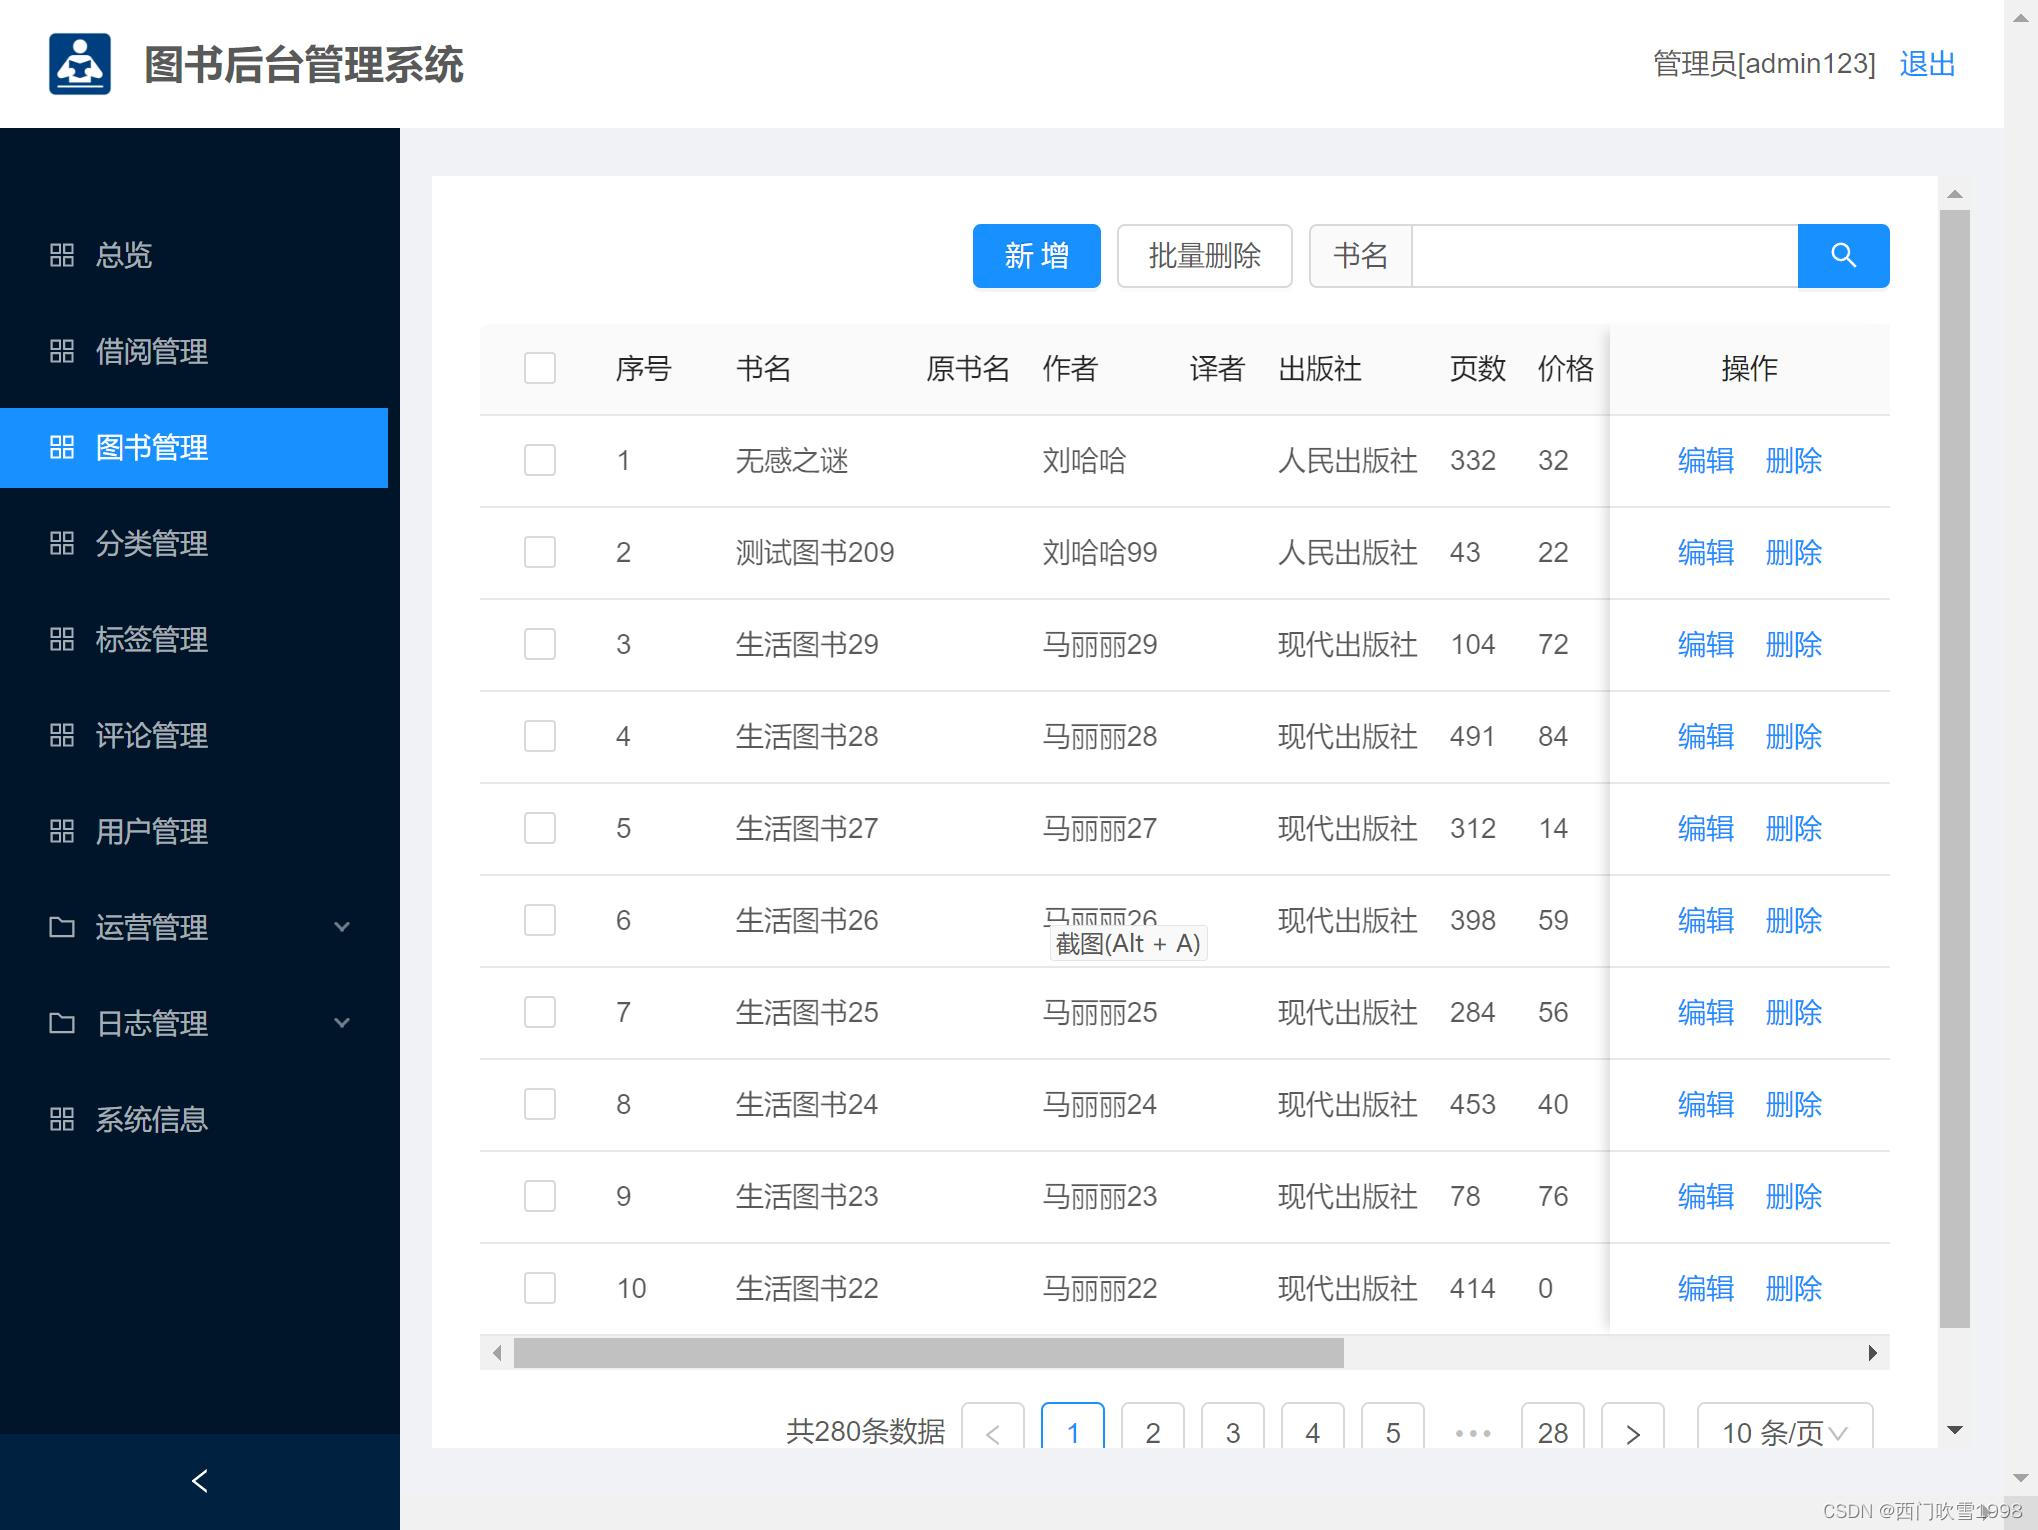
界面预览
功能介绍
系统分为后台和前台两部分。
后台的主要功能:
- 图书管理:管理系统可以录入、修改和查询图书的基本信息,如图书名称、isbn、简介、备注等。
- 类型管理:系统可以管理图书的类型信息,包括类型的名称等。
- 标签管理:管理标签录入、修改和查询标签的信息。
- 评论管理:管理和浏览整个网站的评论信息。
- 用户管理:管理和浏览网站的用户信息,可以新增、编辑和删除用户。
- 统计分析:系统可以根据图书的活动数据和会员参与度进行统计和分析,帮助管理员了解整个系统的状况。
- 消息管理:图书管理员可以在系统上发布消息,整个网站的用户都能收到。
- 系统信息:管理员可以查看系统的基本信息,包括系统名称、服务器信息、内存信息、cpu信息、软件信息等。
前台的主要功能:
- 注册登录:用户通过注册和登录后,才能使用网站。
- 门户浏览:用户进入首页后,可以浏览图书列表信息,包括最新、最热、推荐。
- 智能推荐:详情页右侧的热门推荐。
- 用户中心:包括用户基本资料修改、用户邮箱推送、消息。
- 我的借阅:包括我借阅的图书的信息。
- 模糊搜索:顶部搜索功能,支持模糊搜索图书信息。
- 图书评论:详情页下侧用户可以评论图书。
开发环境
- 后端: Java 1.8 + SpringBoot + MyBatis
- 前端: Javascript + Vue
- 数据库:MySQL 5.7
- 开发平台:Idea 2021 + vscode
- 运行环境:Windows 10/11
关键技术
- 前端技术栈 ES6、vue、vuex、vue-router、vue-cli、axios、antd
- 后端技术栈 SpringBoot、MyBatis、Maven
后端技术
Springboot框架
Spring Boot是一款开箱即用框架,提供各种默认配置来简化项目配置。让我们的Spring应用变的更轻量化、更快的入门。 在主程序执行main函数就可以运行。你也可以打包你的应用为jar并通过使用java -jar来运行你的Web应用。它遵循"约定优先于配置"的原则, 使用SpringBoot只需很少的配置,大部分的时候直接使用默认的配置即可。同时可以与Spring Cloud的微服务无缝结合。
优点:
- 使编码变得简单: 推荐使用注解。
- 使配置变得简单: 自动配置、快速集成新技术能力 没有冗余代码生成和XML配置的要求
- 使部署变得简单: 内嵌Tomcat、Jetty、Undertow等web容器,无需以war包形式部署
- 使监控变得简单: 提供运行时的应用监控
- 使集成变得简单: 对主流开发框架的无配置集成。
- 使开发变得简单: 极大地提高了开发快速构建项目、部署效率。
前端技术
- npm:node.js的包管理工具,用于统一管理我们前端项目中需要用到的包、插件、工具、命令等,便于开发和维护。
- ES6:Javascript的新版本,ECMAScript6的简称。利用ES6我们可以简化我们的JS代码,同时利用其提供的强大功能来快速实现JS逻辑。
- vue-cli:Vue的脚手架工具,用于自动生成Vue项目的目录及文件。
- vue-router: Vue提供的前端路由工具,利用其我们实现页面的路由控制,局部刷新及按需加载,构建单页应用,实现前后端分离。
- vuex:Vue提供的状态管理工具,用于统一管理我们项目中各种数据的交互和重用,存储我们需要用到数据对象。
- Ant-design:基于MVVM框架Vue开源出来的一套前端ui组件。
运行步骤
后端运行步骤
(1) 下载代码后,使用IntelliJ IDEA打开server目录
(2) 配置application.yml文件,配置数据库DB_NAME和BASE_LOCATION
(3) 安装mysql 5.7数据库后,创建数据库,创建SQL如下:
CREATE DATABASE IF NOT EXISTS java_book DEFAULT CHARSET utf8 COLLATE utf8_general_ci
(4) 恢复sql数据。在mysql下依次执行如下命令:
mysql> use java_book;
mysql> source D:/xxx/xxx/java_book.sql;
(5) 启动后端服务:点击IDEA顶部run按钮
前端运行步骤
(1) 安装node 16
(2) cmd进入web目录下,安装依赖,执行:
npm install
(3) 运行项目
npm run dev
代码结构
后端结构
com.gk.study
├── common            // 工具类
│       └── APIResponse                   // 返回体
│       └── ResponseCode                  // 状态码
├── controller         // 业务接口
│       └── ThingController               // 图书业务
│       └── ClassificationController      // 分类
│       └── TagController                 // 标签
│       └── CommentController             // 评论
│       └── UserController                // 用户
│       └── NoticeController              // 通知
│       └── OpLogController               // 日志
├── entity            // 实体类
├── interceptor       // 拦截器
├── mapper            // 数据库映射
├── service           // 服务实现
├── utils             // 辅助代码
前端结构
├── build                      // 构建相关
├── public                     // 公共文件
│   ├── favicon.ico            // favicon图标
│   └── index.html             // html模板
├── src                        // 源代码
│   ├── api                    // 所有请求
│   ├── assets                 // 主题 字体等静态资源
│   ├── router                 // 路由
│   ├── store                  // 全局 store管理
│   ├── utils                  // 全局公用方法
│   ├── views                  // view界面
│   ├── App.vue                // 入口页面
│   ├── main.js                // 入口 加载组件 初始化等
│   └── settings.js            // 系统配置
├── .eslintignore              // 忽略语法检查
├── .eslintrc.js               // eslint 配置项
├── .gitignore                 // git 忽略项
├── babel.config.js            // babel.config.js
├── package.json               // package.json
└── vite.config.js             // vue配置
数据库设计
需求分析
在图书管理系统中,需要存储和管理图书信息、评论信息、分类信息、标签信息、用户信息、通知信息、日志信息。
实体设计如下:
- 图书(thing)
- 分类(classification)
- 标签(tag)
- 用户(user)
- 评价(comment)
- 日志(log)
- 通知(notice)
关系如下:
- 用户可以借阅多个图书
- 图书可以被多个用户借阅
- 一个图书有一个分类
- 一个分类可以对应多个图书
- 一个图书有多个标签
- 一个标签可以对应多个图书
数据表设计如下:
// 图书
Table book {
    book_id int [pk]
    classification_id int [ref: > C.classification_id]
    tag_id int [ref:  tag.tag_id]
    title varchar // 图书名称
    original_title varchar // 原书名
    cover varchar // 封面
    author varchar
    translator varchar
    press varchar
    page_count int
    price varchar
    isbn varchar
    pub_date varchar
    online_time varchar
    status int
    repertory int
    score varchar
    layout varchar // 装帧
    description text
    create_time datetime
    pv int
    wish_count int
    recommend_count int
    wish int [ref:  user.user_id]
    collect int [ref:  user.user_id]
 }
 // 分类
 Table classification as C {
   classification_id int [pk]
   pid int
   title varchar
   create_time datetime
 }
 // 标签
 Table tag {
   tag_id int [pk]
   title varchar
   create_time datetime
 }
 // 评论
 Table comment {
   comment_id int [pk]
   content varchar
   user_id int [ref: > user.user_id]
   book_id int [ref: > book.book_id]
   comment_time datetime
   like_count int
 }
 // 用户
 Table user {
   user_id int [pk]
   role varchar // 1管理员 2普通用户 3演示帐号
   status int // 0正常 1封号
   username varchar
   password varchar
   nickname varchar
   avatar varchar
   description varchar
   wish int [ref:  book.book_id]
   email varchar
   mobile varchar
   score int // 积分
   push_email varchar // 推送邮箱
   push_switch int  // 推送开关
   token varchar
   admin_token varchar
 }

 // 登录日志
 Table login_log {
   log_id int [pk]
   username varchar
   ip varchar
   log_time datetime
 }

 // 操作日志
 Table op_log {
   id int [pk]
   re_ip varchar
   re_time datetime
   re_url varchar
   re_method varchar
   re_content varchar
   access_time varchar
 }

 // 异常日志
 Table error_log {
   id int [pk]
   ip varchar
   method varchar
   content varchar
   log_time varchar
 }
 // 借阅表
 Table borrow {
   borrow_id int [pk]
   user_id int [ref: > user.user_id]
   book_id int [ref: > book.book_id]
   status varchar // 1借出 2已还
   borrow_time datetime
   expect_time datetime // 应还时间
   delayed boolean // 是否点击延期了 1已延期
 }
 // 通知表
 Table notice {
   id int [pk]
   content varchar
   create_time datetime
 }
开发过程
无论是图书管理、用户管理、标签管理、分类管理、评价管理、日志管理、消息管理等功能都是基于springboot+vue框架开发的,开发流程是:
- 第一步:编写实体类
- 第二步:编写mapper数据库映射
- 第三步:编写service层
- 第四步:编写controller层
- 第五步:编写界面和API
下面用图书管理功能来演绎这个流程,其它的管理功能都是这个流程。
第一步:编写实体类
在server的entity文件夹中,新建Thing.java文件。并写入如下代码:
@Data
@TableName("b_thing")
public class Thing implements Serializable {
    @TableId(value = "id",type = IdType.AUTO)
    public Long id;
    @TableField
    public String title;
    @TableField
    public String cover;
    @TableField
    public String description;
    @TableField
    public String status;
    @TableField
    public String createTime;
    @TableField
    public String mobile;
    @TableField
    public String email;
    @TableField
    public String location;
    @TableField
    public String pv;
    @TableField
    public String recommendCount;
    @TableField
    public String wishCount;
    @TableField
    public String collectCount;
    @TableField
    public Long classificationId;
    @TableField(exist = false)
    public List tags; // 标签
    @TableField(exist = false)
    public MultipartFile imageFile;
    @TableField
    public String userId;
}
第二步:编写mapper数据库映射
在server的mapper文件夹下,新建ThingMapper.java文件,并写入代码:
// Mapper是mybatis里面的技术,用于操作mysql中的数据
@Mapper
public interface ThingMapper extends BaseMapper {
}
第三步:编写service层
在server的service文件夹中,新建ThingService.java代码,并写入代码:
public interface ThingService {
    List getThingList(String keyword, String sort, String c, String tag); // 查
    void createThing(Thing thing);  // 增
    void deleteThing(String id);    // 删
    void updateThing(Thing thing);  // 改
    Thing getThingById(String id);
    void addWishCount(String thingId);
    void addCollectCount(String thingId);
    List getUserThing(String userId);
}
并在impl中编写它的实现类ThingServiceImpl.java
第四步: 编写controller层
在server的controller文件夹新建ThingController.java文件,实现增删改查接口,并编写代码:
@RestController
@RequestMapping("/thing")
public class ThingController {
    private final static Logger logger = LoggerFactory.getLogger(ThingController.class);
    @Autowired
    ThingService service;
    @Value("${File.uploadPath}")
    private String uploadPath;
    @RequestMapping(value = "/list", method = RequestMethod.GET)
    public APIResponse list(String keyword, String sort, String c, String tag){
        List list =  service.getThingList(keyword, sort, c, tag);
        return new APIResponse(ResponeCode.SUCCESS, "查询成功", list);
    }
    @RequestMapping(value = "/detail", method = RequestMethod.GET)
    public APIResponse detail(String id){
        Thing thing =  service.getThingById(id);
        return new APIResponse(ResponeCode.SUCCESS, "查询成功", thing);
    }
    @Access(level = AccessLevel.ADMIN)
    @RequestMapping(value = "/create", method = RequestMethod.POST)
    @Transactional
    public APIResponse create(Thing thing) throws IOException {
        String url = saveThing(thing);
        if(!StringUtils.isEmpty(url)) {
            thing.cover = url;
        }
        service.createThing(thing);
        return new APIResponse(ResponeCode.SUCCESS, "创建成功");
    }
    @Access(level = AccessLevel.ADMIN)
    @RequestMapping(value = "/delete", method = RequestMethod.POST)
    public APIResponse delete(String ids){
        System.out.println("ids===" + ids);
        // 批量删除
        String[] arr = ids.split(",");
        for (String id : arr) {
            service.deleteThing(id);
        }
        return new APIResponse(ResponeCode.SUCCESS, "删除成功");
    }
    @Access(level = AccessLevel.ADMIN)
    @RequestMapping(value = "/update", method = RequestMethod.POST)
    @Transactional
    public APIResponse update(Thing thing) throws IOException {
        System.out.println(thing);
        String url = saveThing(thing);
        if(!StringUtils.isEmpty(url)) {
            thing.cover = url;
        }
        service.updateThing(thing);
        return new APIResponse(ResponeCode.SUCCESS, "更新成功");
    }
    public String saveThing(Thing thing) throws IOException {
        MultipartFile file = thing.getImageFile();
        String newFileName = null;
        if(file !=null && !file.isEmpty()) {
            // 存文件
            String oldFileName = file.getOriginalFilename();
            String randomStr = UUID.randomUUID().toString();
            newFileName = randomStr + oldFileName.substring(oldFileName.lastIndexOf("."));
            String filePath = uploadPath + File.separator + "image" + File.separator + newFileName;
            File destFile = new File(filePath);
            if(!destFile.getParentFile().exists()){
                destFile.getParentFile().mkdirs();
            }
            file.transferTo(destFile);
        }
        if(!StringUtils.isEmpty(newFileName)) {
            thing.cover = newFileName;
        }
        return newFileName;
    }
    @RequestMapping(value = "/listUserThing", method = RequestMethod.GET)
    public APIResponse listUserThing(String userId){
        List list =  service.getUserThing(userId);
        return new APIResponse(ResponeCode.SUCCESS, "查询成功", list);
    }
}
第五步:编写界面和API
打开前端web工程,在views文件夹下新建thing.vue文件,并编写代码:
新增 批量删除 (data.page = current), showSizeChanger: false, showTotal: (total) => `共${total}条数据`, }" > 编辑 删除 {{ item.title }}请选择要上传的封面图片
平装 精装 其它 上架 下架 import { FormInstance, message, SelectProps } from 'ant-design-vue'; import { createApi, listApi, updateApi, deleteApi } from '/@/api/thing'; import {listApi as listClassificationApi} from '/@/api/classification' import {listApi as listTagApi} from '/@/api/tag' import {BASE_URL} from "/@/store/constants"; import { FileImageOutlined } from '@ant-design/icons-vue'; const columns = reactive([ { title: '序号', dataIndex: 'index', key: 'index', width: 60 }, { title: '名称', dataIndex: 'title', key: 'title' }, { title: '作者', dataIndex: 'author', key: 'author' }, { title: 'isbn', dataIndex: 'isbn', key: 'isbn' }, { title: '出版社', dataIndex: 'press', key: 'press' }, { title: '装帧', dataIndex: 'layout', key: 'layout' }, { title: '库存', dataIndex: 'repertory', key: 'repertory' }, { title: '简介', dataIndex: 'description', key: 'description', customRender: ({ text, record, index, column }) => text ? text.substring(0, 10) + '...' : '--' }, { title: '状态', dataIndex: 'status', key: 'status', customRender: ({ text, record, index, column }) => text === '0' ? '上架' : '下架' }, { title: '操作', dataIndex: 'action', key: 'operation', align: 'center', fixed: 'right', width: 140, }, ]); const beforeUpload = (file: File) => { // 改文件名 const fileName = new Date().getTime().toString() + '.' + file.type.substring(6); const copyFile = new File([file], fileName); console.log(copyFile); modal.form.imageFile = copyFile; return false; }; // 文件列表 const fileList = ref([]); // 页面数据 const data = reactive({ dataList: [], loading: false, keyword: '', selectedRowKeys: [] as any[], pageSize: 10, page: 1, }); // 弹窗数据源 const modal = reactive({ visile: false, editFlag: false, title: '', cData: [], tagData: [{}], form: { id: undefined, title: undefined, classificationId: undefined, tags: [], repertory: undefined, author: undefined, translator: undefined, isbn: undefined, press: undefined, price: undefined, pubDate: undefined, pageCount: undefined, status: undefined, cover: undefined, coverUrl: undefined, imageFile: undefined }, rules: { title: [{ required: true, message: '请输入名称', trigger: 'change' }], classificationId: [{ required: true, message: '请选择分类', trigger: 'change' }], repertory: [{ required: true, message: '请输入库存', trigger: 'change' }], price: [{ required: true, message: '请输入定价', trigger: 'change' }], status: [{ required: true, message: '请选择状态', trigger: 'change' }] }, }); const myform = ref(); onMounted(() => { getDataList(); getCDataList(); getTagDataList(); }); const getDataList = () => { data.loading = true; listApi({ keyword: data.keyword, }) .then((res) => { data.loading = false; console.log(res); res.data.forEach((item: any, index: any) => { item.index = index + 1; }); data.dataList = res.data; }) .catch((err) => { data.loading = false; console.log(err); }); } const getCDataList = () => { listClassificationApi({}).then(res => { modal.cData = res.data }) } const getTagDataList = ()=> { listTagApi({}).then(res => { res.data.forEach((item, index) => { item.index = index + 1 }) modal.tagData = res.data }) } const onSearchChange = (e: Event) => { data.keyword = e?.target?.value; console.log(data.keyword); }; const onSearch = () => { getDataList(); }; const rowSelection = ref({ onChange: (selectedRowKeys: (string | number)[], selectedRows: DataItem[]) => { console.log(`selectedRowKeys: ${selectedRowKeys}`, 'selectedRows: ', selectedRows); data.selectedRowKeys = selectedRowKeys; }, }); const handleAdd = () => { resetModal(); modal.visile = true; modal.editFlag = false; modal.title = '新增'; // 重置 for (const key in modal.form) { modal.form[key] = undefined; } modal.form.cover = undefined }; const handleEdit = (record: any) => { resetModal(); modal.visile = true; modal.editFlag = true; modal.title = '编辑'; // 重置 for (const key in modal.form) { modal.form[key] = undefined; } for (const key in record) { if(record[key]) { modal.form[key] = record[key]; } } if(modal.form.cover) { modal.form.coverUrl = BASE_URL + '/api/staticfiles/image/' + modal.form.cover modal.form.cover = undefined } }; const confirmDelete = (record: any) => { console.log('delete', record); deleteApi({ ids: record.id }) .then((res) => { getDataList(); }) .catch((err) => { message.error(err.msg || '操作失败'); }); }; const handleBatchDelete = () => { console.log(data.selectedRowKeys); if (data.selectedRowKeys.length { message.success('删除成功'); data.selectedRowKeys = []; getDataList(); }) .catch((err) => { message.error(err.msg || '操作失败'); }); }; const handleOk = () => { myform.value ?.validate() .then(() => { const formData = new FormData(); if(modal.editFlag) { formData.append('id', modal.form.id) } formData.append('title', modal.form.title) if (modal.form.classificationId) { formData.append('classificationId', modal.form.classificationId) } if (modal.form.tags) { modal.form.tags.forEach(function (value) { if(value){ formData.append('tags[]', value) } }) } if (modal.form.imageFile) { formData.append('imageFile', modal.form.imageFile) } formData.append('description', modal.form.description || '') formData.append('author', modal.form.author || '') formData.append('translator', modal.form.translator || '') formData.append('isbn', modal.form.isbn || '') formData.append('layout', modal.form.layout || '') formData.append('press', modal.form.press || '') formData.append('pubDate', modal.form.pubDate || '') formData.append('pageCount', modal.form.pageCount || '') if (modal.form.repertory >= 0) { formData.append('repertory', modal.form.repertory) } if (modal.form.status) { formData.append('status', modal.form.status) } if (modal.editFlag) { updateApi(formData) .then((res) => { hideModal(); getDataList(); }) .catch((err) => { console.log(err); message.error(err.msg || '操作失败'); }); } else { createApi(formData) .then((res) => { hideModal(); getDataList(); }) .catch((err) => { console.log(err); message.error(err.msg || '操作失败'); }); } }) .catch((err) => { console.log('不能为空'); }); }; const handleCancel = () => { hideModal(); }; // 恢复表单初始状态 const resetModal = () => { myform.value?.resetFields(); fileList.value = [] }; // 关闭弹窗 const hideModal = () => { modal.visile = false; }; .page-view { min-height: 100%; background: #fff; padding: 24px; display: flex; flex-direction: column; } .table-operations { margin-bottom: 16px; text-align: right; } .table-operations > button { margin-right: 8px; }这就是图书管理功能的实现流程,其它的功能管理实现一模一样的。按照这个流程编写即可。
重要模块实现
分页实现
基于ant-design框架的a-table的分页插件。
// 分页变量
  const data = reactive({
    dataList: [],
    loading: false,
    keyword: '',
    selectedRowKeys: [] as any[],
    pageSize: 10,
    page: 1,
  });

// 分页插件
:pagination="{
          size: 'default',
          current: data.page,
          pageSize: data.pageSize,
          onChange: (current) => (data.page = current),
          showSizeChanger: false,
          showTotal: (total) => `共${total}条数据`,
        }"
请求工具实现
前端的请求工具是基于axios开发的,位于utils的http文件夹中。封装了request请求和拦截器。
const service: AxiosInstance = axios.create({
  // baseURL: import.meta.env.BASE_URL + '',
  baseURL: BASE_URL + '',
  timeout: 15000,
});
// axios实例拦截请求
service.interceptors.request.use(
  (config: InternalAxiosRequestConfig) => {
    config.headers.ADMINTOKEN = localStorage.getItem(ADMIN_USER_TOKEN);
    config.headers.TOKEN = localStorage.getItem(USER_TOKEN);
    return config;
  },
  (error: AxiosError) => {
    return Promise.reject(error);
  },
);
// axios实例拦截响应
service.interceptors.response.use(
  (response: AxiosResponse) => {
    if (response.status == 200) {
      if (response.data.code == 0 || response.data.code == 200) {
        return response;
      } else {
        return Promise.reject(response.data);
      }
    } else {
      return Promise.reject(response.data);
    }
  },
  // 请求失败
  (error: any) => {
    console.log(error.response.status);
    if (error.response.status == 404) {
      // todo
    } else if (error.response.status == 403) {
      // todo
    }
    return Promise.reject(error);
  },
);
权限控制模块
权限控制使用了Access和AccessLevel注解实现的,通过设置访问常量实现访问权限的控制,
// 关键代码
public enum AccessLevel {
    LOGIN(1, "all"), // 登录用户
    DEMO(2, "demo"), // 演示账号
    ADMIN(3, "admin"), // 管理员
    SUPER(4, "super"); // 超级管理员
每次使用的时候,可以在controller接口上面加入相应的注解来实现权限控制,例如下面加入了@Access(level = AccessLevel.ADMIN)
注解,表明当前接口只能管理员调用。
    @Access(level = AccessLevel.ADMIN)
    @RequestMapping(value = "/update", method = RequestMethod.POST)
    @Transactional
    public APIResponse update(Thing thing) throws IOException {
        System.out.println(thing);
        String url = saveThing(thing);
        if(!StringUtils.isEmpty(url)) {
            thing.cover = url;
        }
        service.updateThing(thing);
        return new APIResponse(ResponeCode.SUCCESS, "更新成功");
    }
底层原理实现是通过实现HandlerInterceptorAdapter接口来运行的。参见interceptor文件夹下的AccessInterceptor.java
@Component
public class AccessInterceptor extends HandlerInterceptorAdapter {
    private Logger logger = LoggerFactory.getLogger(AccessInterceptor.class);
    private static OpLogService service;
    private static UserService userService;
    @Autowired
    public void setOpLogService( OpLogService service) {
        // 为解决先@Component 后@Autowired失效的方案
        AccessInterceptor.service = service;
    }
    @Autowired
    public void setUserService( UserService userService) {
        // 为解决先@Component 后@Autowired失效的方案
        AccessInterceptor.userService = userService;
    }
    @Override
    public boolean preHandle(HttpServletRequest request, HttpServletResponse response, Object handler)
            throws Exception {
            // 权限判断
    }
路由模块实现
前端的路由是基于vue-router框架实现的,路由文件位于src的rooter的root.js文件中。预览如下:
  {
    path: '/admin',
    name: 'admin',
    redirect: '/admin/thing',
    component: () => import('/@/views/admin/main.vue'),
    children: [
      { path: 'overview', name: 'overview', component: () => import('/@/views/admin/overview.vue') },
      { path: 'order', name: 'order', component: () => import('/@/views/admin/order.vue') },
      { path: 'thing', name: 'thing', component: () => import('/@/views/admin/thing.vue') },
      { path: 'comment', name: 'comment', component: () => import('/@/views/admin/comment.vue') },
      { path: 'user', name: 'user', component: () => import('/@/views/admin/user.vue') },
      { path: 'classification', name: 'classification', component: () => import('/@/views/admin/classification.vue') },
      { path: 'tag', name: 'tag', component: () => import('/@/views/admin/tag.vue') },
      { path: 'ad', name: 'ad', component: () => import('/@/views/admin/ad.vue') },
      { path: 'notice', name: 'notice', component: () => import('/@/views/admin/notice.vue') },
      { path: 'loginLog', name: 'loginLog', component: () => import('/@/views/admin/login-log.vue') },
      { path: 'opLog', name: 'opLog', component: () => import('/@/views/admin/op-log.vue') },
      { path: 'errorLog', name: 'errorLog', component: () => import('/@/views/admin/error-log.vue') },
      { path: 'sysInfo', name: 'sysInfo', component: () => import('/@/views/admin/sys-info.vue') },
    ]
  },
常见问题
- 数据库版本有要求吗?
需要mysql 5.7以上
- 前端 npm install 失败怎么办?
使用国内镜像安装,设置命令为:
npm config set registry https://registry.npm.taobao.org
- 提示"演示账号无法操作",怎么办?
将用户的权限提高,修改b_user表的role字段
- 如何更换后端请求地址
修改store文件夹下的constants.js文件中的BASE_URL,改成你自己的后端地址
- 如何新增页面
在views文件夹下创建新的vue文件,写入界面代码,然后在router的root.js中添加路由即可。
- 如何新增页面
- 如何更换后端请求地址
- 提示"演示账号无法操作",怎么办?
- 前端 npm install 失败怎么办?
- 数据库版本有要求吗?


