
mybatis详细学习教程(建议收藏)
前言
猛淦两万字,只为图君一乐。
一、Mybatis
概述
1、什么是MyBatis?
MyBatis(官网:https://mybatis.org/mybatis-3/zh/index.html )是一款优秀的 持久层 框架,用于简化JDBC的开发。是 Apache的一个开源项目iBatis,2010年这个项目由apache迁移到了google code,并且改名为MyBatis 。2013年11月迁移到Github。
MyBatis 免除了几乎所有的 JDBC 代码以及设置参数和获取结果集的工作。
MyBatis 可以通过简单的 XML 或注解来配置和映射原始类型、接口和 Java POJO(Plain Old Java Objects,普通老式 Java 对象)为数据库中的记录。
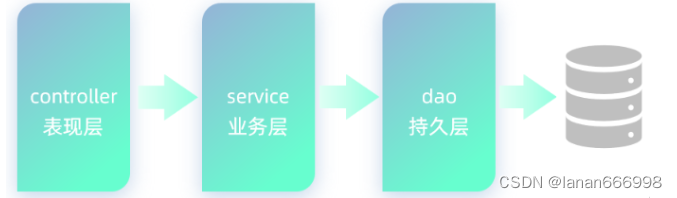
持久层:指的是就是数据访问层(dao),是用来操作数据库的。
框架:是一个半成品软件,是一套可重用的、通用的、软件基础代码模型。在框架的基础上进行软件开发更加高效、规范、通用、可拓展。
二、快速入门
准备工作
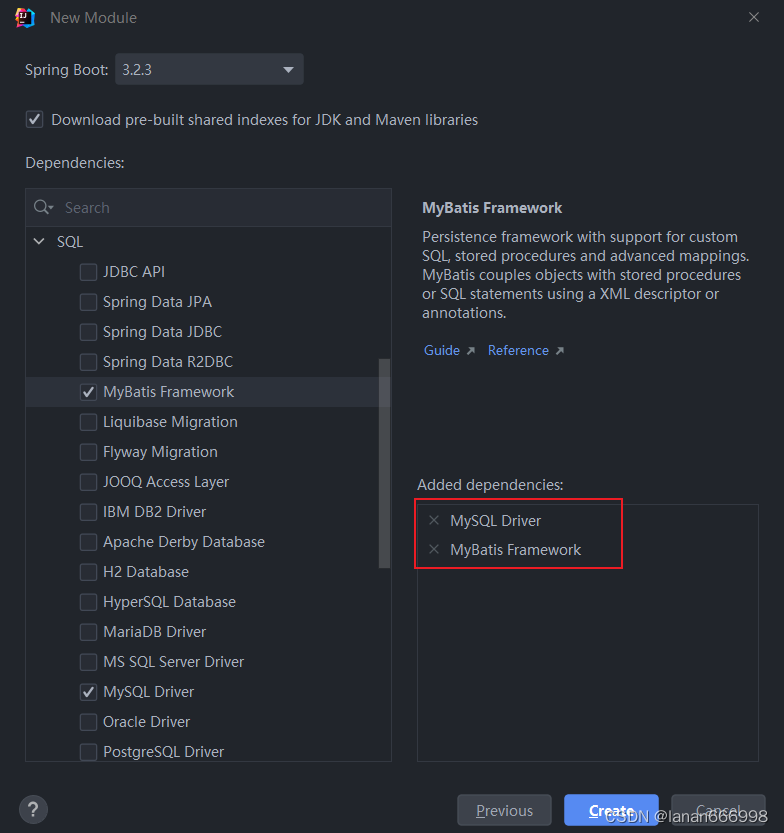
1、创建springboot工程
创建springboot工程;
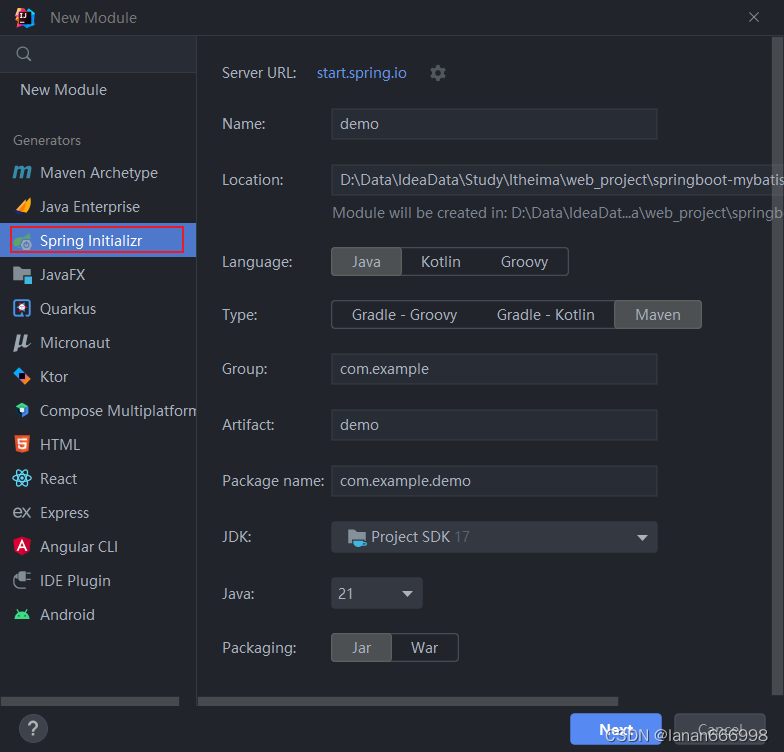
导入 mybatis的起步依赖、mysql的驱动包(初次使用,下载依赖时间会有些长,不要着急;如果下载好依然无法打开,请重启Idea)
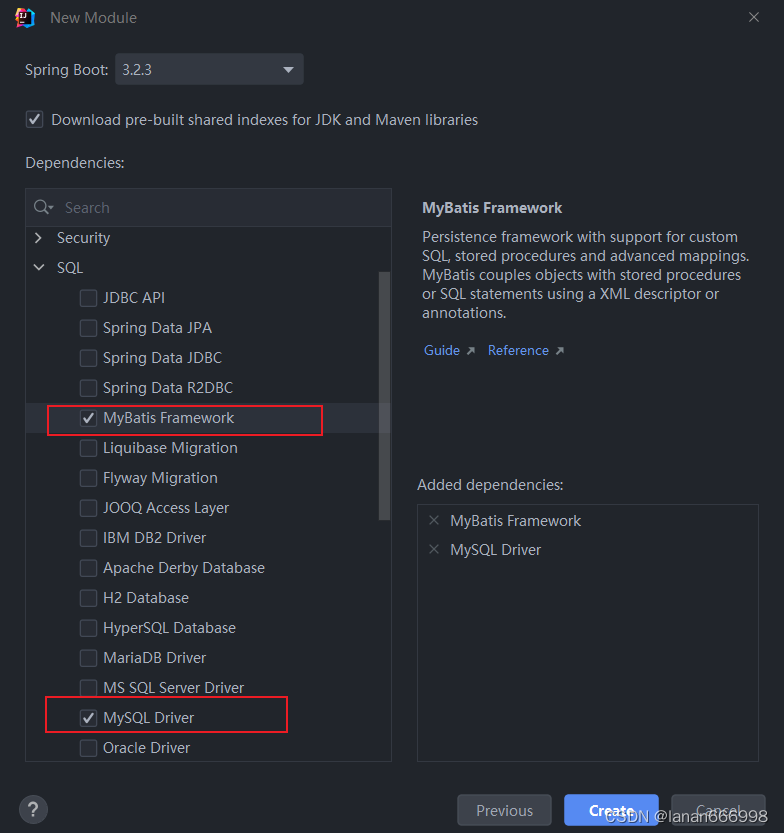
项目创建完成后,会自动在pom.xml文件中,导入 Mybatis依赖和 MySQL驱动依赖。
            org.mybatis.spring.boot
            mybatis-spring-boot-starter
            2.2.2


            com.mysql
            mysql-connector-j
            runtime
2、数据准备
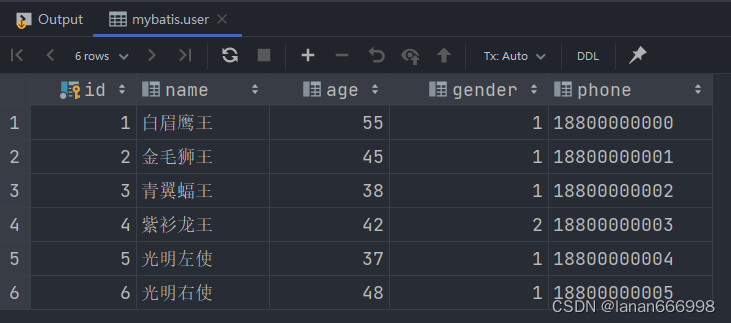
创建用户表user,并创建对应的实体类User。
用户表:
-- 用户表
create table user(
id int unsigned primary key auto_increment comment 'ID',
name varchar(100) comment '姓名',
age tinyint unsigned comment '年龄',
gender tinyint unsigned comment '性别, 1:男, 2:女',
phone varchar(11) comment '手机号'
) comment '用户表';
添加测试数据:
insert into user(id, name, age, gender, phone) VALUES (null,'白眉鹰王',55,'1','18800000000');
insert into user(id, name, age, gender, phone) VALUES (null,'金毛狮王',45,'1','18800000001');
insert into user(id, name, age, gender, phone) VALUES (null,'青翼蝠王',38,'1','18800000002');
insert into user(id, name, age, gender, phone) VALUES (null,'紫衫龙王',42,'2','18800000003');
insert into user(id, name, age, gender, phone) VALUES (null,'光明左使',37,'1','18800000004');
insert into user(id, name, age, gender, phone) VALUES (null,'光明右使',48,'1','18800000005');
查询数据:
创建实体类:
public class User {
private Integer id; //id(主键)
private String name; //姓名
private Short age; //年龄
private Short gender; //性别
private String phone; //手机号
//省略GET, SET方法
}
配置Mybatis
在之前使用图形化客户端工具,连接MySQL数据库时,需要配置:
连接数据库的四大参数:
-
MySQL驱动类
-
登录名
-
密码
-
数据库连接字符串
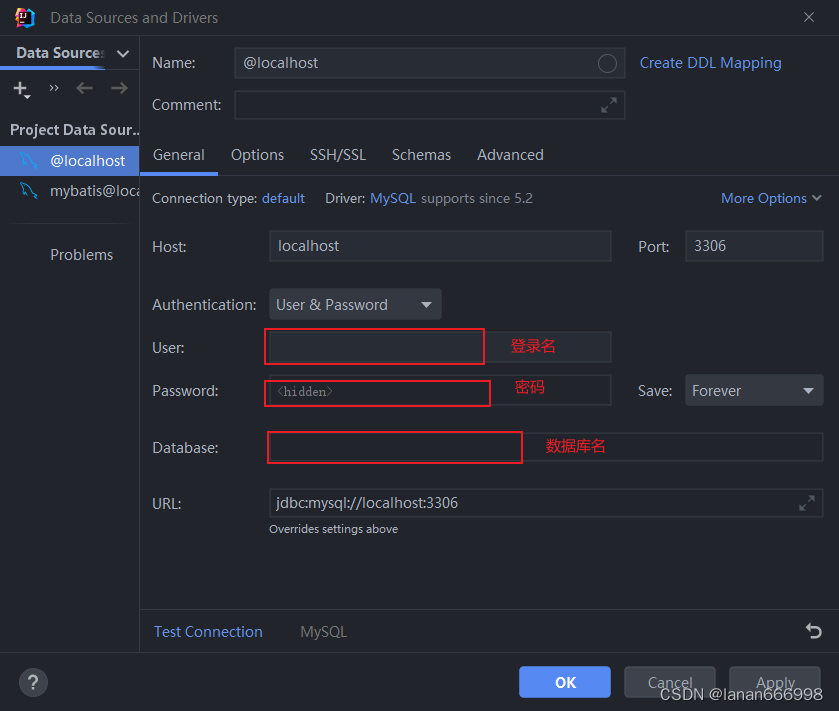
在springboot项目中,可以编写application.properties文件,配置数据库连接信息。我们要连接数据库,就需要配置数据库连接的基本信息,包括:driver-class-name、url 、username,password。 在入门程序中,大家可以直接这么配置,后面会介绍什么是驱动。
打开resources下的application.properties
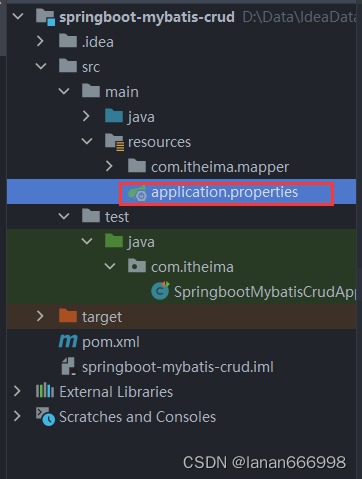
然后进行配置;
spring.datasource.driver-class-name=com.mysql.cj.jdbc.Driver
spring.datasource.url=jdbc:mysql://localhost:3306/mybatis
spring.datasource.username=root
spring.datasource.password=1234
编写SQL语句
在创建出来的springboot工程中,在引导类所在包下,在创建一个包 mapper。在mapper包下创建一个接口 UserMapper ,这是一个持久层接口(Mybatis的持久层接口规范一般都叫 XxxMapper)。
UserMapper:
import com.itheima.pojo.User;
import org.apache.ibatis.annotations.Mapper;
import org.apache.ibatis.annotations.Select;
import java.util.List;
@Mapper
public interface UserMapper {

    //查询所有用户数据
    @Select("select id, name, age, gender, phone from user")
    public List list();

}
@Mapper注解:表示是mybatis中的Mapper接口
-
程序运行时:框架会自动生成接口的实现类对象(代理对象),并给交Spring的IOC容器管理
@Select注解:代表的就是select查询,用于书写select查询语句
单元测试
在创建出来的SpringBoot工程中,在src下的test目录下,已经自动帮我们创建好了测试类 ,并且在测试类上已经添加了注解 @SpringBootTest,代表该测试类已经与SpringBoot整合。
该测试类在运行时,会自动通过引导类加载Spring的环境(IOC容器)。我们要测试那个bean对象,就可以直接通过@Autowired注解直接将其注入进行,然后就可以测试了。
测试类代码如下:
@SpringBootTest
public class MybatisQuickstartApplicationTests {

    @Autowired
    private UserMapper userMapper;

    @Test
    public void testList(){
        List userList = userMapper.list();
        for (User user : userList) {
            System.out.println(user);
        }
    }
}
运行结果:
User{id=1, name='白眉鹰王', age=55, gender=1, phone='18800000000'}
User{id=2, name='金毛狮王', age=45, gender=1, phone='18800000001'}
User{id=3, name='青翼蝠王', age=38, gender=1, phone='18800000002'}
User{id=4, name='紫衫龙王', age=42, gender=2, phone='18800000003'}
User{id=5, name='光明左使', age=37, gender=1, phone='18800000004'}
User{id=6, name='光明右使', age=48, gender=1, phone='18800000005'}
打开SQL提示和警告
默认我们在UserMapper接口上加的@Select注解中编写SQL语句是没有提示的。 如果想让idea给我们提示对应的SQL语句,我们需要在IDEA中配置与MySQL数据库的链接。 默认我们在UserMapper接口上的@Select注解中编写SQL语句是没有提示的。如果想让idea给出提示,可以做如下配置:
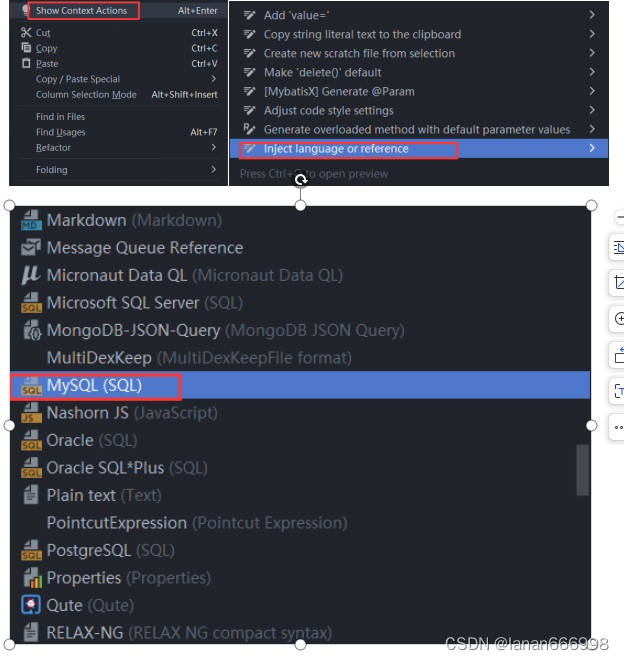
配置完成之后,发现SQL语句中的关键字有提示了.
三、基础操作(案例)
1、准备工作
实施前的准备工作:
-
准备数据库表
-
创建一个新的springboot工程,选择引入对应的起步依赖(mybatis、mysql驱动、lombok)
-
application.properties中引入数据库连接信息
-
创建对应的实体类 Emp(实体类属性采用驼峰命名)
-
准备Mapper接口 EmpMapper
准备数据库表
-- 部门管理
create table dept
(
    id          int unsigned primary key auto_increment comment '主键ID',
    name        varchar(10) not null unique comment '部门名称',
    create_time datetime    not null comment '创建时间',
    update_time datetime    not null comment '修改时间'
) comment '部门表';
-- 部门表测试数据
insert into dept (id, name, create_time, update_time)
values (1, '学工部', now(), now()),
       (2, '教研部', now(), now()),
       (3, '咨询部', now(), now()),
       (4, '就业部', now(), now()),
       (5, '人事部', now(), now());
-- 员工管理
create table emp
(
    id          int unsigned primary key auto_increment comment 'ID',
    username    varchar(20)      not null unique comment '用户名',
    password    varchar(32) default '123456' comment '密码',
    name        varchar(10)      not null comment '姓名',
    gender      tinyint unsigned not null comment '性别, 说明: 1 男, 2 女',
    image       varchar(300) comment '图像',
    job         tinyint unsigned comment '职位, 说明: 1 班主任,2 讲师, 3 学工主管, 4 教研主管, 5 咨询师',
    entrydate   date comment '入职时间',
    dept_id     int unsigned comment '部门ID',
    create_time datetime         not null comment '创建时间',
    update_time datetime         not null comment '修改时间'
) comment '员工表';
-- 员工表测试数据
INSERT INTO emp (id, username, password, name, gender, image, job, entrydate, dept_id, create_time, update_time)
VALUES
(1, 'jinyong', '123456', '金庸', 1, '1.jpg', 4, '2000-01-01', 2, now(), now()),
(2, 'zhangwuji', '123456', '张无忌', 1, '2.jpg', 2, '2015-01-01', 2, now(), now()),
(3, 'yangxiao', '123456', '杨逍', 1, '3.jpg', 2, '2008-05-01', 2, now(), now()),
(4, 'weiyixiao', '123456', '韦一笑', 1, '4.jpg', 2, '2007-01-01', 2, now(), now()),
(5, 'changyuchun', '123456', '常遇春', 1, '5.jpg', 2, '2012-12-05', 2, now(), now()),
(6, 'xiaozhao', '123456', '小昭', 2, '6.jpg', 3, '2013-09-05', 1, now(), now()),
(7, 'jixiaofu', '123456', '纪晓芙', 2, '7.jpg', 1, '2005-08-01', 1, now(), now()),
(8, 'zhouzhiruo', '123456', '周芷若', 2, '8.jpg', 1, '2014-11-09', 1, now(), now()),
(9, 'dingminjun', '123456', '丁敏君', 2, '9.jpg', 1, '2011-03-11', 1, now(), now()),
(10, 'zhaomin', '123456', '赵敏', 2, '10.jpg', 1, '2013-09-05', 1, now(), now()),
(11, 'luzhangke', '123456', '鹿杖客', 1, '11.jpg', 5, '2007-02-01', 3, now(), now()),
(12, 'hebiweng', '123456', '鹤笔翁', 1, '12.jpg', 5, '2008-08-18', 3, now(), now()),
(13, 'fangdongbai', '123456', '方东白', 1, '13.jpg', 5, '2012-11-01', 3, now(), now()),
(14, 'zhangsanfeng', '123456', '张三丰', 1, '14.jpg', 2, '2002-08-01', 2, now(), now()),
(15, 'yulianzhou', '123456', '俞莲舟', 1, '15.jpg', 2, '2011-05-01', 2, now(), now()),
(16, 'songyuanqiao', '123456', '宋远桥', 1, '16.jpg', 2, '2010-01-01', 2, now(), now()),
(17, 'chenyouliang', '123456', '陈友谅', 1, '17.jpg', NULL, '2015-03-21', NULL, now(), now());
创建一个新的springboot工程,选择引入对应的起步依赖(mybatis、mysql驱动、lombok)
application.properties中引入数据库连接信息 :
#驱动类名称
spring.datasource.driver-class-name=com.mysql.cj.jdbc.Driver
#数据库连接的url
spring.datasource.url=jdbc:mysql://localhost:3306/mybatis
#连接数据库的用户名
spring.datasource.username=root
#连接数据库的密码
spring.datasource.password=1234
创建对应的实体类Emp(实体类属性采用驼峰命名)
@Data
@NoArgsConstructor
@AllArgsConstructor
public class Emp {
    private Integer id;
    private String username;
    private String password;
    private String name;
    private Short gender;
    private String image;
    private Short job;
    private LocalDate entrydate;     //LocalDate类型对应数据表中的date类型
    private Integer deptId;
    private LocalDateTime createTime;//LocalDateTime类型对应数据表中的datetime类型
    private LocalDateTime updateTime;
}
**@Data 注解:为类中的属性提供get方法,set方法和tostring方法
**@NoArgsConstructor 注解:提供无参构造
**@AllArgsConstructor 注解:提供全参构造
准备Mapper接口:EmpMapper
/*@Mapper注解:表示当前接口为mybatis中的Mapper接口
  程序运行时会自动创建接口的实现类对象(代理对象),并交给Spring的IOC容器管理
*/
@Mapper
public interface EmpMapper {
}
2、功能实现
2.1 删除
功能:根据主键删除数据
SQL语句
-- 删除id=17的数据
delete from emp where id = 1;
接口方法
@Mapper
public interface EmpMapper {
    // 根据id删除数据。
    @Delete("delete from emp where id = #{id} ")
    public void delete(Integer id);
@Delete注解:用于编写delete操作的SQL语句
如果mapper接口方法形参只有一个普通类型的参数,#{…} 里面的属性名可以随便写,如:#{id}、#{value}。但是建议保持名字一致。
测试
@SpringBootTest
class SpringbootMybatisCrudApplicationTests {
    @Autowired
    private EmpMapper empMapper;
    @Test
    public void testDel() {
        // 调用删除方法
        empMapper.delete(1);
    }
运行前:

运行后:


2.2 预编译SQL
预编译SQL有两个优势:
性能更高:预编译SQL,编译一次之后会将编译后的SQL语句缓存起来,后面再次执行这条语句时,不会再次编译。(只是输入的参数不同)
更安全(防止SQL注入):将敏感字进行转义,保障SQL的安全性。
SQL注入
SQL注入:是通过操作输入的数据来修改事先定义好的SQL语句,以达到执行代码对服务器进行攻击的方法。 由于没有对用户输入进行充分检查,而SQL又是拼接而成,在用户输入参数时,在参数中添加一些SQL关键字,达到改变SQL运行结果的目的,也可以完成恶意攻击。
什么原因导致了改变SQL运行结果?
由于没有对用户输入内容进行充分检查,而SQL又是字符串拼接方式而成,在用户输入参数时,在参数中添加一些SQL关键字,达到改变SQL运行结果的目的,从而完成恶意攻击。
参数占位符
在Mybatis中提供的参数占位符有两种:${...} 、#{...}
-
#{...}
-
执行SQL时,会将#{…}替换为?,生成预编译SQL,会自动设置参数值
-
使用时机:参数传递,都使用#{…}
-
-
${...}
-
拼接SQL。直接将参数拼接在SQL语句中,存在SQL注入问题
-
使用时机:如果对表名、列表进行动态设置时使用
注意事项:在项目开发中,建议使用#{...},生成预编译SQL,防止SQL注入安全。
2.3 新增
员工表结构:
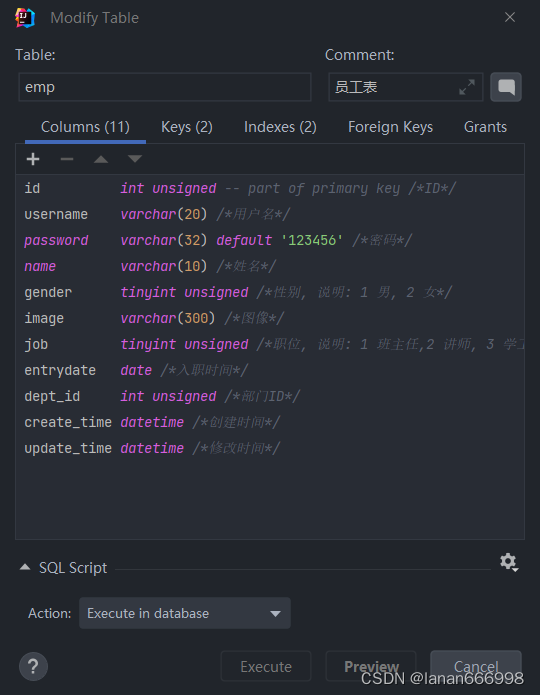
SQL语句:
insert into emp(username, name, gender, image, job, entrydate, dept_id, create_time, update_time)
values ('songyuanqiao', '宋远桥', 1, '1.jpg', 2, '2012-10-09', 2, '2022-10-01 10:00:00', '2022-10-01 10:00:00');
接口方法:
@Mapper
public interface EmpMapper {
    // 新增员工的操作
    @Insert("insert into emp(username, name, gender, image, job, entrydate, dept_id, create_time, update_time)" +
            "values (#{username},#{name},#{gender},#{image},#{job},#{entrydate},#{deptId},#{createTime},#{updateTime});")
    public void insert(Emp emp);
测试类:
@SpringBootTest
class SpringbootMybatisCrudApplicationTests {
    @Autowired
    private EmpMapper empMapper;
    @Test
    public void testInsert(){
        Emp emp = new Emp();
        emp.setUsername("Tom2");
        emp.setName("汤姆2");
        emp.setImage("1.jpg");
        emp.setGender((short)1);
        emp.setJob((short)1);
        emp.setEntrydate(LocalDate.of(2000,1,1));
        emp.setCreateTime(LocalDateTime.now());
        emp.setUpdateTime(LocalDateTime.now());
        emp.setDeptId(1);
        empMapper.insert(emp);
        System.out.println(emp.getId());
    }
日志输出:

2.4 主键返回
概念:在数据添加成功后,需要获取插入数据库数据的主键。
那要如何实现在插入数据之后返回所插入行的主键值呢?
默认情况下,执行插入操作时,是不会主键值返回的。如果我们想要拿到主键值,需要在Mapper接口中的方法上添加一个Options注解,并在注解中指定属性useGeneratedKeys=true和keyProperty="实体类属性名"
主键返回代码实现:
@Mapper
public interface EmpMapper {
    // 新增员工的操作
    @Options(keyProperty = "id",useGeneratedKeys = true)
    @Insert("insert into emp(username, name, gender, image, job, entrydate, dept_id, create_time, update_time)" +
            "values (#{username},#{name},#{gender},#{image},#{job},#{entrydate},#{deptId},#{createTime},#{updateTime});")
测试:
@SpringBootTest
class SpringbootMybatisCrudApplicationTests {
    @Autowired
    private EmpMapper empMapper;
    @Test
    public void testInsert(){
        Emp emp = new Emp();
        emp.setUsername("Tom2");
        emp.setName("汤姆2");
        emp.setImage("1.jpg");
        emp.setGender((short)1);
        emp.setJob((short)1);
        emp.setEntrydate(LocalDate.of(2000,1,1));
        emp.setCreateTime(LocalDateTime.now());
        emp.setUpdateTime(LocalDateTime.now());
        emp.setDeptId(1);
        empMapper.insert(emp);
        System.out.println(emp.getId());
    }
结果如下:

2.5 更新
功能:修改员工信息
SQL语句:
# 修改员工信息
update emp
set username    = 'linghushaoxia',
    name        = '令狐少侠',
    gender      = 1,
    image       = '1.jpg',
    job         = 2,
    entrydate   = '2012-01-01',
    dept_id     = 2,
    update_time = '2022-10-01 12:12:12'
where id = 18;
接口方法:
    @Mapper
    public interface EmpMapper {
    // 更新员工数据
    @Update("update emp set username=#{username},name=#{name},gender=#{gender},image=#{image},job=#{job}," +
            "entrydate=#{entrydate},dept_id=#{deptId},update_time=#{updateTime} where id=#{id}")
    public void update(Emp emp);
测试类:
@SpringBootTest
class SpringbootMybatisCrudApplicationTests {
    @Autowired
    private EmpMapper empMapper;
    //修改员工信息
    @Test
    public void testUpdate(){
        Emp emp = new Emp();
        emp.setId(21);
        emp.setUsername("Tom3");
        emp.setName("汤姆3");
        emp.setImage("2.jpg");
        emp.setGender((short)1);
        emp.setJob((short)2);
        emp.setEntrydate(LocalDate.of(2012,1,1));
        emp.setUpdateTime(LocalDateTime.now());
        emp.setDeptId(2);
        //调用方法,修改员工数据
        empMapper.update(emp);
    }
2.6 查询
根据ID查询
在员工管理的页面中,当我们进行更新数据时,会点击 “编辑” 按钮,然后此时会发送一个请求到服务端,会根据Id查询该员工信息,并将员工数据回显在页面上。
SQL语句:
-- 条件查询员工信息
select id, username, password, name, gender, image, job, entrydate, dept_id, create_time, update_time
from emp
where name like '%张%'
  and gender = 1
  and entrydate between '2010-01-01' and '2020-01-01 '
order by update_time desc;
接口方法:
@Mapper
public interface EmpMapper {
//    根据Id来查询员工数据
   @Select("select id, username, password, name, gender, image, job, entrydate, dept_id, "
    +    "create_time, update_time from emp where id = #{id}")
    public Emp getById(Integer id);
测试类:
   @SpringBootTest
class SpringbootMybatisCrudApplicationTests {
    @Autowired
    private EmpMapper empMapper;
    //根据id来查询
    @Test
    public void testGetById(){
        Emp emp = empMapper.getById(2);
        System.out.println(emp);
    }
运行结果:

数据封装
我们看到查询返回的结果中大部分字段是有值的,但是deptId,createTime,updateTime这几个字段是没有值的,而数据库中是有对应的字段值的,这是为什么呢?

原因如下:
-
实体类属性名和数据库表查询返回的字段名一致,mybatis会自动封装。
-
如果实体类属性名和数据库表查询返回的字段名不一致,不能自动封装。
解决方案:
-
起别名
-
结果映射
-
开启驼峰命名
起别名 :在SQL语句中,对不一样的列名起别名,别名和实体类属性名一样
    // 方法一:起别名
        @Select("select id, username, password, name, gender, image, job, entrydate, dept_id deptId, " +
             "create_time createTime, update_time updateTime from emp where id = #{id}")
        public Emp getById(Integer id);
手动结果映射:通过 @Results及@Result 进行手动结果映射
@Results({@Result(column = "dept_id", property = "deptId"),
@Result(column = "create_time", property = "createTime"),
@Result(column = "update_time", property = "updateTime")})
@Select("select id, username, password, name, gender, image, job, entrydate, dept_id, create_time, update_time from emp where id=#{id}")
public Emp getById(Integer id);
注:这种方式很繁琐,工作时大概率不会用到;这里标出只是介绍一下,了解即可。
开启驼峰命名(推荐):如果字段名与属性名符合驼峰命名规则,mybatis会自动通过驼峰命名规则映射
驼峰命名规则: abc_xyz => abcXyz
-
表中字段名:abc_xyz
-
类中属性名:abcXyz
# 在application.properties中添加:
mybatis.configuration.map-underscore-to-camel-case=true
注:要使用驼峰命名前提是 实体类的属性 与 数据库表中的字段名严格遵守驼峰命名。
条件查询
在员工管理的列表页面中,我们需要根据条件查询员工信息,查询条件包括:姓名、性别、入职时间。
通过页面原型以及需求描述我们要实现的查询:
-
姓名:要求支持模糊匹配
-
性别:要求精确匹配
-
入职时间:要求进行范围查询
-
根据最后修改时间进行降序排序
SQL语句:
-- concat 字符串拼接函数
select concat('hello',' nihao',' 你好');
-- 条件查询员工信息
select id, username, password, name, gender, image, job, entrydate, dept_id, create_time, update_time
from emp
where name like concat('%','张','%')
  and gender = 1
  and entrydate between '2010-01-01' and '2020-01-01 '
order by update_time desc;
接口方法:
-
方式一
    //条件查询员工信息,可能是多条记录,用集合来存储
        @Select("select id, username, password, name, gender, image, job, entrydate, dept_id, create_time, update_time " +
            "from emp " +
            "where name like concat('%',#{name},'%')" +
            "  and gender = #{gender}" +
            "  and entrydate between #{begin} and #{end} " +
            "order by update_time desc;")
    public List list(String name, Short gender, LocalDate begin, LocalDate end);
以上方式注意事项:
-
方法中的形参名和SQL语句中的参数占位符名保持一致
-
模糊查询使用${...}进行字符串拼接,这种方式呢,由于是字符串拼接,并不是预编译的形式,所以效率不高、且存在sql注入风险。
方式二(解决SQL注入风险)
使用MySQL提供的字符串拼接函数:concat('%' , '关键字' , '%')
    // 条件查询员工信息,可能是多条记录,用集合来存储,并且解决SQL注入问题
    @Select("select id, username, password, name, gender, image, job, entrydate, dept_id, create_time, update_time " +
            "from emp " +
            "where name like concat('%',#{name},'%')" +
            "  and gender = #{gender}" +
            "  and entrydate between #{begin} and #{end} " +
            "order by update_time desc;")
    public List list(String name, Short gender, LocalDate begin, LocalDate end);
测试类:
    @Test
    public void testlist(){
        List empList = empMapper.list("Tom", (short) 1, LocalDate.of(2001,1,1), LocalDate.of(2015,1,1));
        System.out.println(empList);
    }
3、Mybatis的XML配置文件
3.1 XML配置文件规范
使用Mybatis的注解方式,主要是来完成一些简单的增删改查功能。如果需要实现复杂的SQL功能,建议使用XML来配置映射语句,也就是将SQL语句写在XML配置文件中。
在Mybatis中使用XML映射文件方式开发,需要符合一定的规范:
-
XML映射文件的名称与Mapper接口名称一致,并且将XML映射文件和Mapper接口放置在相同包下(同包同名)
-
XML映射文件的namespace属性为Mapper接口全限定名一致
-
XML映射文件中sql语句的id与Mapper接口中的方法名一致,并保持返回类型一致。
标签:就是用于编写select查询语句的。
-
resultType属性,指的是查询返回的单条记录所封装的类型。
3.2 XML配置文件实现
第1步:创建XML映射文件
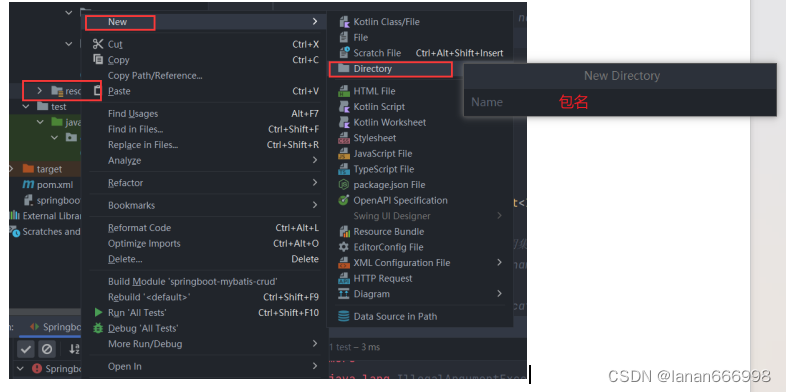
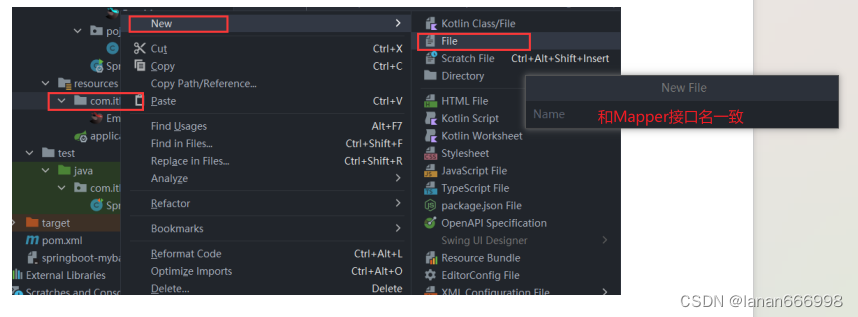
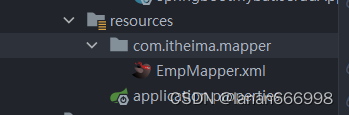
第2步:编写XML映射文件
xml映射文件中的dtd约束,直接从mybatis官网复制即可
配置:XML映射文件的namespace属性为Mapper接口全限定名
配置:XML映射文件中sql语句的id与Mapper接口中的方法名一致,并保持返回类型一致
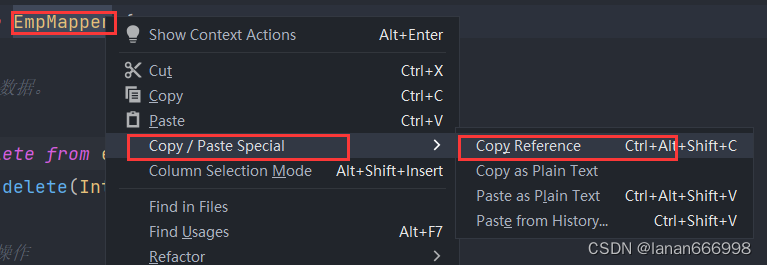
        select * from emp
        where name like concat('%',#{name},'%')
              and gender = #{gender}
              and entrydate between #{begin} and #{end}
        order by update_time desc
3.3 MybatisX的使用
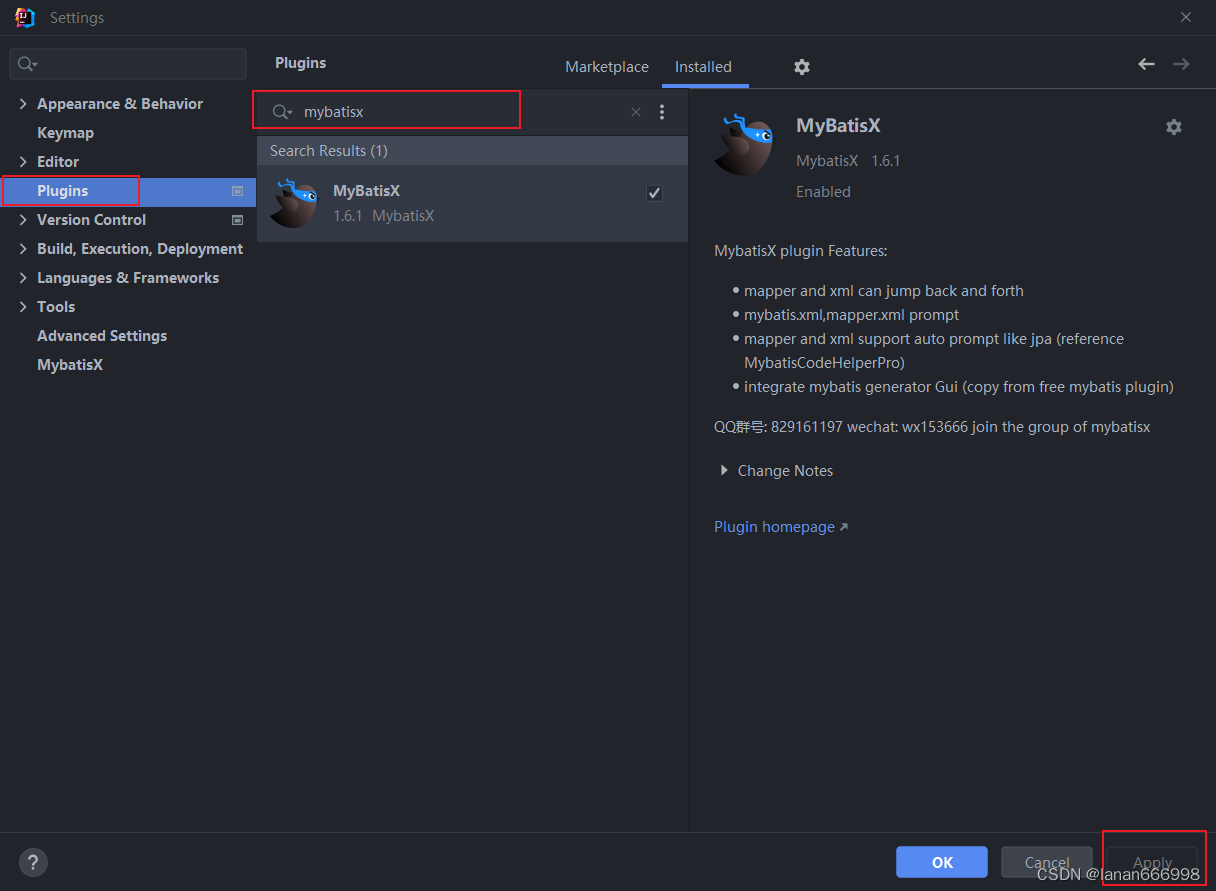
MybatisX是一款基于IDEA的快速开发Mybatis的插件,为效率而生。
MybatisX的安装:
学习了Mybatis中XML配置文件的开发方式了,大家可能会存在一个疑问:到底是使用注解方式开发还是使用XML方式开发?

结论:使用Mybatis的注解,主要是来完成一些简单的增删改查功能。如果需要实现复杂的SQL功能,建议使用XML来配置映射语句。
4、动态SQL
4.1 什么是动态SQL?
在我们刚才编写的SQL语句中,我们会看到,我们将三个条件直接写死了。 如果页面只传递了参数姓名name 字段,其他两个字段 性别 和 入职时间没有传递,那么这两个参数的值就是null。

这个查询结果是不正确的。正确的做法应该是:传递了参数,再组装这个查询条件;如果没有传递参数,就不应该组装这个查询条件。
比如:如果姓名输入了"张", 对应的SQL为:
select * from emp where name like '%张%' order by update_time desc;
如果姓名输入了"张",,性别选择了"男",则对应的SQL为:
select * from emp where name like '%张%' and gender = 1 order by update_time desc;
SQL语句会随着用户的输入或外部条件的变化而变化,我们称为:动态SQL。
在Mybatis中提供了很多实现动态SQL的标签,我们学习Mybatis中的动态SQL就是掌握这些动态SQL标签。
4.2 动态SQL-if
:用于判断条件是否成立。使用test属性进行条件判断,如果条件为true,则拼接SQL。
要拼接的sql语句
接下来,我们就通过标签来改造之前条件查询的案例。
条件查询
重点:使用标签代替SQL语句中的where关键字
只会在子元素有内容的情况下才插入where子句,而且会自动去除子句的开头的AND或OR。(上面的操作我已经使用了)
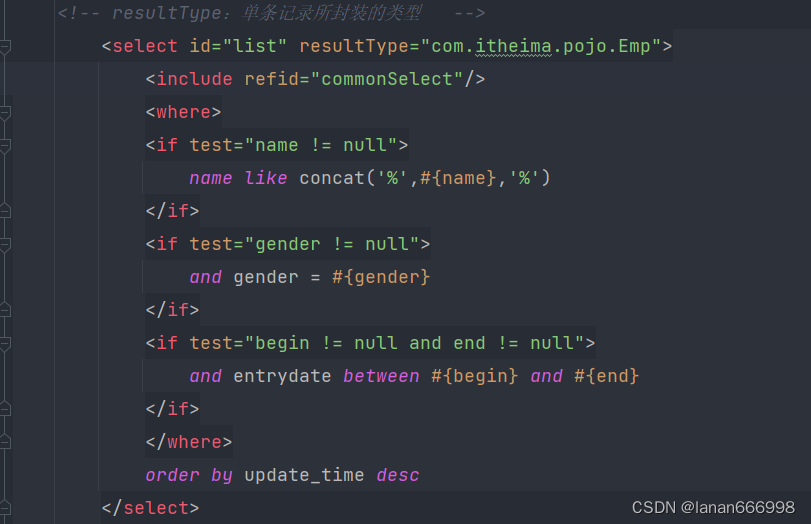
原有的SQL语句
        select * from emp
        where name like concat('%',#{name},'%')
              and gender = #{gender}
              and entrydate between #{begin} and #{end}
        order by update_time desc
动态SQL语句
                name like concat('%',#{name},'%')


                and gender = #{gender}


                and entrydate between #{begin} and #{end}


            order by update_time desc
测试方法:
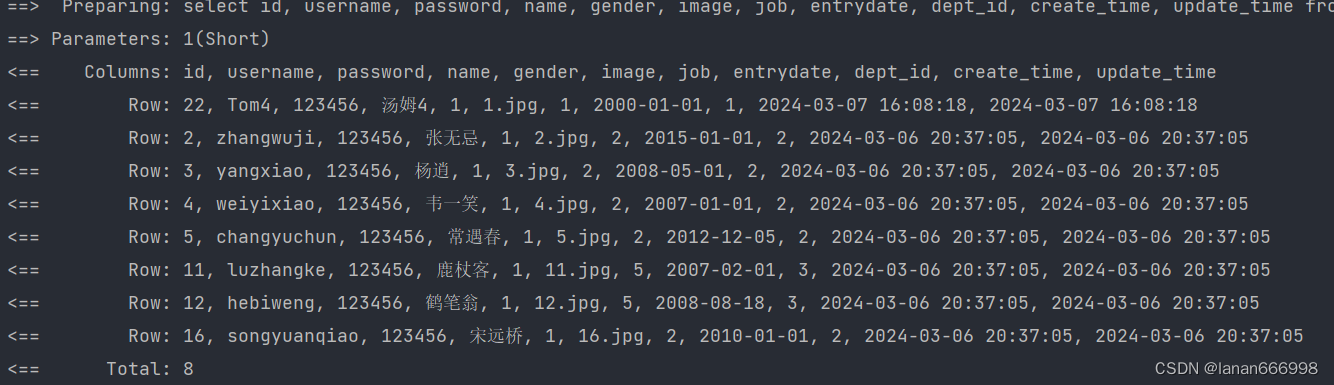
    @Test
    public void testlist(){
        List empList = empMapper.list(null, (short) 1, null, null);
        System.out.println(empList);
    }
运行结果:
更新员工
动态更新员工信息,如果更新时传递有值,则更新;如果更新时没有传递值,则不更新。
重点:使用标签代替SQL语句中的set关键字
:动态的在SQL语句中插入set关键字,并会删掉额外的逗号。(用于update语句中)
修改Mapper接口:
 @Mapper
public interface EmpMapper {
    //删除@Update注解编写的SQL语句
    //update操作的SQL语句编写在Mapper映射文件中
    public void update(Emp emp);
}
修改Mapper映射文件:
    update emp


        username=#{username},


        name=#{name},


        gender=#{gender},


        image=#{image},


        job=#{job},


        entrydate=#{entrydate},


        dept_id=#{deptId},


        update_time=#{updateTime}


    where id=#{id}
测试方法:
@Test
public void testUpdate2(){
        //要修改的员工信息
        Emp emp = new Emp();
        emp.setId(20);
        emp.setUsername("Tom111");
        emp.setName("汤姆111");
        emp.setUpdateTime(LocalDateTime.now());
        //调用方法,修改员工数据
        empMapper.update(emp);
}
运行结果:

小结:
1、
用于判断条件是否成立,如果成立为true,否则拼接SQL
形式: …
2、
where元素只会在子元素有内容的情况下才插入where子句,而且会自动去除子句的开头的AND或OR
3、
动态地在行首插入 SET 关键字,并会删掉额外的逗号。(用在update语句中)
4.3 动态SQL-foreach
案例:员工删除功能(既支持删除单条记录,又支持批量删除)
SQL语句:
delete from emp where id in (1,2,3);
Mapper接口:
@Mapper
public interface EmpMapper {
    //批量删除
    public void deleteByIds(List ids);
}
XML映射文件:
使用遍历deleteByIds方法中传递的参数ids集合
        delete from emp where id in

            #{id}
执行的SQL语句:

4.4 动态SQL-sql&include
问题分析:
在xml映射文件中配置的SQL,有时可能会存在很多重复的片段,此时就会存在很多冗余的代码
select id, username, password, name, gender, image, job, entrydate, dept_id, create_time, update_time from emp
我们可以对重复的代码片段进行抽取,将其通过标签封装到一个SQL片段,然后再通过标签进行引用。
-
:定义可重用的SQL片段
-
:通过属性refid,指定包含的SQL片段
SQL片段: 抽取重复的代码
    //抽取重复的代码

        select id, username, password, name, gender, image, job, entrydate, dept_id, create_time, update_time
        from emp
然后通过 标签在原来抽取的地方进行引用。操作如下:
                name like concat('%',#{name},'%')


                and gender = #{gender}


                and entrydate between #{begin} and #{end}


            order by update_time desc
注:本文是一篇比较详细的笔记,记录的是小朕这几天的学习和实战内容,所以篇幅比较长。当对Mybatis的使用有较为熟练后,小朕后续还会写更为精简和使用的总结,从而在整体框架和源码层面来掌握mybatis。至此,小朕这篇的干货就分享完了,如果还有疑问,可以在评论区发表,到时候一起解决,共同进步。
-
-
-
-
-
-
-
-


