
在Windows或Mac上安装并运行LLAMA2
温馨提示:这篇文章已超过394天没有更新,请注意相关的内容是否还可用!
llama.cpp 的主要目标是在本地和云端的各种硬件上以最少的设置和最先进的性能实现 LLM 推理。没有任何依赖的纯 C/C++ 实现(Plain C/C++ implementation without any dependencies)
Llama.cpp在不同系统上运行的结果
LLAMA.cpp 在windows 上运行的结果

LLAMA.cpp 在Mac上运行的结果

安装llama.cpp的不同方法
方法一:
编译 llama.cpp
克隆 llama.cpp
git clone https://github.com/ggerganov/llama.cpp.git
编译llama.cpp
on mac
LLAMA_METAL=1 make
on windows , 用powershell 运行
make
如果不行,就要下载最新的fortran版本 w64devkit.

然后解压,运行w64devkit.exe后再运行make命令。
下载llama2模型
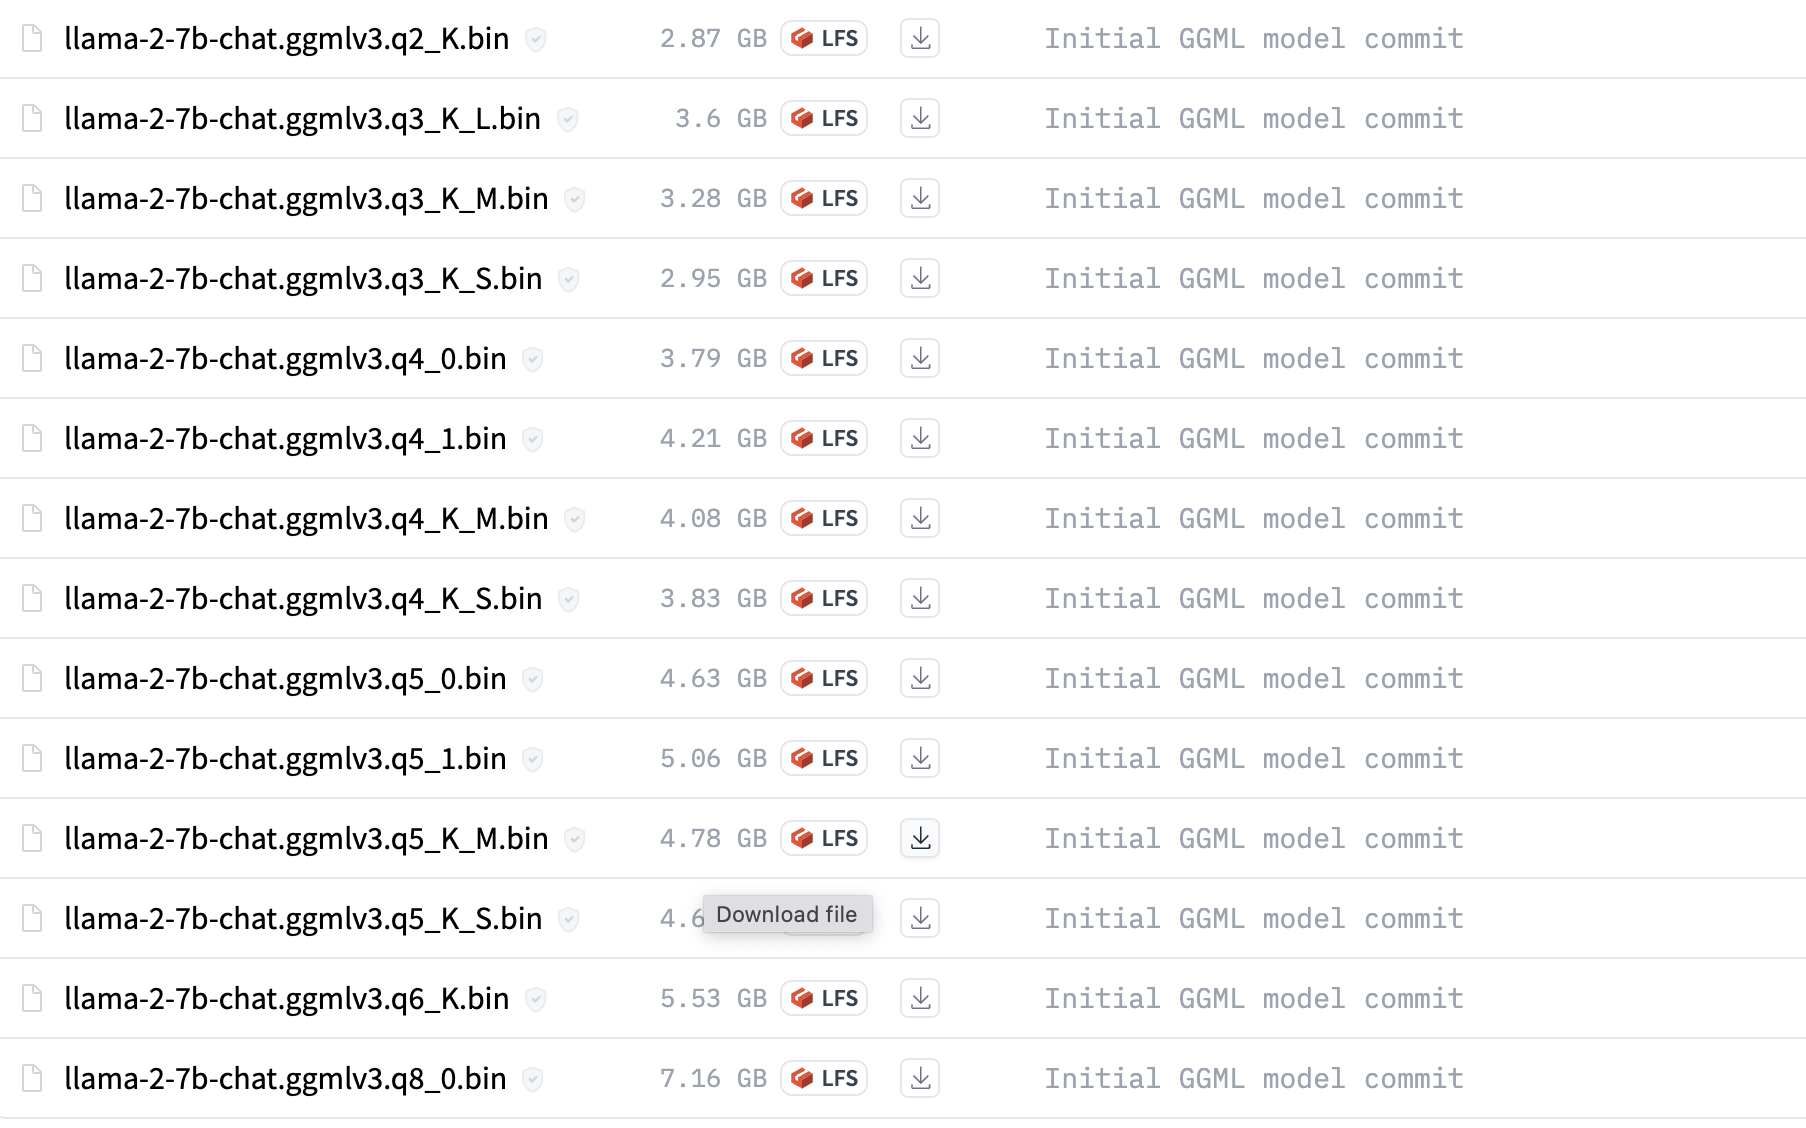
直接在huggingface里下载量化了的 gguf格式的llama2模型。
https://huggingface.co/TheBloke/Llama-2-7B-Chat-GGUF/tree/main
我下载的是llama-2-7b-chat.Q4_0.gguf
拷贝llama-2-7b-chat.Q4_0.gguf 到llama.cpp目录里的models目录里
运行模型
如果是windows,要用powershell
./main -m ./models/llama-2-7b-chat.Q4_0.gguf --color --ctx_size 2048 -n -1 -ins -b 256 --top_k 10000 --temp 0.2 --repeat_penalty 1.1 -t 8
用Python code 运行。
1. 配置下面系统变量
$env:CMAKE_GENERATOR = "MinGW Makefiles"
$env:CMAKE_ARGS = "-DCMAKE_C_COMPILER=C:/apps/w64devkit/bin/gcc.exe -DCMAKE_CXX_COMPILER=C:/apps/w64devkit/bin/g++.exe"
2. 安装 llama-cpp-python
3. 运行下面代码
from llama_cpp import Llama

# Instanciate the nous-hermes model
my_gguf_llama_model = Llama(model_path="./llama2-7b-nous-hermes-8-bit.gguf")


prompt = "Write a java code that prints hello"
max_tokens = 100
temperature = 0
echo = False
stop = ["Q", "\n"]


# Define the inference parameters and run the model...in cpu
model_output =  my_gguf_llama_model(
       prompt,
       max_tokens=max_tokens,
       temperature=temperature,
       echo=echo,
       stop=stop,
   )
final_result = model_output["choices"][0]["text"]
方法二:
Meta已将llama2开源,任何人都可以通过在meta ai上申请并接受许可证、提供电子邮件地址来获取模型。 Meta 将在电子邮件中发送下载链接。

下载llama2
- 获取download.sh文件,将其存储在mac上
- 打开mac终端,执行 chmod +x ./download.sh 赋予权限。
- 运行 ./download.sh 开始下载过程
- 复制电子邮件中的下载链接,粘贴到终端
- 仅下载13B-chat
安装系统依赖的东西
必须安装 Xcode 才能编译 C++ 项目。 如果您没有,请执行以下操作:
xcode-select --install
接下来,安装用于构建 C++ 项目的依赖项。
brew install pkgconfig cmake
最后,我们安装 Torch。
如果您没有安装python3,请通过以下方式安装
brew install python@3.11
像这样创建一个虚拟环境:
/opt/homebrew/bin/python3.11 -m venv venv
激活 venv。
source venv/bin/activate
安装 PyTorch:
pip install --pre torch torchvision --extra-index-url https://download.pytorch.org/whl/nightly/cpu
编译 llama.cpp
克隆 llama.cpp
git clone https://github.com/ggerganov/llama.cpp.git
安装python依赖包
pip3 install -r requirements.txt
编译
LLAMA_METAL=1 make

如果你有两个arch (x86_64, arm64), 可以用下面指定arm64
arch -arm64 make


将下载的 13B 移至 models 文件夹下的 llama.cpp 项目。

将模型转换为ggml格式
13B和70B是不一样的。 Convert-pth-to-ggml.py 已弃用,请使用 Convert.py 代替
13B-chat
python3 convert.py --outfile ./models/llama-2-13b-chat/ggml-model-f16.bin --outtype f16 ./models/llama-2-13b-chat
Quantize 模型:
In order to run these huge LLMs in our small laptops we will need to reconstruct and quantize the model with the following commands, here we will convert the model’s weights from float16 to int4 requiring less memory to be executed and only losing a little bit of quality in the process.
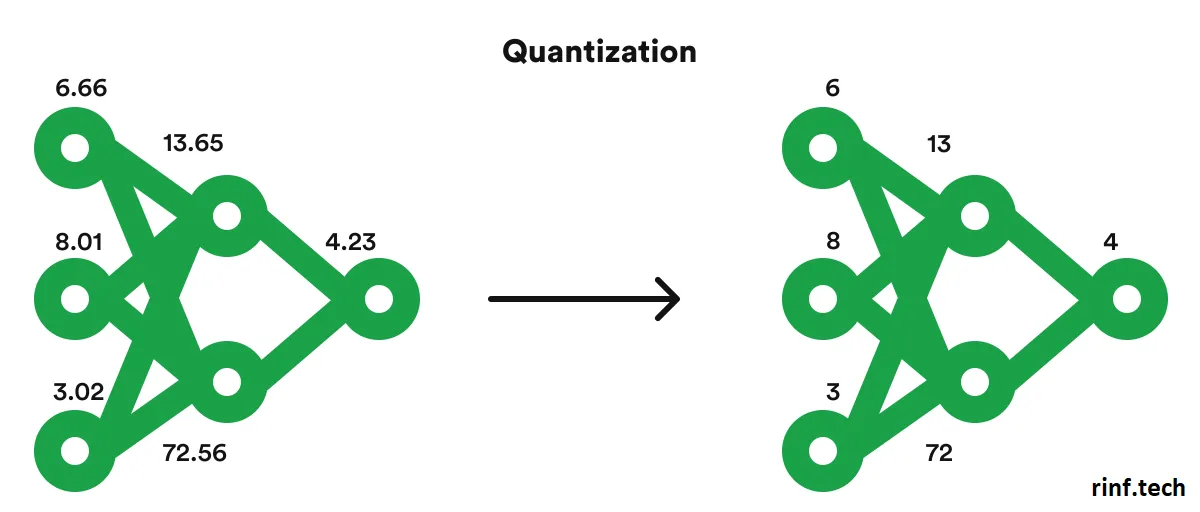
13B-chat:
./quantize ./models/llama-2-13b-chat/ggml-model-f16.bin ./models/llama-2-13b-chat/ggml-model-q4_0.bin q4_0
运行模型
./main -m ./models/llama-2-13b-chat/ggml-model-q4_0.bin -t 4 -c 2048 -n 2048 --color -i -r '### Question:' -p '### Question:'
您可以使用 -ngl 1 命令行参数启用 GPU 推理。 任何大于 0 的值都会将计算负载转移到 GPU。 例如:
./main -m ./models/llama-2-13b-chat/ggml-model-q4_0.bin -t 4 -c 2048 -n 2048 --color -i -ngl 1 -r '### Question:' -p '### Question:'
在我的 Mac 上测试时,它比纯 cpu 快大约 25%。
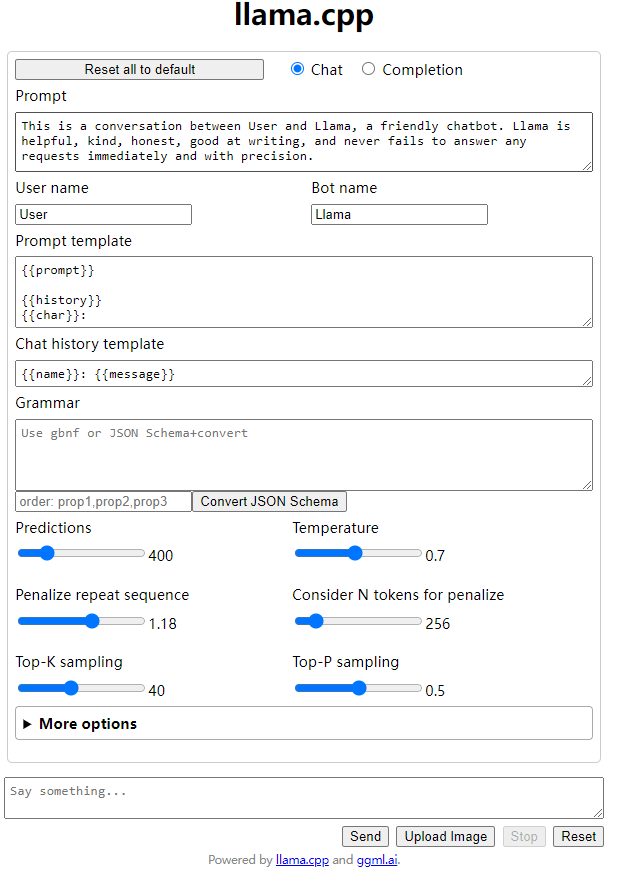
用Web server 的方式运行Llama.cpp
在powershell 上运行下面命令
./server -m ./models/llama-2-7b-chat.Q4_0.gguf
其它参数
options:
  -h, --help                show this help message and exit
  -v, --verbose             verbose output (default: disabled)
  -t N, --threads N         number of threads to use during computation (default: 4)
  -tb N, --threads-batch N  number of threads to use during batch and prompt processing (default: same as --threads)
  -c N, --ctx-size N        size of the prompt context (default: 512)
  --rope-scaling {none,linear,yarn}
                            RoPE frequency scaling method, defaults to linear unless specified by the model
  --rope-freq-base N        RoPE base frequency (default: loaded from model)
  --rope-freq-scale N       RoPE frequency scaling factor, expands context by a factor of 1/N
  --yarn-ext-factor N       YaRN: extrapolation mix factor (default: 1.0, 0.0 = full interpolation)
  --yarn-attn-factor N      YaRN: scale sqrt(t) or attention magnitude (default: 1.0)
  --yarn-beta-slow N        YaRN: high correction dim or alpha (default: 1.0)
  --yarn-beta-fast N        YaRN: low correction dim or beta (default: 32.0)
  -b N, --batch-size N      batch size for prompt processing (default: 512)
  --memory-f32              use f32 instead of f16 for memory key+value (default: disabled)
                            not recommended: doubles context memory required and no measurable increase in quality
  --mlock               force system to keep model in RAM rather than swapping or compressing
  --no-mmap             do not memory-map model (slower load but may reduce pageouts if not using mlock)
  --numa                attempt optimizations that help on some NUMA systems
  -ngl N, --n-gpu-layers N
                        number of layers to store in VRAM
  -ts SPLIT --tensor-split SPLIT
                        how to split tensors across multiple GPUs, comma-separated list of proportions, e.g. 3,1
  -mg i, --main-gpu i   the GPU to use for scratch and small tensors
  -nommq, --no-mul-mat-q
                        use cuBLAS instead of custom mul_mat_q CUDA kernels.
                        Not recommended since this is both slower and uses more VRAM.
  -m FNAME, --model FNAME
                        model path (default: models/7B/ggml-model-f16.gguf)
  -a ALIAS, --alias ALIAS
                        set an alias for the model, will be added as `model` field in completion response
  --lora FNAME          apply LoRA adapter (implies --no-mmap)
  --lora-base FNAME     optional model to use as a base for the layers modified by the LoRA adapter
  --host                ip address to listen (default  (default: 127.0.0.1)
  --port PORT           port to listen (default  (default: 8080)
  --path PUBLIC_PATH    path from which to serve static files (default examples/server/public)
  -to N, --timeout N    server read/write timeout in seconds (default: 600)
  --embedding           enable embedding vector output (default: disabled)
  -np N, --parallel N   number of slots for process requests (default: 1)
  -cb, --cont-batching  enable continuous batching (a.k.a dynamic batching) (default: disabled)
    -spf FNAME, --system-prompt-file FNAME
                        Set a file to load a system prompt (initial prompt of all slots), this is useful for chat applications.
  --mmproj MMPROJ_FILE  path to a multimodal projector file for LLaVA.
访问
http://127.0.0.1:8080/
你也可以用Python代码用post url 访问
import requests
from file_reader import *
from nltk_test.punkt_test import *
def chat(prompt, history):
    resp = requests.post(
        url = "http://localhost:8080/completion",
        json={"prompt":prompt , "history": history},
        # data = '{"prompt": "Building a website can be done in 10 simple steps:","n_predict": 128}',
        headers={"Content-Type": "application/json;charset=utf-8"}
    )
    print(resp.json())
    return resp.json()["content"]
if __name__ == '__main__':
    prompt = "hi"
    chat(prompt, [])
运行huggingface版本的llama2
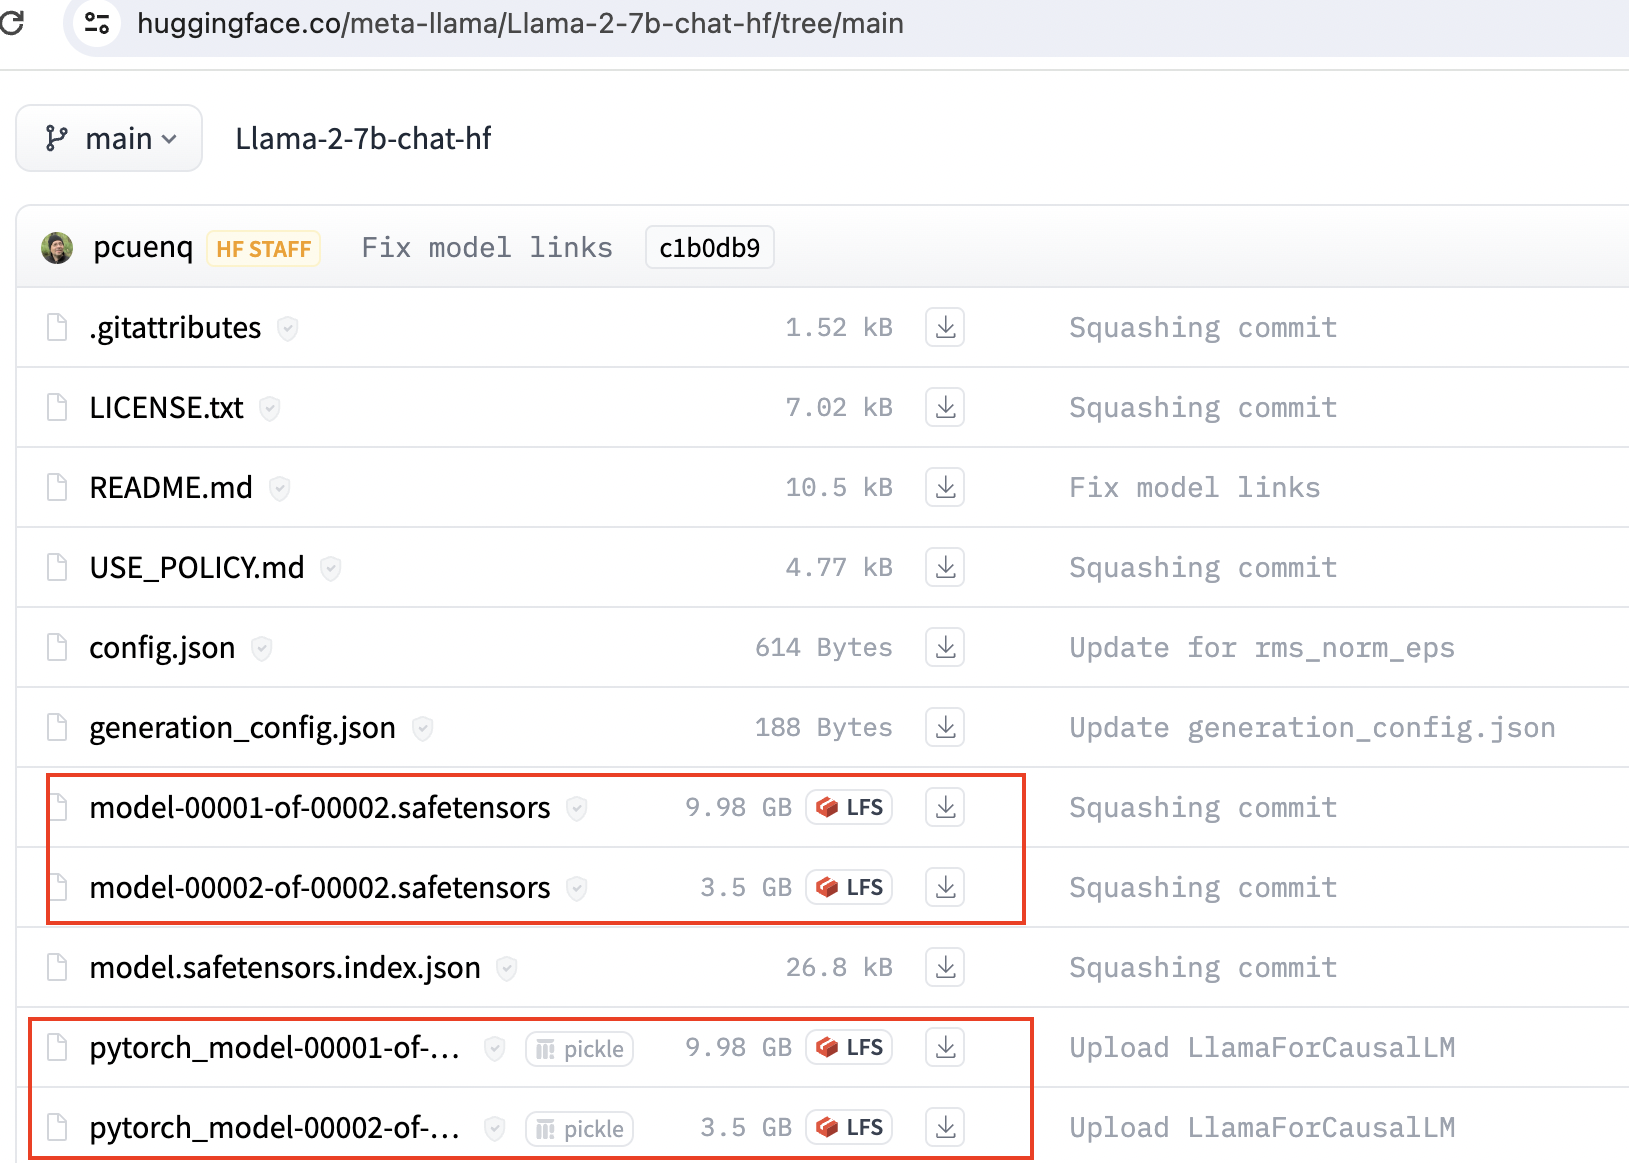
下载
https://huggingface.co/meta-llama/Llama-2-7b-chat-hf/tree/main
下载这个下面的所有文件,safetensors 和pytorch这个两个任意选一个。一般是safetensors的模型。下载后放在同一个目录,我的目录的是C:\apps\ml_model\llama2-7b-chat-hf。
用python代码运行
from transformers import AutoTokenizer, AutoModelForCausalLM
import transformers
import torch
model = r"C:\apps\ml_model\llama2-7b-chat-hf"
def get_completion(prompt = "hello" ):
    tokenizer = AutoTokenizer.from_pretrained(model)
    pipeline = transformers.pipeline(
        "text-generation",
        model=model,
        torch_dtype=torch.float16,
        device_map="auto",
        # device_map="cuda"
    )
    sequences = pipeline(
        prompt,
        do_sample=True,
        top_k=10,
        num_return_sequences=1,
        eos_token_id=tokenizer.eos_token_id,
        max_length=4096,
        return_full_text=False,
        # top_p=0.5, # default=0.9
        # temperature=0.6 # default=0
    )
    for index, seq in enumerate(sequences):
        print(index,f"Result: {seq['generated_text']}")
if __name__ == '__main__':
    prompt = "hello"
    completion = get_completion(prompt)
其它
ggml格式的llama2
通过conda 创建或者venv. 下面是通过conda 创建的。
conda create --name llama_test python=3.9
conda activate llama_test
安装python依赖的包
pip3 install -r requirements.txt
如果你下载的是ggml格式的, 要运行下面命令转换格式
python convert-llama-ggml-to-gguf.py --eps 1e-5 -i ./models/llama-2-13b-chat.ggmlv3.q4_0.bin -o ./models/llama-2-13b-chat.ggmlv3.q4_0.gguf.bin
(llama) C:\Users\Harry\PycharmProjects\llama.cpp>python convert-llama-ggml-to-gguf.py --eps 1e-5 -i ./models/llama-2-13b-chat.ggmlv3.q4_0.bin -o ./models/llama-2-13b-chat.ggmlv3.q4_0.gguf.bin
* Using config: Namespace(input=WindowsPath('models/llama-2-13b-chat.ggmlv3.q4_0.bin'), output=WindowsPath('models/llama-2-13b-chat.ggmlv3.q4_0.gguf.bin'), name=None, desc=None, gqa=1, eps='1e-5', context_length=2048, model_metadata_dir=None, vocab_dir=None, vocabtype='spm')
=== WARNING === Be aware that this conversion script is best-effort. Use a native GGUF model if possible. === WARNING ===
- Note: If converting LLaMA2, specifying "--eps 1e-5" is required. 70B models also need "--gqa 8".
* Scanning GGML input file
* File format: GGJTv3 with ftype MOSTLY_Q4_0
* GGML model hyperparameters:
=== WARNING === Special tokens may not be converted correctly. Use --model-metadata-dir if possible === WARNING ===
* Preparing to save GGUF file
This gguf file is for Little Endian only
* Adding model parameters and KV items
* Adding 32000 vocab item(s)
* Adding 363 tensor(s)
    gguf: write header
    gguf: write metadata
    gguf: write tensors
* Successful completion. Output saved to: models\llama-2-13b-chat.ggmlv3.q4_0.gguf.bin
参考资料
GitHub - facebookresearch/llama: Inference code for LLaMA models
A comprehensive guide to running Llama 2 locally – Replicate


