
centos 7 安装磐维(PanWeiDB)数据库(单机)


.png)


前置环境准备
文件系统环境要求
文件系统环境所要求的扇区必须为512bytes,查看方法如下:
[root@devops-core-highapp3-b-32 ~]#df -h /apps/
[root@devops-core-highapp3-b-32 ~]#ll /dev/mapper/vg--docker-lvapp
[root@devops-core-highapp3-b-32 ~]#fdisk -l /dev/dm-2

注意:如上图所示,Sector size 为扇区的大小,必须是512 bytes。
系统环境优化
检查root 是否禁止登录
以root 用户执行
vi /etc/ssh/sshd_config
PermitRootLogin yes
如果没有这条参数,请添加,如果 PermitRootLogin 的值不是yes,请改为 yes(请预留其他账号可以登录,否则可能会造成系统无法登录问题)。
检查kernel 版本
注意:BC-Linux 7.6 版本内核建议为3.10.0-957.el7.x86_64,BC-Linux 7.8 版本根据测试也
满足安装要求,内核版本建议为4.19.25-204.el7.bclinux.x86_64。
cat /etc/redhat-release
uname -r
关闭selinux
修改 /etc/selinux/config 文件
vim /etc/selinux/config
修改内容:
SELINUX=disabled
# 关闭selinux
setenforce 0
关闭防火墙
systemctl disable firewalld.service
systemctl stop firewalld.service
设置字符集
修改 /etc/profile 文件
vim /etc/profile
文件中新增一下内容(如果已存在新增的内容请作修改)
export LANG=en_US.UTF-8
关闭swap 交换内存
swapoff -a
内核参数优化
修改文件:/etc/sysctl.conf
vi /etc/sysctl.conf
修改或增加一下内容:
net.ipv4.tcp_max_tw_buckets = 10000
net.ipv4.tcp_tw_reuse = 1
net.ipv4.tcp_tw_recycle = 1 #根据操作系统内核版本设置,参见如下注意
net.ipv4.tcp_keepalive_time = 30
net.ipv4.tcp_keepalive_probes = 9
net.ipv4.tcp_keepalive_intvl = 30
net.ipv4.tcp_retries1 = 5
net.ipv4.tcp_syn_retries = 5
net.ipv4.tcp_synack_retries = 5
net.ipv4.tcp_retries2 = 12
vm.overcommit_memory = 0
net.ipv4.tcp_rmem = 8192 250000 16777216
net.ipv4.tcp_wmem = 8192 250000 16777216
net.core.wmem_max = 21299200
net.core.rmem_max = 21299200
net.core.wmem_default = 21299200
net.core.rmem_default = 21299200
net.ipv4.ip_local_port_range = 26000 65535
kernel.sem = 250 6400000 1000 25600
net.core.somaxconn = 65535
net.ipv4.tcp_syncookies = 1
net.core.netdev_max_backlog = 65535
net.ipv4.tcp_max_syn_backlog = 65535
net.ipv4.tcp_fin_timeout = 60
kernel.shmall = 52805669 #根据实际情况进行计算
kernel.shmmax = 18446744073692774399 #根据实际情况进行计算
net.ipv4.tcp_sack = 1
net.ipv4.tcp_timestamps = 1
vm.extfrag_threshold = 500
vm.overcommit_ratio = 90
vm.swappiness = 0
修改完成之后请执行以下命令让其生效
sysctl -p
注意:
1)kernel.shmall 和kernel.shmmax 需根据主机操作系统的内存配置进行自定义调整,一般
shmmax 建议设置为主机物理内存的60%,shmall >= shmmax/4096。例如主机100G 内存,
shmmax=100G60%102410241024= 64424509440 , shmall= 64424509440/4096=
15728640。
2)如果使用BC-Linux 7.6 版本(内核为3.10.0-957.el7.x86_64),net.ipv4.tcp_tw_recycle =
1 参数可以设置;如果使用BC-Linux 7.8 版本(内核为4.19.25-204.el7.bclinux.x86_64),
net.ipv4.tcp_tw_recycle = 1 参数需删除。
配置资源限制
修改文件 /etc/security/limits.conf
vi /etc/security/limits.conf
增加以下内容:
* soft nofile 655360
* hard nofile 655360
* soft nproc 655360
* hard nproc 655360
* soft memlock unlimited
* hard memlock unlimited
* soft core unlimited
* hard core unlimited
* soft stack unlimited
* hard stack unlimited
安装CMDB 数据库
安装数据库依赖
安装磐维数据库,需要提前安装依赖库
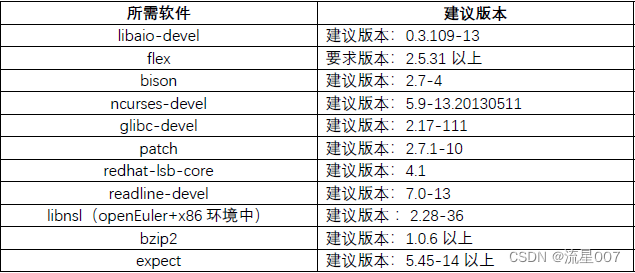
注意:
1)readline_devel 版本在CentOS7 环境下默认为6.2-11.el7.x86_64 版本,实测也可以使用;
2)bzip2 包必须安装,不安装的话在gs_preinstall 阶段会报如下错
/tmp/script/script/gs_preinstall -U omm -G dbgrp -X /tmp/cluster_config_template.xml
Parsing the configuration file.
Successfully parsed the configuration file.
[GAUSS-50217] : Failed to decompress version.cfg.The cmd is cd /tmp/script/script/…/ &&
tar -xpf ls openGauss*.tar.bz2|tail -1 ./version.cfg ./bin/encrypt &&
mv ./bin/encrypt ./script/gspylib/clib && rm -rf ./bin. The output is ls: cannot access
openGauss*.tar.bz2: No such file or directory
tar: This does not look like a tar archive
tar: ./bin/encrypt: Not found in archive
tar: Exiting with failure status due to previous errors.”
3)expect 包必须安装,不安装的话在gs_preinstall 阶段会直接报错[GAUSS-51405]:You
need to install software:expect
4)libnsl 包在openEuler x86 系统中需要安装,Centos7 环境和BC-Linux7.6、BC-Linux7.8
环境中不用安装。
5)redhat-lsb-core 包为编译部署时需要,二进制安装不需要。此包可以不用安装。
使用 yum 安装依赖库
yum -y install libaio-devel flex bison ncurses-devel glibc-devel patch redhat-lsb-core readline-devel python3 expect* bzip2
如果安装过程中出现报错:
yum Could not resolve host
请前往 /etc/resolv.conf 文件中添加以下内容(如果没有报错,直接忽略):
vi /etc/resolv.conf
nameserver 8.8.8.8
安装python3
检查服务器是否已经安装了 python3
python3 --version

如果显示已经安装了 python3 ,请查看版本是否高于或等于3.6.9(推荐使用3.6.9),如果不是,请安装 python3。
python-3.6.9文件
将 python-3.6.9.tar 上传到服务器中(python请自行下载),进入当前文件目录下,随后解压当前文件:
tar -zxf Python-3.6.9.tgz
进入解压后的文件目录:
cd Python-3.6.9
**编译 python3 **:
./configure --prefix=/opt/python/Python-3.6.9 --enable-shared --enable-optimizations --with-ssl
注意:/opt/python/Python-3.6.9 是你的 python3 的目录,请切换成自己的目录。
如果在编译过程出现报错(没有请忽略):
configure: error: no acceptable C compiler found in $PATH
出现以上报错是由于服务器缺少 gcc ,使用 yum 安装对应的组件即可。
yum install gcc -y
安装完 gcc 之后继续执行编译 python3流程。
安装python
make -j 12 && make install
设置软链和赋权
ln -s /opt/python/Python-3.6.9/bin/python3 /usr/bin/python3
ln -s /opt/python/Python-3.6.9/bin/python3.6-config /usr/bin/python3-config
cp /opt/python/Python-3.6.9/lib/libpython3.6m.so.1.0 /usr/lib64
chmod -R 755 /usr/lib64/libpython3.6m.so.1.0
ln -s /usr/lib64/libpython3.6m.so.1.0 /usr/lib64/libpython3.6m.so
如果出现文件已存在的话,请将文件重命名为其他名称。
最后设置环境变量
cat >> /etc/profile /etc/hosts

(上)")

")


