
Android 车载应用开发指南(3) - SystemUI 详解


.png)


Android 车载应用开发指南系列文章
Android 车载应用开发指南(1)- 车载操作系统全解析
Android 车载应用开发指南(2)- 应用开发入门
Android 车载应用开发指南(3)- SystemUI 详解
一 SystemUI 概述
SystemUI全称System User Interface,直译过来就是系统级用户交互界面,在 Android 系统中由SystemUI负责统一管理整个系统层的 UI,它是一个系统级应用程序(APK),源码在/frameworks/base/packages/目录下。
1.1 SystemUI
Android - Phone中SystemUI从源码量看就是一个相当复杂的程序,常见的如:状态栏、消息中心、近期任务、截屏以及一系列功能都是在SystemUI中实现的。
源码位置:/frameworks/base/packages/SystemUI
常见 UI 组件有(包含但不限于,完整列表可以查看 SystemUI 服务组件列表)
- 状态栏 StatusBar
- 导航栏 NavigationBar
- 通知栏 NotificationPanel
- 快捷按键栏 QSPanel
- 最近任务 Recent
- 键盘锁 Keyguard
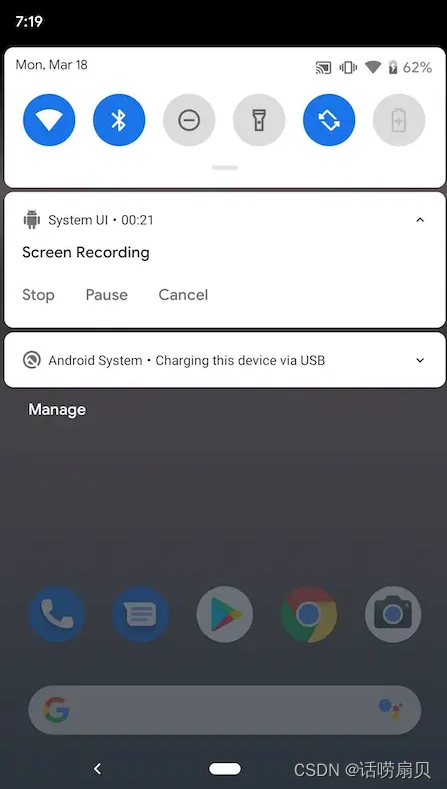
原生 Android 系统中 SystemUI 大概是这样
1.2 CarSystemUI
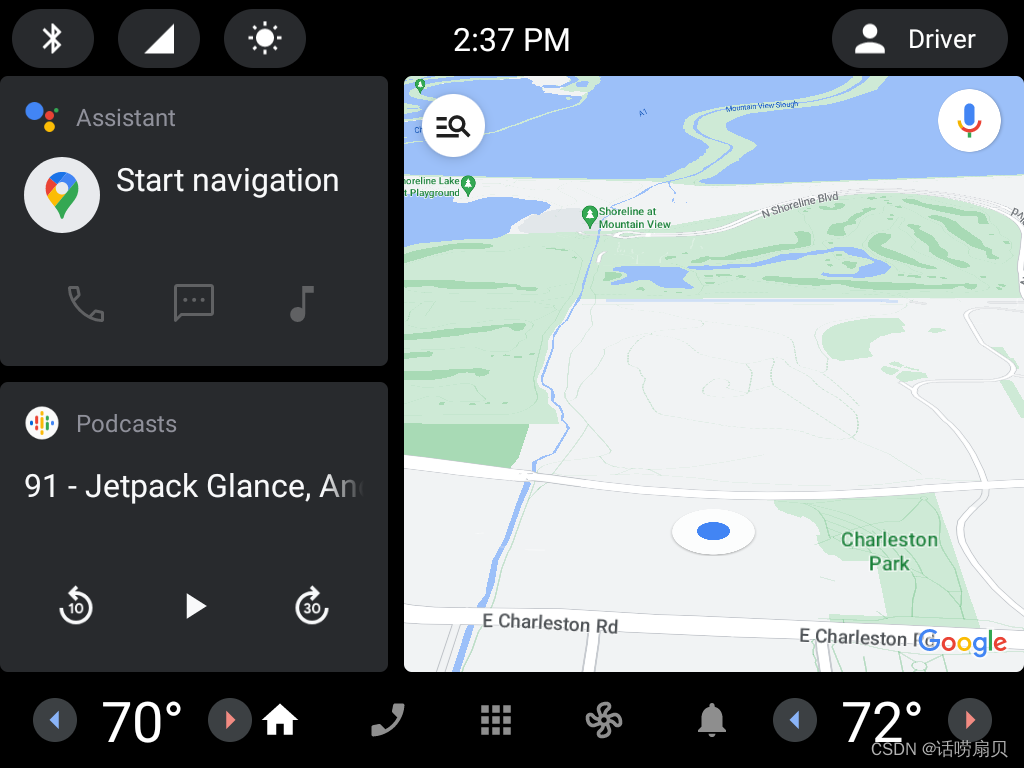
Android-AutoMotive中的SystemUI相对手机中要简单不少,目前商用车载系统中几乎必备的顶部状态栏、消息中心、底部导航栏在原生的Android系统中都已经实现了。
源码位置:frameworks/base/packages/CarSystemUI
虽然CarSystemUI与SystemUI的源码位置不同,但是二者实际上是复用关系。通过阅读CarSystemUI的 Android.bp 文件可以发现CarSystemUI在编译时把SystemUI以静态库的方式引入进来了。
android.bp 源码位置:/frameworks/base/packages/CarSystemUI/Android.bp
android_library {
    name: "CarSystemUI-core",
    ...
    static_libs: [
        "SystemUI-core",
        "SystemUIPluginLib",
        "SystemUISharedLib",
        "SystemUI-tags",
        "SystemUI-proto",
        ...
    ],
    ...
}
二 SystemUI 启动流程
System UI的启动大致可分为以下两个流程:
- 在Framework中启动SystemUIService
- 在SystemUIService中启动SystemUI所需的各种组件
说明:本文源码分析基于版本:android-12.0.0_r3
2.1 Framework 中的流程
SystemUI 是系统应用,所以它也是一个 APK,有入口 Application,只不过它是由 system_server 进程直接启动的。
关于SystemServer,它是 Android framework 中关键系统的服务,由 Android 系统最核心的进程Zygotefork 生成,进程名为system_server。常见的ActivityManagerService、PackageManagerService、WindowManageService都是由SystemServer启动的。
SystemServer 源码路径:/frameworks/base/services/java/com/android/server/SystemServer.java
第一步:SystemServer 的 main() 方法中调用 SystemServer.run(),run()中调用startOtherServices()
public static void main(String[] args) {
    new SystemServer().run();
}
private void run() { ... ... // Start services. try { startBootstrapServices(t); startCoreServices(t); startOtherServices(t); //SystemServer在startOtherServices()被启动 } ... ... }第二步:startOtherServices()中通过AMS的回调方法ready(),然后调用startSystemUi()
    mActivityManagerService.systemReady(() -> {
        ... ...
        try {
            startSystemUi(context, windowManagerF);
        } catch (Throwable e) {
            reportWtf("starting System UI", e);
        }
        ... ...
    ,t);
第三步:startSystemUi()中可以看出,SystemUI本质就是一个Service,通过PM获取到的Component 是com.android.systemui/.SystemUIService,然后通过调用context.startServiceAsUser()完成对SystemUIService的启动。
private static void startSystemUi(Context context, WindowManagerService windowManager) {
        PackageManagerInternal pm = LocalServices.getService(PackageManagerInternal.class);
        Intent intent = new Intent();
        intent.setComponent(pm.getSystemUiServiceComponent());
        intent.addFlags(Intent.FLAG_DEBUG_TRIAGED_MISSING);
        //Slog.d(TAG, "Starting service: " + intent);
        context.startServiceAsUser(intent, UserHandle.SYSTEM);
        windowManager.onSystemUiStarted();
    }
第四步:SystemUIService 依附于SystemUI应用,所以SystemUIService启动前需要完成SystemUI整个应用的启动,其流程也就是应用常见的冷启动流程,这里展开讲一下:
-
SystemUI 应用启动流程
context中的startServiceAsUser()是一个抽象方法,具体实现在ContextImpl.java里。实现方法startServiceCommon()中,通过ActivityManager.getService()就会走到AMS中,最终在AMS来启动SystemUIService。
@Override
public ComponentName startServiceAsUser(Intent service, UserHandle user) {
    return startServiceCommon(service, false, user);
}
@Override
private ComponentName startServiceCommon(Intent service, boolean requireForeground,
                                         UserHandle user) {
    try {
        validateServiceIntent(service);
        service.prepareToLeaveProcess(this);
        ComponentName cn = ActivityManager.getService().startService(  //在AMS中开启Service
            mMainThread.getApplicationThread(), service,
            service.resolveTypeIfNeeded(getContentResolver()), requireForeground,
            getOpPackageName(), getAttributionTag(), user.getIdentifier());
        ... ...
    } catch (RemoteException e) {
        throw e.rethrowFromSystemServer();
    }
}
接下来进入AMS,一探究竟:
AMS 源码路径:/frameworks/base/services/core/java/com/android/server/am/ActivityManagerService.java
在AMS的startService()方法里,会经过一系列内部流程,调用到bringUpServiceLocked()方法。
@Override
public ComponentName startService(IApplicationThread caller, Intent service,
        String resolvedType, boolean requireForeground, String callingPackage,
        String callingFeatureId, int userId)
        throws TransactionTooLargeException {
  		... ...
        try {
            res = mServices.startServiceLocked(caller, service,
                    resolvedType, callingPid, callingUid,
                    requireForeground, callingPackage, callingFeatureId, userId); // 内部调用到 startServiceLocked()
        }
      	... ...
    }
}
ComponentName startServiceLocked(IApplicationThread caller, Intent service, String resolvedType, int callingPid, int callingUid, boolean fgRequired, String callingPackage,
        @Nullable String callingFeatureId, final int userId,
        boolean allowBackgroundActivityStarts) throws TransactionTooLargeException {
    ... ...
    if (caller != null) {
        // 这里记录app的进程信息
        final ProcessRecord callerApp = mAm.getRecordForAppLocked(caller);
    ... ...
    ComponentName cmp = startServiceInnerLocked(smap, service, r, callerFg, addToStarting); //内部调用到startServiceInnerLocked()
    ... ...
    return cmp;
}

ComponentName startServiceInnerLocked(ServiceMap smap, Intent service, ServiceRecord r, boolean callerFg, boolean addToStarting) throws TransactionTooLargeException {
    ... ...
    String error = bringUpServiceLocked(r, service.getFlags(), callerFg, false, false); //调用到bringUpServiceLocked()
    if (error != null) {
        return new ComponentName("!!", error);
    }
    ... ...
    return r.name;
}
继续调用了bringUpServiceLocked()方法,
private String bringUpServiceLocked(ServiceRecord r, int intentFlags, boolean execInFg, boolean whileRestarting, boolean permissionsReviewRequired)
        throws TransactionTooLargeException {
    ... ...
    if (!isolated) {
        app = mAm.getProcessRecordLocked(procName, r.appInfo.uid, false);
        if (DEBUG_MU) Slog.v(TAG_MU, "bringUpServiceLocked: appInfo.uid=" + r.appInfo.uid + " app=" + app);
        //如果service进程存在
        if (app != null && app.thread != null) {
            try {
                app.addPackage(r.appInfo.packageName, r.appInfo.longVersionCode, mAm.mProcessStats);
                //启动service
                realStartServiceLocked(r, app, execInFg);
                return null;
            } catch (TransactionTooLargeException e) {
                throw e;
            } catch (RemoteException e) {
                Slog.w(TAG, "Exception when starting service " + r.shortInstanceName, e);
            }
        }
    }
    ... ...
    // 如果不存在此进程
    if (app == null && !permissionsReviewRequired) {
        // 启动运行的线程
        if ((app=mAm.startProcessLocked(procName, r.appInfo, true, intentFlags,
                hostingRecord, ZYGOTE_POLICY_FLAG_EMPTY, false, isolated, false)) == null) {
            String msg = "Unable to launch app "
                    + r.appInfo.packageName + "/"
                    + r.appInfo.uid + " for service "
                    + r.intent.getIntent() + ": process is bad";
            Slog.w(TAG, msg);
            bringDownServiceLocked(r);
            return msg;
        }
    }
    ... ...
    return null;
}
这个方法做了两件事:
- 如果SystemUIService所属进程已经存在,则直接调用realStartServiceLocked()。
- 如果SystemUIService所属进程不存在,则执行startProcessLocked()方法创建进程,经过层层调用,最终也会走到realStartServiceLocked()中:
private final void realStartServiceLocked(ServiceRecord r,
        ProcessRecord app, boolean execInFg) throws RemoteException {
    ... ...
    try {
    ... ...
        app.thread.scheduleCreateService(r, r.serviceInfo,
                mAm.compatibilityInfoForPackage(r.serviceInfo.applicationInfo),
                app.getReportedProcState());
        r.postNotification();
        created = true;
    }
}
这个方法内部调用了app.thread.scheduleCreateService(),而app.thread是一个IApplicationThread类型的,他的实现是ActivityThread的一个内部类ApplicationThread,而这个类正好实现了IApplicationThread.Stub,在ApplicationThread类中,找到对应的调用方法:
public final void scheduleCreateService(IBinder token,
        ServiceInfo info, CompatibilityInfo compatInfo, int processState) {
    updateProcessState(processState, false);
    CreateServiceData s = new CreateServiceData();
    s.token = token;
    s.info = info;
    s.compatInfo = compatInfo;
    sendMessage(H.CREATE_SERVICE, s);
}
可以看出,是发送一个消息给Handler,这个Handler是ActivityThread的内部类H
public void handleMessage(Message msg) {
    switch (msg.what) {
        ... ...
        case CREATE_SERVICE:
            if (Trace.isTagEnabled(Trace.TRACE_TAG_ACTIVITY_MANAGER)) {
                Trace.traceBegin(Trace.TRACE_TAG_ACTIVITY_MANAGER,
                        ("serviceCreate: " + String.valueOf(msg.obj)));
            }
            handleCreateService((CreateServiceData)msg.obj);
            Trace.traceEnd(Trace.TRACE_TAG_ACTIVITY_MANAGER);
            break;
        ... ...
    }
}
最终调用了handleCreateService()方法:
private void handleCreateService(CreateServiceData data) {
    LoadedApk packageInfo = getPackageInfoNoCheck(
            data.info.applicationInfo, data.compatInfo);
    Service service = null;
    try {
        //创建service的context
        ContextImpl context = ContextImpl.createAppContext(this, packageInfo);
        //创建Application
        Application app = packageInfo.makeApplication(false, mInstrumentation);
        //获取类加载器
        java.lang.ClassLoader cl = packageInfo.getClassLoader();
        //加载service实例
        service = packageInfo.getAppFactory()
                .instantiateService(cl, data.info.name, data.intent);
        // Service resources must be initialized with the same loaders as the application
        // context.
        context.getResources().addLoaders(
                app.getResources().getLoaders().toArray(new ResourcesLoader[0]));
        context.setOuterContext(service);
        //初始化service
        service.attach(context, this, data.info.name, data.token, app,
                ActivityManager.getService());
        //调用service的onCreate方法
        service.onCreate();
        mServices.put(data.token, service);
        try {
            //通过serviceDoneExecuting告知AMS,service已经启动完成
            ActivityManager.getService().serviceDoneExecuting(
                    data.token, SERVICE_DONE_EXECUTING_ANON, 0, 0);
        } catch (RemoteException e) {
            throw e.rethrowFromSystemServer();
        }
    } catch (Exception e) {
        if (!mInstrumentation.onException(service, e)) {
            throw new RuntimeException(
                "Unable to create service " + data.info.name
                + ": " + e.toString(), e);
        }
    }
}
这个方法主要做了以下几件事:
- 首先,创建上下文
- 创建SystemUIApplication,获取类加载器
- 加载SystemUIService实例,初始化SystemUIService, 调用onCreate()方法
- 最后通知AMS,SystemUIService启动完成。
到这里SystemUIService已经启动完成。
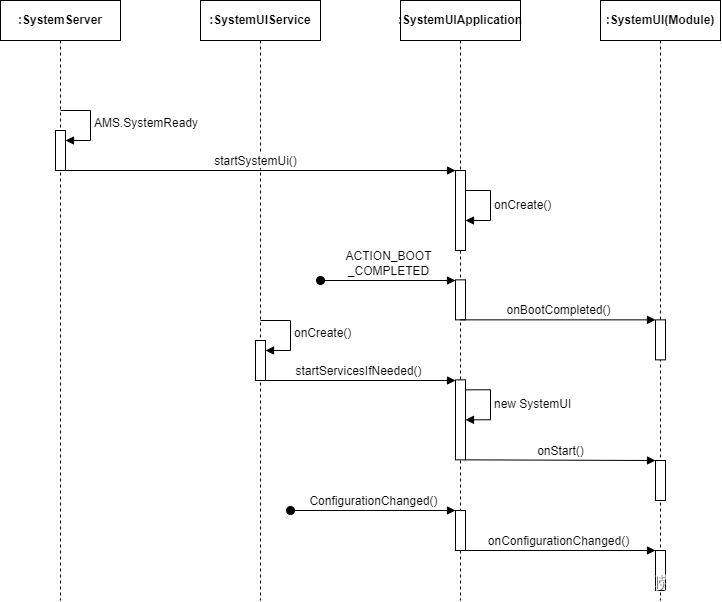
第五步: 前面在SystemUIApplication创建成功后会回调内部的OnCreate()方法,在OnCreate()中方法注册了一个开机广播,当接收到开机广播后会调用SystemUI的onBootCompleted()方法来告诉每个子模块 Android 系统已经完成开机。
@Override public void onCreate() { super.onCreate(); Log.v(TAG, "SystemUIApplication created."); // 设置所有服务继承的应用程序主题。 // 请注意,在清单中设置应用程序主题仅适用于activity。这里是让Service保持与主题设置同步。 setTheme(R.style.Theme_SystemUI); if (Process.myUserHandle().equals(UserHandle.SYSTEM)) { IntentFilter bootCompletedFilter = new IntentFilter(Intent.ACTION_BOOT_COMPLETED); bootCompletedFilter.setPriority(IntentFilter.SYSTEM_HIGH_PRIORITY); registerReceiver(new BroadcastReceiver() { @Override public void onReceive(Context context, Intent intent) { if (mBootCompleteCache.isBootComplete()) return; if (DEBUG) Log.v(TAG, "BOOT_COMPLETED received"); unregisterReceiver(this); mBootCompleteCache.setBootComplete(); if (mServicesStarted) { final int N = mServices.length; for (int i = 0; i2.2 SystemUI 中的流程
第六步:SystemUIService初始化完成后会调用onCreate()方法,onCreate()中调用了SystemUIApplication中的startServiceIfNeeded()方法完成SystemUI子模块的初始化。
SystemUIService 源码位置:/frameworks/base/packages/SystemUI/src/com/android/systemui/SystemUIService.java
public class SystemUIService extends Service { ... ... @Override public void onCreate() { super.onCreate(); // Start all of SystemUI ((SystemUIApplication) getApplication()).startServicesIfNeeded(); //调用startServicesIfNeeded() ... ... } }第七步: 在SystemUIApplication的startServicesIfNeeded()方法中,通过SystemUIFactory获取到配置在config.xml中每个子模块的className。
SystemUIApplication 源码位置:/frameworks/base/packages/SystemUI/src/com/android/systemui/SystemUIApplication.java
// SystemUIApplication public void startServicesIfNeeded() { String[] names = SystemUIFactory.getInstance().getSystemUIServiceComponents(getResources()); startServicesIfNeeded("StartServices", names); } // SystemUIFactory /** Returns the list of system UI components that should be started. */ public String[] getSystemUIServiceComponents(Resources resources) { return resources.getStringArray(R.array.config_systemUIServiceComponents); }config.xml 位置:/frameworks/base/packages/SystemUI/res/values/config.xml
com.android.systemui.util.NotificationChannels com.android.systemui.keyguard.KeyguardViewMediator com.android.systemui.recents.Recents com.android.systemui.volume.VolumeUI com.android.systemui.stackdivider.Divider com.android.systemui.statusbar.phone.StatusBar com.android.systemui.usb.StorageNotification com.android.systemui.power.PowerUI com.android.systemui.media.RingtonePlayer com.android.systemui.keyboard.KeyboardUI com.android.systemui.pip.PipUI com.android.systemui.shortcut.ShortcutKeyDispatcher @string/config_systemUIVendorServiceComponent com.android.systemui.util.leak.GarbageMonitor$Service com.android.systemui.LatencyTester com.android.systemui.globalactions.GlobalActionsComponent com.android.systemui.ScreenDecorations com.android.systemui.biometrics.AuthController com.android.systemui.SliceBroadcastRelayHandler com.android.systemui.SizeCompatModeActivityController com.android.systemui.statusbar.notification.InstantAppNotifier com.android.systemui.theme.ThemeOverlayController com.android.systemui.accessibility.WindowMagnification com.android.systemui.accessibility.SystemActions com.android.systemui.toast.ToastUI第八步: 在startServicesIfNeeded()中通过反射完成了每个SystemUI组件的创建,然后再调用各个SystemUI的onStart()方法来继续执行子模块的初始化。
private SystemUI[] mServices; private void startServicesIfNeeded(String metricsPrefix, String[] services) { if (mServicesStarted) { return; } mServices = new SystemUI[services.length]; ... final int N = services.length; for (int i = 0; i这里的SystemUI是一个抽象类,状态栏、近期任务等等模块都是继承自SystemUI,通过这种方式可以很大程度上简化复杂的SystemUI程序中各个子模块创建方式,同时我们可以通过配置资源的方式动态加载需要的SystemUI模块。
SystemUI的源码如下,方法基本都能见名知意,就不再介绍了。
public abstract class SystemUI implements Dumpable { protected final Context mContext; public SystemUI(Context context) { mContext = context; } public abstract void start(); protected void onConfigurationChanged(Configuration newConfig) { } @Override public void dump(@NonNull FileDescriptor fd, @NonNull PrintWriter pw, @NonNull String[] args) { } protected void onBootCompleted() { }2.3 CarSystemUI 的启动流程
前文提到CarSystemUI复用了手机SystemUI的代码,所以CarSystemUI的启动流程和SystemUI的是完全一致的。
但CarSystemUI中需要的功能与SystemUI中也有部分差异,那么是这些差异化的功能是如何引入并完成初始化?以及一些手机的SystemUI才需要的功能是如何去除的呢?
其实很简单,在SystemUI的启动流程中我们得知,各个子模块的 className 是通过SystemUIFactory的getSystemUIServiceComponents()获取到的,那么只要继承SystemUIFactory并重写getSystemUIServiceComponents()就可以了。
public class CarSystemUIFactory extends SystemUIFactory { @Override protected SystemUIRootComponent buildSystemUIRootComponent(Context context) { return DaggerCarSystemUIRootComponent.builder() .contextHolder(new ContextHolder(context)) .build(); } @Override public String[] getSystemUIServiceComponents(Resources resources) { Set names = new HashSet(); // 先引入systemUI中的components for (String s : super.getSystemUIServiceComponents(resources)) { names.add(s); } // 再移除CarsystemUI不需要的components for (String s : resources.getStringArray(R.array.config_systemUIServiceComponentsExclude)) { names.remove(s); } // 最后再添加CarsystemUI特有的components for (String s : resources.getStringArray(R.array.config_systemUIServiceComponentsInclude)) { names.add(s); } String[] finalNames = new String[names.size()]; names.toArray(finalNames); return finalNames; } }com.android.systemui.recents.Recents com.android.systemui.volume.VolumeUI com.android.systemui.stackdivider.Divider com.android.systemui.statusbar.phone.StatusBar com.android.systemui.keyboard.KeyboardUI com.android.systemui.pip.PipUI com.android.systemui.shortcut.ShortcutKeyDispatcher com.android.systemui.LatencyTester com.android.systemui.globalactions.GlobalActionsComponent com.android.systemui.SliceBroadcastRelayHandler com.android.systemui.statusbar.notification.InstantAppNotifier com.android.systemui.accessibility.WindowMagnification com.android.systemui.accessibility.SystemActions com.android.systemui.car.navigationbar.CarNavigationBar com.android.systemui.car.voicerecognition.ConnectedDeviceVoiceRecognitionNotifier com.android.systemui.car.window.SystemUIOverlayWindowManager com.android.systemui.car.volume.VolumeUI通过以上方式,就完成了CarSystemUI子模块的替换。
2.4 小结
总结一下,SystemUI的大致启动流程可以归纳如下:
SystemUI 是一个 persistent 应用,它由操作系统启动,主要流程为
- Android 系统在开机后会创建 system_server 进程,它会启动各种系统所需要的服务,其中就包括 SystemUIService。
- SystemUIService 启动后进入到应用层 SystemUI 中,在 SystemUIApplication 它首先会初始化监听ACTION_BOOT_COMPLETED 等通知,待系统完成启动后会通知各个组件 onBootCompleted。
- 在进入 SystemUIService 中依然执行的 SystemUIApplication 中的startServicesIfNeeded() 方法启动 SystemUI 中的子模块。
- 最终的服务启动逻辑都是在 SystemUIApplication 里面,并且都保存在 mServices 数组中。
三 总结
SystemUI在原生的车载 Android 系统是一个较为复杂的模块,本文主要介绍了SystemUI 和CarSystemUI的功能、源码结构及启动时序,希望能帮到从事SystemUI开发的同学。
四 参考文档
Android 车载应用开发与分析(12) - SystemUI (一)
-

或更高版本”规则失败 比计算机上未安装 Oracle Java SE Runti)")


")

